Install VMTools
Login as yourself mkdir /tmp/x cd /tmp/x tar xvzf "/media/justdave/VMware Tools/VMwareTools-10.1.6-5214329.tar.gz" cd vmware-tools-distrib sudo su ./vmware-install.pl sync reboot2.13 Windows 10 stuck in safe mode
If a you a PIN to log into Windows then the locally cached copy of your password mnaybe out of date
When booting into safe mode the login screen will ONLY accept the password NOT a pin!
How to fix this when you cannot login anymore
All recovery screen options even command prompt require a login as an account with admin privileges!
There is no option to boot back into normal mode!!
First we create a usb stick with a Win PE environment
Download the Windows 10 ADK from Windows Assessment and Deployment Kit (Windows ADK)
Install this on a different PC and then create a bootable usb stick with a WinPE environment
As per WinPE: Create USB Bootable drive
diskpart list disk selectclean rem === Create the Windows PE partition. === create partition primary size=2000 format quick fs=fat32 label="Windows PE" assign letter=P active rem === Create a data partition. === create partition primary format fs=ntfs quick label="Other files" assign letter=O list vol exit Start the Deployment and Imaging Tools Environment as an administrator copype amd64 C:\WinPE_amd64 MakeWinPEMedia /UFD C:\WinPE_amd64 P: # /UFD specifies that the media is a USB Flash Drive! Boot the affected PC from the USB Flash Drive
Then based on Reset Lost Windows 10 Password with Sticky Keys Method
diskpart list disk -- Based on size identify which disk contains the original C: drive list vols -- Work out which drive letter is the original C: drive (or just run dir D:\ dir E:\ dir F:\ etc!) exit cd:\windows\system32 dir sethc2.exe -- check does not exist otherwise use another name in the next command move sethc.exe sethc2.exe copy cmd.exe sethc.exe Now reboot
When you get to the login prompt press the shift key until a command prompt window appears
We check who we are login as via "set" and it reports a username of "SYSTEM"!
This can be used to enable local accounts and reset their password
This cannot be used to reset the password for windows live type account as it does not have permission!
Then enable the administrator account
net user -- lists Administrator net user administrator /active:yes net user administrator blob1234 -- reset passwordWe can then disable safe mode as per How to Turn Off Safe Mode without Logging into Windows
bcdedit -- list current config bcdedit /deletevalue {default} safeboot -- curly brackets If this fails you may need to specify where the bcd store is located bcdedit /store:\Boot\BCD /deletevalue {default} safeboot bcdedit /store :\EFI\Microsoft\Boot\BCD /deletevalue {default} safeboot -- For EFI systems 2.14 Rocky Linux 8.8 setup
Install via DVD, Add to Software Selection
- Debugging Tools
- Guest Agents
- Performance Tools
- Legacy UNIX Compatability
- Development Tools>/li>
- System Tools>/li>
After installation go to Activities->Show Applications (grid of 9 dots)->Settings->Network->Wired and turn on!
2.15 CentOs 7.9 setup
Install via Everything ISO, Add to Software Selection
Install done as Server with a GUI and adding Compatability Libraries,Development Tools, Security Tools and System Administration Tools
Network & Hostname turn on Network Device
3 Windows
3.1 SQL Server on Windows
3.1.1 .Net Framework 3.5x
Microsoft SQL Server 2008,2012,2014 all need .Net Framework 3.5. Go into Server Manager, Install Features or Install Roles/Feaures and add .Net Framwork 3.5 as a feature
For Windows 10 Client Preview go to start-> Search -> Turn windows features on and off. Add .net 3.5 from the top of the list.
From Command Prompt (Admin)
Dism /online /Get-Features | find /i ".NET" # check3.1.2 Firewall rules
SQL Server browsing including SSMS require firewall rules to be turned off
From How to open the firewall port for SQL Server on Windows Server 2008
Command Prompt -> Pin to taskbar -> Right Click (Run as Administrator)
For Windows Server 2008 and higher:
netsh advfirewall firewall add rule name="Open Port 80" dir=in action=allow protocol=TCP localport=80 @echo ========= SQL Server Ports =================== @echo Enabling SQLServer default instance port 1433 netsh advfirewall firewall add rule name="SQL Server" dir=in action=allow protocol=TCP localport=1433 @echo Enabling Dedicated Admin Connection port 1434 netsh advfirewall firewall add rule name="SQL Admin Connection" dir=in action=allow protocol=TCP localport=1434 @echo Enabling Conventional SQL Server Service Broker port 4022 netsh advfirewall firewall add rule name="SQL Service Broker" dir=in action=allow protocol=TCP localport=4022 @echo Enabling Transact SQL/RPC port 135 netsh advfirewall firewall add rule name="SQL Debugger/RPC" dir=in action=allow protocol=TCP localport=135 @echo ========= Analysis Services Ports ============== @echo Enabling SSAS Default Instance port 2383 netsh advfirewall firewall add rule name="Analysis Services" dir=in action=allow protocol=TCP localport=2383 @echo Enabling SQL Server Browser Service port 2382 netsh advfirewall firewall add rule name="SQL Browser" dir=in action=allow protocol=TCP localport=2382 @echo ========= Misc Applications ============== @echo Enabling HTTP port 80 netsh advfirewall firewall add rule name="HTTP" dir=in action=allow protocol=TCP localport=80 @echo Enabling SSL port 443 netsh advfirewall firewall add rule name="SSL" dir=in action=allow protocol=TCP localport=443 @echo Enabling port for SQL Server Browser Service's 'Browse' Button netsh advfirewall firewall add rule name="SQL Browser" dir=in action=allow protocol=UDP localport=1434 @echo Allowing multicast broadcast response on UDP (Browser Service Enumerations OK) netsh firewall set multicastbroadcastresponse ENABLE @echo ========= SSIS Scale Out Ports ============== @echo Enabling SSIS Default Scale Out Master port 8391 netsh advfirewall firewall add rule name="SSIS Scale Out Master" dir=in action=allow protocol=TCP localport=8391For earlier windows versions:
Derived from Open Windows Firewall Ports for SQL Server the Easy Way
Also Configure the Windows Firewall to Allow SQL Server Access
@echo ========= SQL Server Ports =================== @echo Enabling SQLServer default instance port 1433 netsh firewall set portopening TCP 1433 "SQLServer" @echo Enabling Dedicated Admin Connection port 1434 netsh firewall set portopening TCP 1434 "SQL Admin Connection" @echo Enabling conventional SQL Server Service Broker port 4022 netsh firewall set portopening TCP 4022 "SQL Service Broker" @echo Enabling Transact-SQL Debugger/RPC port 135 netsh firewall set portopening TCP 135 "SQL Debugger/RPC" @echo ========= Analysis Services Ports ============== @echo Enabling SSAS Default Instance port 2383 netsh firewall set portopening TCP 2383 "Analysis Services" @echo Enabling SQL Server Browser Service port 2382 netsh firewall set portopening TCP 2382 "SQL Browser" @echo ========= Misc Applications ============== @echo Enabling HTTP port 80 netsh firewall set portopening TCP 80 "HTTP" @echo Enabling SSL port 443 netsh firewall set portopening TCP 443 "SSL" @echo Enabling port for SQL Server Browser Service's 'Browse' Button netsh firewall set portopening UDP 1434 "SQL Browser" @echo Allowing multicast broadcast response on UDP (Browser Service Enumerations OK) netsh firewall set multicastbroadcastresponse ENABLEAdding firewall rules for Named Analysis Services instances with a dynamic port
SQL Server 2016 (Edit for instance name) netsh advfirewall firewall add rule name="allow analysis services" dir=in program="C:\Program Files\Microsoft SQL Server\MSAS13.SQL2016X1\OLAP\bin\msmdsrv.exe" action=allow SQL Server 2017 (Edit for instance name) netsh advfirewall firewall add rule name="allow analysis services" dir=in program="C:\Program Files\Microsoft SQL Server\MSAS14.SQL2017X1\OLAP\bin\msmdsrv.exe" action=allow3.1.3 2008 SP3/2014 SP1 issues
Before installing SP3 ensure fdhost.exe (SQL Full Text Host) is stopped as the SP3 installer will not do this, otherwise the installer will complain when checking files that are in use:
- Go into service.msc
- Stop SQL Server service
- Check in Task Manager -> Processes -> Check the settings Show processes from all users
After install restart the server
3.1.4 Windows Server Technical Preview 2 issues
Windows Server Technical Preview 2 choose install with Local Admin tools.
Then Add Windows Update Services:
- Select "Local Server" on the left
- From top right select Manage->Add roles and features
- On the "Before you begin" screen Click Next
- On the "Select Installation Type" screen leave at "Role-based or feature-based installation"
- On the "Server Selection" screen it will default to the local server, Click Next
On the "Server Roles" screen add "Window Server Update Services", this will also add .Net Framework 4.6 Features (+ many other features!).Leave "Include Management Tools (if applicable) ticked.
FYI Default is .NET Framework 4.6 Features but not ASP.NET 4.6 which is needed for Windows Update Services
- Keep clicking next until getting to WSUS - Content - Store updates in the following locations and untick the box.
- Keep clicking next until the Confirmation screen and then Click Install
- Go back to Windows update and click Next until getting to the Features screen
- On the "Features" screen Add "User Interfaces and Infrastructure" -> "Server Graphical Shell"
Note - "Graphical Management Tools and Infrastructure" is greyed out as it is already selected
- Under ".Net Framework features" also add ".NET Framework 3.5 (includes .NET 2.0 and 3.0)"
- Click Next
- Click "Specify an alternate source path"
- Enter "D:\Sources\SXS" (CD Drive)
- Click OK then Install
Finally from an Admin Command Prompt run sconfig and choose option 6 to download and install updates
Choose Recommended and reboot when needed
3.1.5 Checking SQL Server Version
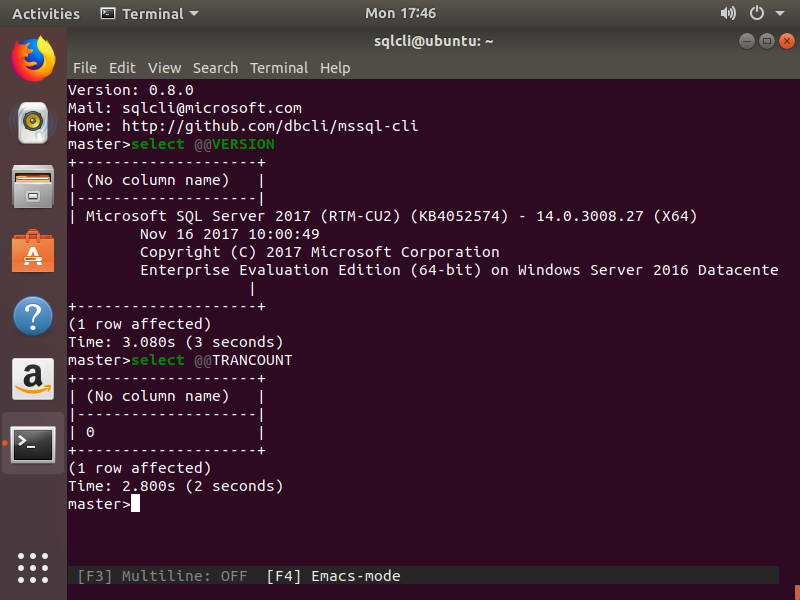
To check the SQL Server Version use
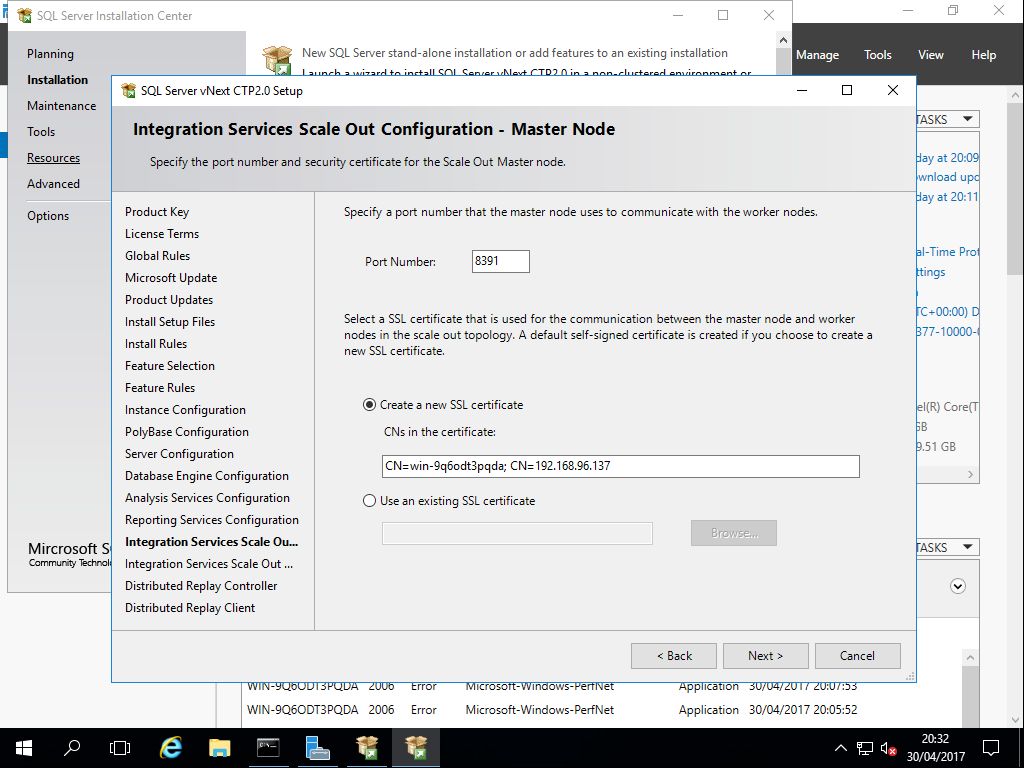
SELECT SERVERPROPERTY('productversion'), SERVERPROPERTY ('productlevel'), SERVERPROPERTY ('edition'),@@VERSION3.1.6 SQL Server 2016 CTP2 needs Oracle JRE Update 51 (64-bit) or higher
SQL Server 2016 CTP2 needs Oracle JRE Update 51 (64-bit) or higher
Download from Oracle JRE download
Choose Java top left picture then "Java SE Development Kit 8u45" Accept the License and download "Windows x64"
Click on Run the on the Taskbar bring the installer to the front and just keep clicking Next!
3.1.7 SQL Server Management Studio July 2015
Even SQL Server 2016 CTP 2.2 (re-released)
select @@VERSION (No column name) Microsoft SQL Server 2016 (CTP2.2) - 13.0.407.1 (X64) Jul 22 2015 21:19:11 Copyright (c) Microsoft Corporation Enterprise Evaluation Edition (64-bit) on Windows 10 Pro Insider Preview 6.3(Build 10162: ) (Hypervisor) considers the July 2015 SSMS as an upgrade (Tools->Check for Updates)
Download from Download SQL Server Management Studio
3.1.8 SQL Server 2016 CTP 2.2 (re-release) on Windows 10
Do not use a Windows 10 Insider Account to install SQl Server, xp_logininfo will not be able to information about the account
Instead create a local Account
- Start -> User -> Add,edit or remove other users (Control Panel)
- Under "Other Users" Choose "Add someone else to this PC"
- On the "How will this person sign in?" screen choose "The person who I want to add doesn't have an email address"
- On the "Let's create your account" screen choose "Add a user without a Microsoft Account"
- Then enter the username and password
- This will then appear under "Other users" as a local account
- Then sign out and choose the local account in the bottom left of the screen
Install the SQL Server under this account
3.1.9 SQL Server 2016 CTP 2.3 collation with Polybase
If Polybase is being installed then the Server Collation must be either Latin1_General_100_AS_KS_WS or SQL_Latin1_General_CP1_CI_AS
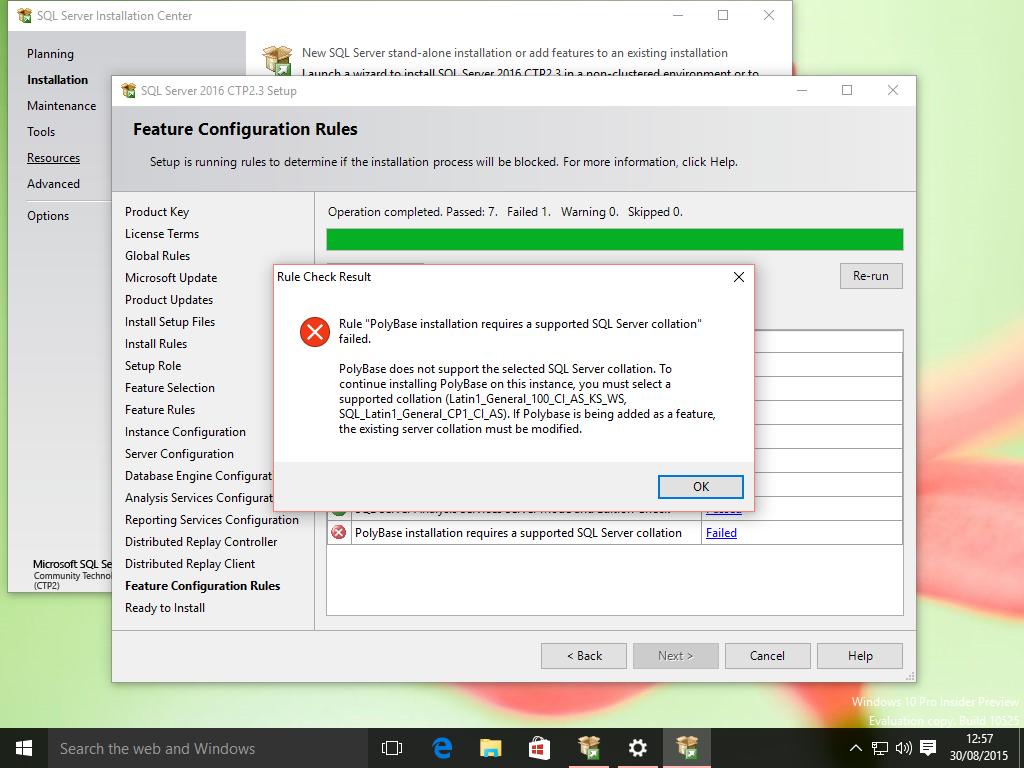
This can be selected on the Server Configuration Screen
As per
Clarification on SQL Server Collation Requirements for System Center 2012there was a similar issue on System Centre 2012 until it was updated to support more collations
As per the above "The SQL Server collations are no longer being updated and will eventually be phased out in favor of the Windows collations."!!
Since we have a choice of 2 collations (Latin1_General_100_AS_KS_WS or SQL_Latin1_General_CP1_CI_AS) which one to choose?
As per
Supportability regarding SQL collation for SharePoint Databases and TempDB
Sharepoint (even 2013) wants Latin1_General_CI_AS_KS_WS so this was chosen
on the Server Configuration Screen choose the Collation tab
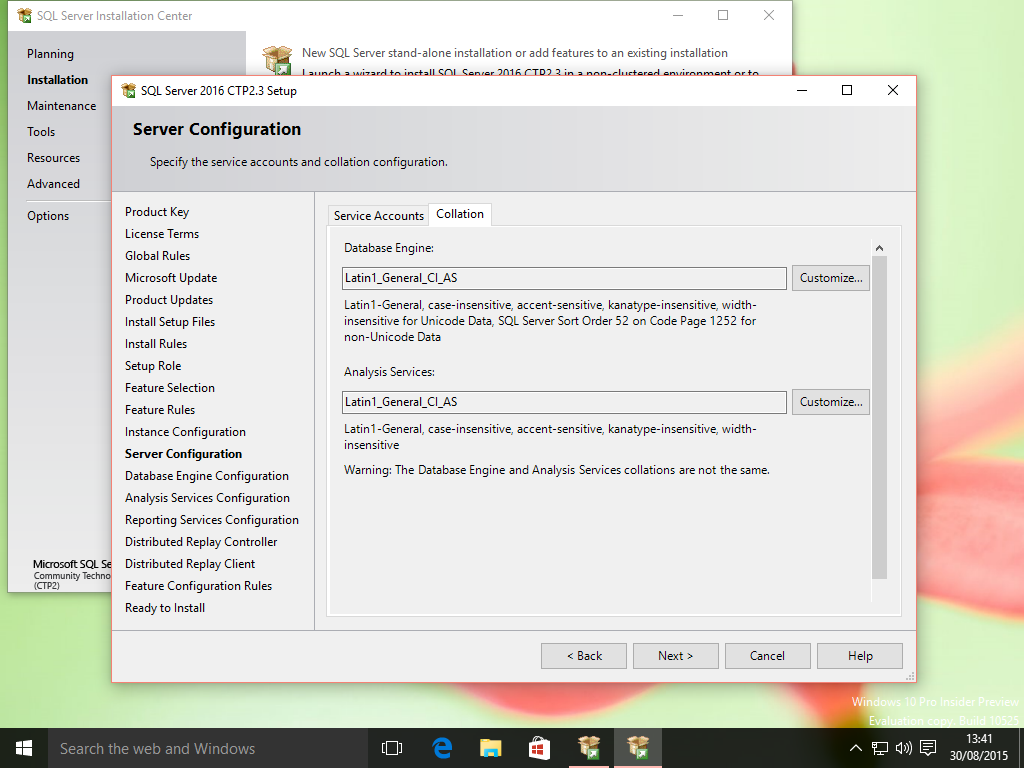
Change BOTH collation settings to
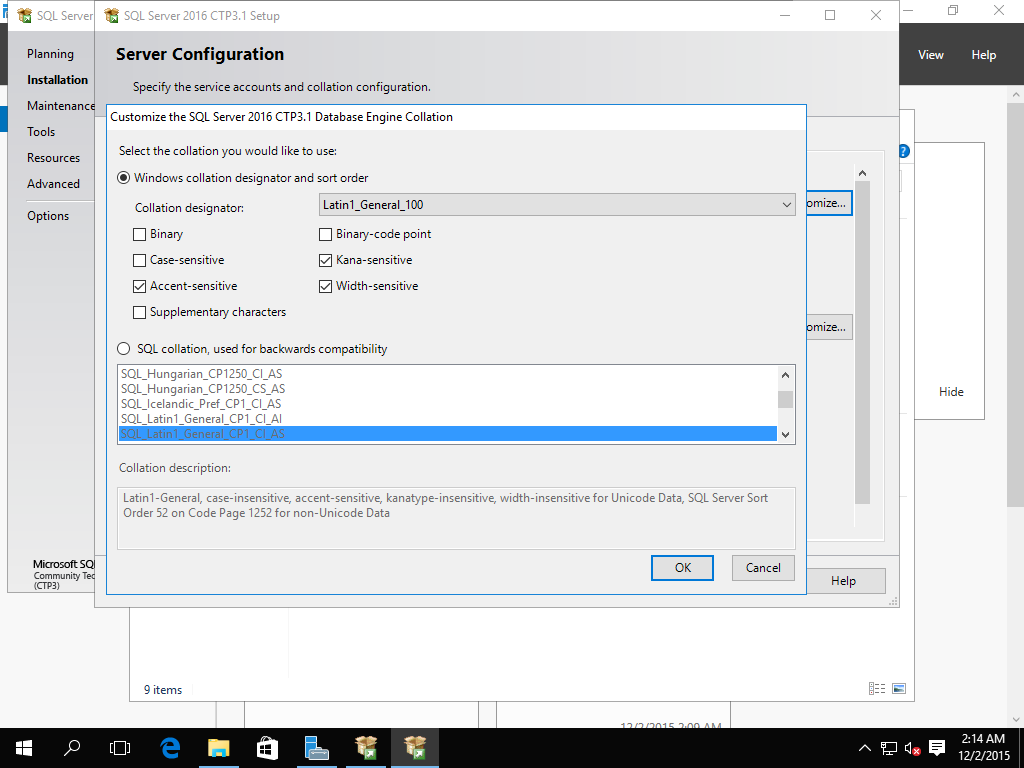
This allows the installation checks to pass!
3.1.10 SQL Server 2005 RTM on Windows Server 2008 R2 Datacenter
First install the additional windows components required
Start-> Turn Windows Features on and off-> Roles (left pane) -> Add Role -> IIS
Add roles services
Add:
- Common HTTP Features - Static Content,Default Document,HTTP Redirection,Directory Browsing
- Application Development - ASP.NET,ISAPI Extensions,ISAPI Filters
- Security - Windows Authentication
- Management Tools - IIS 6 Metabase Compatability,IIS 6 WMI Compatability
3.1.11 SQL Server 2016 CTP 3.0 Advanced Analytics
As well as .NET Framework 3.5, .NET Framework 4.6 and Java this also requires
Installing SQL Server R Services
- SQL Server Feature Advanced Analytics Extensions
- Revolution R Open 3.2.2 for Revolution R Enterprise 7.5.0
- The server installation package for Revolution R Enterprise 7.5.
- Install R Packages and Providers for SQL Server R Services
- Post-Installation Server Configuration (SQL Server R Services)
No development environment is required on the server
Develop R code on another computer and send the R code to SQL Server as described in Tutorial: Data Exploration and Predictive Modeling (SQL Server R Services).
3.1.12 Windows Server 2008 R2 Cluster Build - single subnet with iSCSI FreeNAS
All VMs need to be sysprep'ed with Generalize option to generate unique machine SIDs!3.1.12.A Windows Server 2008 Domain Controller Build
Change SID with c:\Windows\System32\sysprep\sysprep.exe /generalize
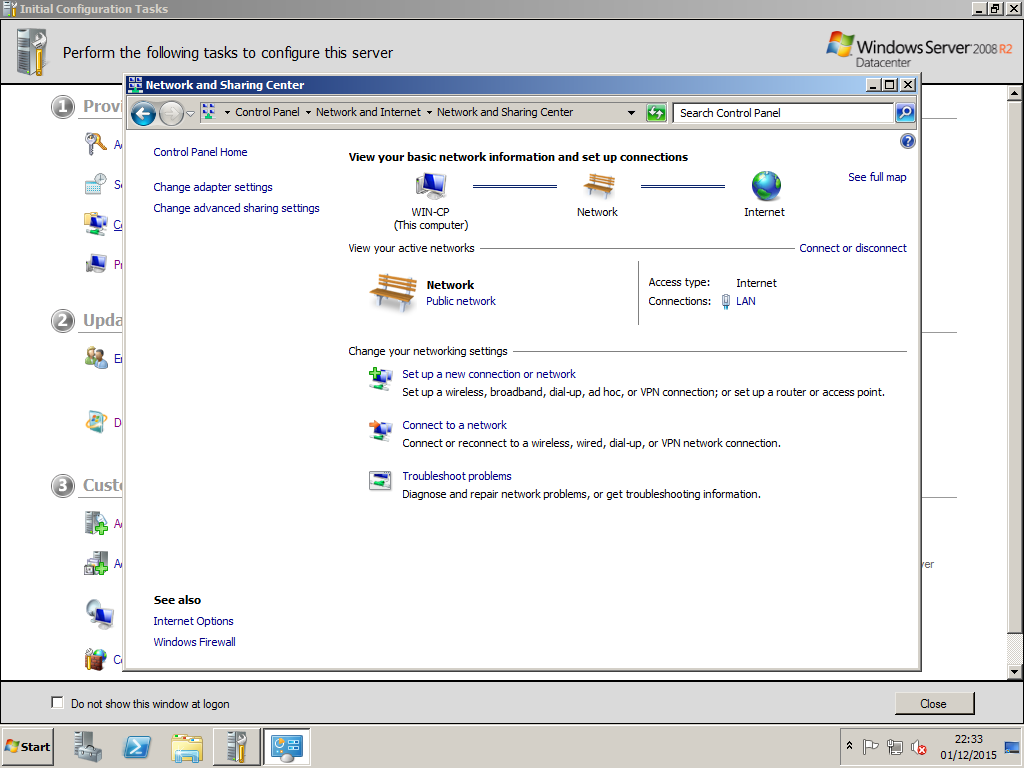
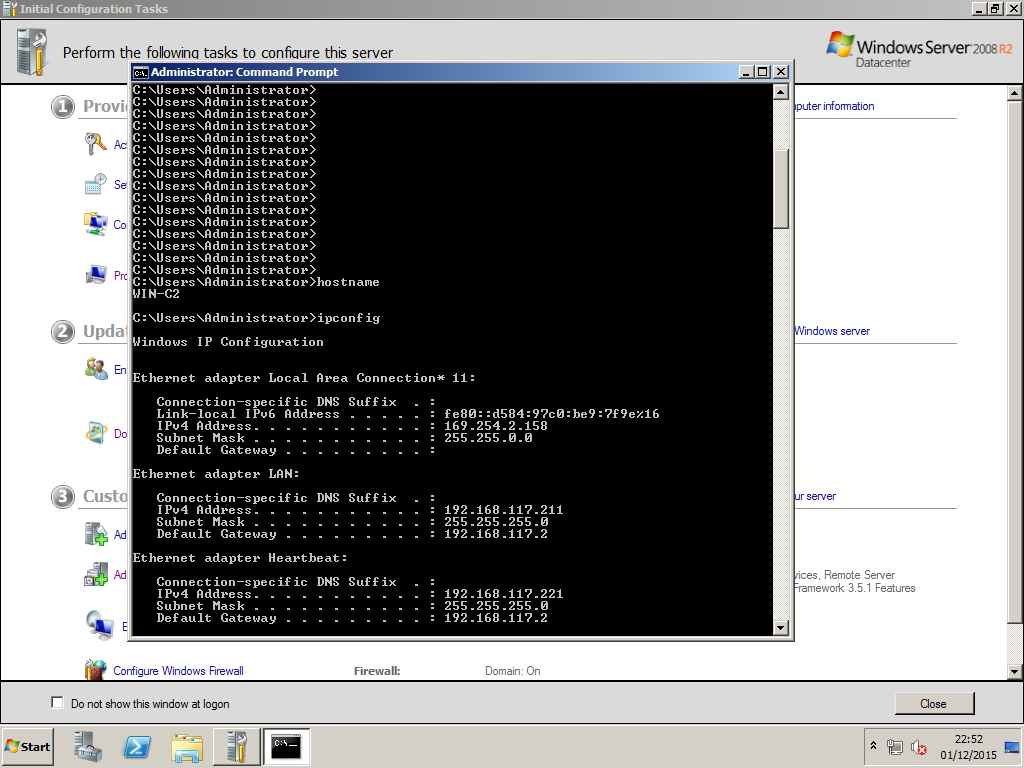
In the default Initial Configure Tasks panel change the computer name to Win-CP
VMWare will configure 1 network adapter using NAT
In Windows Click Start-Control Panel-Network and Internet-View Network Status and tasks-Change Adapter Settings
In Windows Right click on Network Adapter and rename to LAN
In Windows click back arrow to get to Network and Sharing Centre
The network adapter should appear in the middle of the screen under "View your active Network" under Public
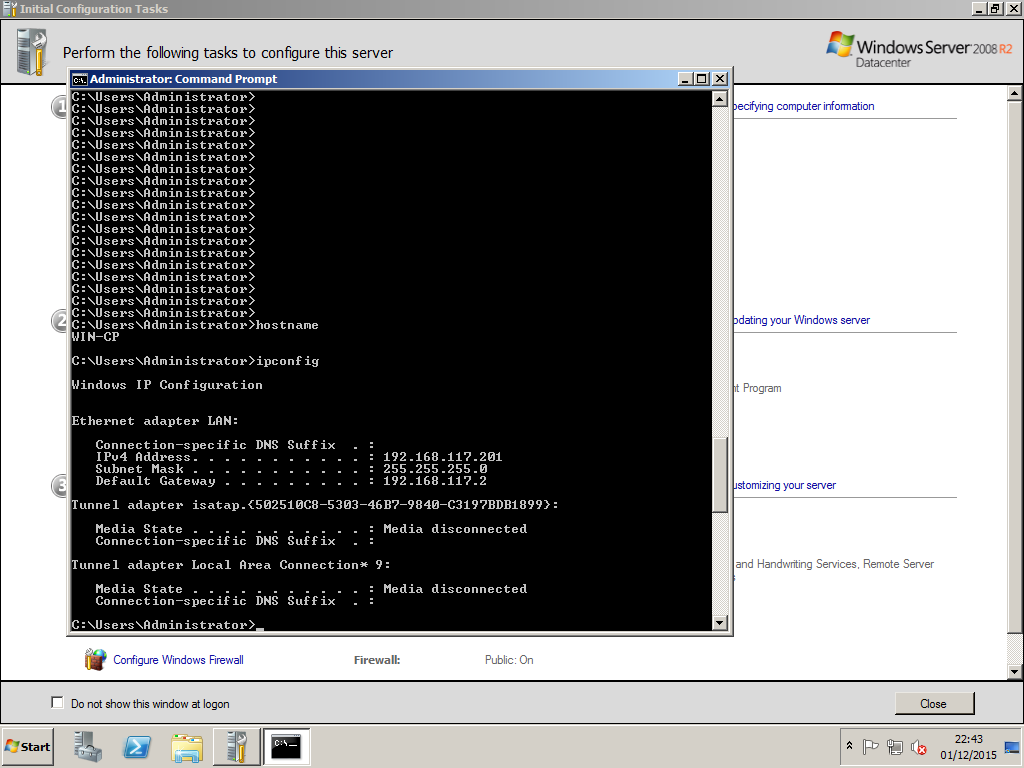
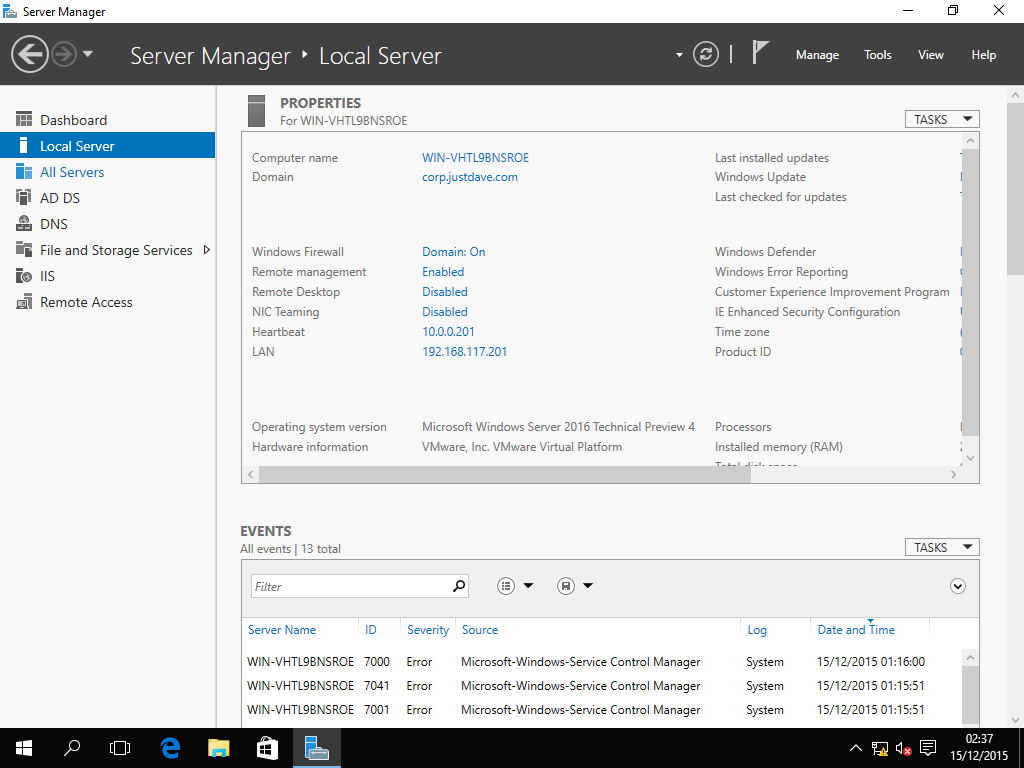
In a Command prompt run ipconfig /all and check windows settings
In Windows Click on LAN and change properties to disable IPV6 and set IPV4 to a static IP I used 192.168.117(.201) with the same IP for the DNS server
Next to the Start Button click on the Server Manager Icon
FYI In the left pane Click Features,In the right pane,Click Add Features,Add Desktop Experience which adds the Disk Cleanup Tool - faster Windows Update!
In the left pane Click Roles, In the right pane, Click Add Roles
Click Next, then Add "Add Directory Domain Services"
Add .Net Framework 3.5.1!
Click Install, when done Click Close
In the right pane, under Roles, click "Active Directory Domain Services"
In the right pane, under Summary click "Run the Active Directory Domain Services Installation Wizard (dcpromo.exe)
Click Next,Next and Create a new domain in a new forest
Enter the FQDN of the Forest Root Domain
(Wizard Checks if Forest name is in use and NetBiosName)
Set the Forest Functional Level to Windows Server 2008 R2
(Wizard Examines DNS Configuration)
Leave DNS Server selected in the "Additional Domain Controller Options"
https://technet.microsoft.com/en-us/library/cc754463%28WS.10%29.aspx#BKMK_Dcpromo
Accept Folders
Enter Recovery Password
Click Next on the Summary Screen
Click Finish and Restart the Server
Start->Run->dcomcnfg
Component services -> Computers->My Computer->Properties
Default Properties tab
Under default impersonation level select impersonate
Restart the Server
Final state should be
3.1.12.B Cluster Node 1 Build
Configure new VM (Win-C1) as Cluster Host 1 and Install Windows Server 2008
Change SID with c:\Windows\System32\sysprep\sysprep.exe /generalize
VMWare will configure 1 network adapter using NAT
In Windows Click Start-Control Panel-Network and Internet-View Network Status and tasks-Change Adapater Settings
In Windows Right click on Network Adapter and rename to LAN
In VMware change VM settings and add another network adapter using NAT
In Windows Control Panel -> Hardware -> Device Manager -> Network Adapters->Right Click, Refresh
In Windows Click Start-Control Panel-Network and Internet-View Network Status and tasks-Change Adapter Settings
In Windows Right click on Network Adapter and rename to Heartbeat
In Windows click back arrow to get to Network and Sharing Centre
Both network adapters should appear in the middle of the screen under "View your active Network" under Public
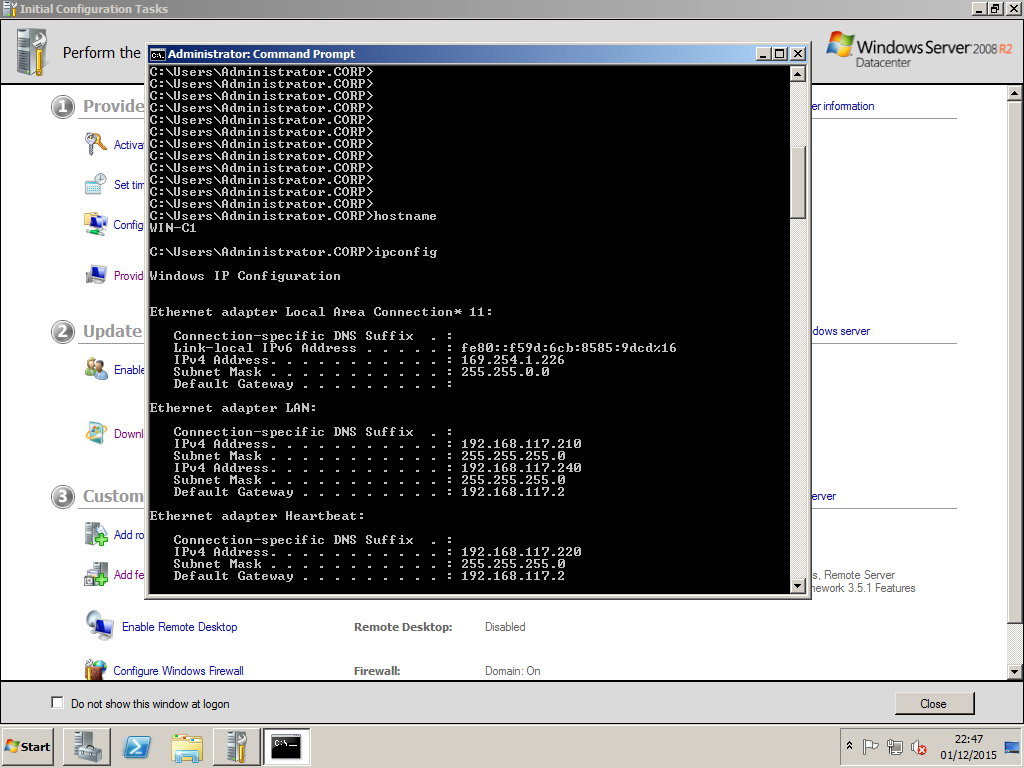
In a Command prompt run ipconfig /all and check windows settings
In Windows Click on LAN and change properties to disable IPV6 and set IPV4 to a static IP (.210) with the same DNS server
In Windows Click on heartbeat and change properties to disable IPV6 and set IPV4 to a static IP (.220) with no DNS server
For the heartbeat adapter under Properties IPV4 click Advanced, move to DNS tab and uncheck "Register this connection's addresses in DNS"
Heartbeat and LAN should both be on the same Public network
In Windows Click Start-Control Panel-Network and Internet-View Network Status and tasks-Change Adapter Settings
Press Alt key to bring up the menu
Choose Advanced and Advanced Settings, move the LAN to the top
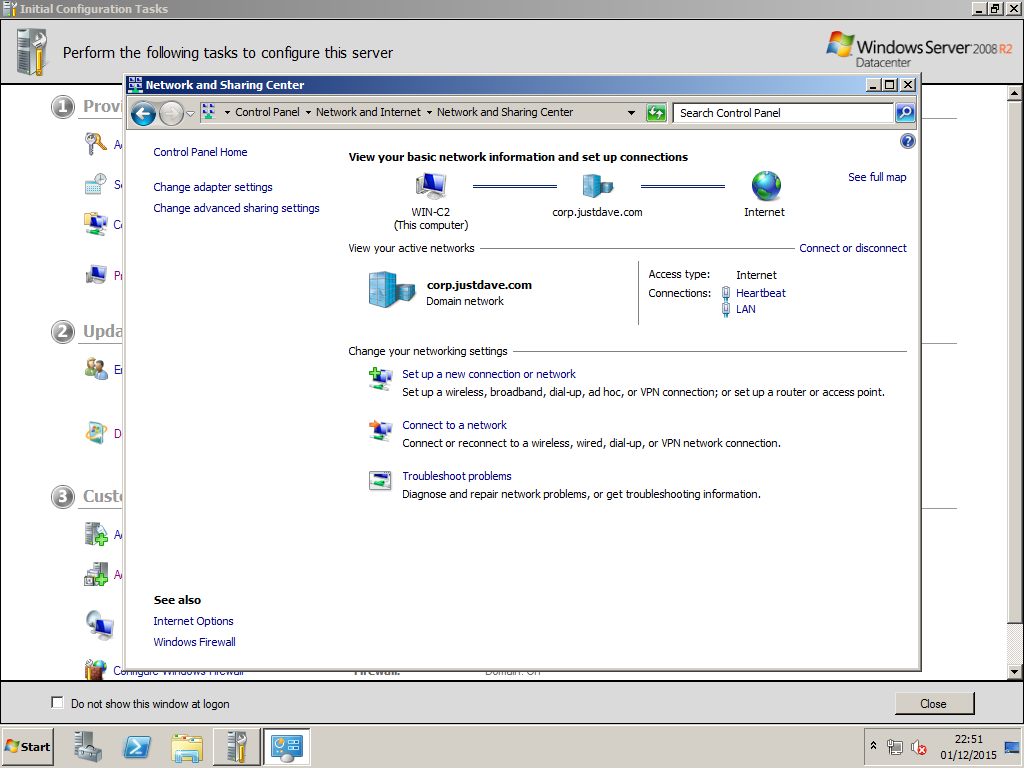
In the Initial Configuration Tasks screen under Provide Computer Name and Domain
Join Domain corp.justdave.com
Login as corp\Administrator (Domain Admin) and restart again
Final state should be (only with Disks 1/2 offline at this stage)
3.1.12.C Cluster Node 2 Build
Configure new VM (C2) as Cluster Host 2
change SID with c:\Windows\System32\sysprep\sysprep.exe /generalize
Choose System Cleanup Action as Out of Box Experience (OOBE) and click Generalize
Leave Shutdown option as Reboot
Configure Networking as above
Use LAN IP (.211)/Heartbeat (.221)
Attach Storage As above, Disks should be offlineFinal state should be
3.1.12.D FreeNAS Storage Build
Configure a new FreeNAS VM with 20GB Hard Disk 1 and 15GB Hard Disk 2
On startup with the character based menu
Choose 1) Configure Network Interfaces
Choose 1) em0
First Reset Network Configuration y
Rerun with Reset Network Configuration n
Configure IPV4 y
Interface mame em0
IPv4 address (.250)
Netmask: 255.255.255.0
Configure IPv6 n
Login to the GUI via the http address on the VM screen
On the top row choose Services and then turn on iSCSI
On the left panel choose Services -> iSCSI->Initator->Add Initiator
Accept default of ALL and ALL, add comment Initiator1
On the left panel choose Services -> iSCSI->Portals->Add Portal
Add a portal called Portal1, accept default IP Address of 0.0.0.0 and port 3260
On the left panel choose Services -> iSCSI->Targets->Add Target
Add Target Name target 1
Choose Portal and Initiator from above
On the left panel choose Storage, on the right panel choose View Disks
There should be da1 16.1GB
On the left panel choose Storage -> Volumes-> ZFS Volume Manager
Add Volume Name vol1
From Available Disks (1 - 16.1GB) will be select and the are no more drives
Choose Add Volume
On the left panel choose Storage -> Volumes-> View Volumes
There should be vol1
On the left panel choose Services -> iSCSI->Extents->Add Extents
Add Extent Extent1
Path to extent browse and choose /mnt/vol1/extent1
Change Extent Size to 10GB
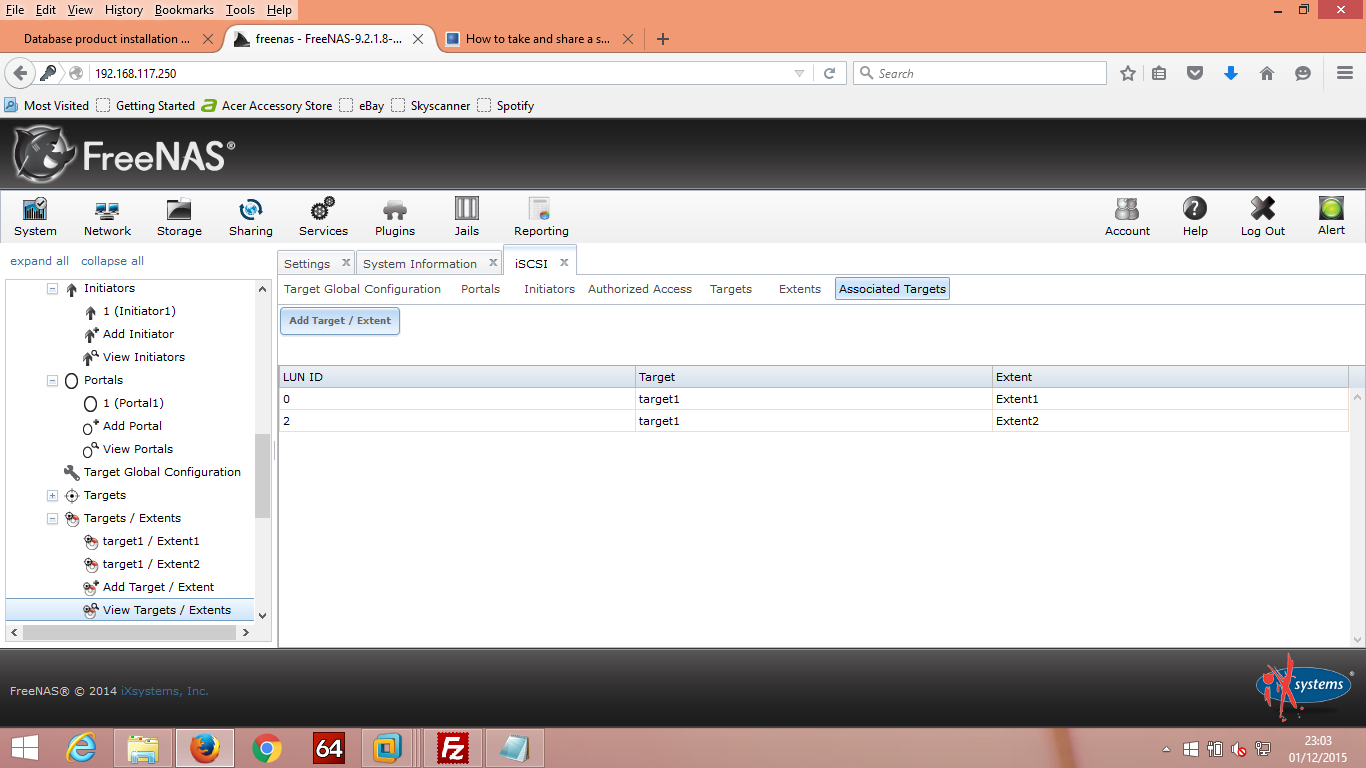
On the left panel choose Services -> iSCSI->Targets/Extents->Add Targets/Extents
Add LUN 0, Target target1,Extent extent1
On the top panel Choose Services, the stop and restart the iSCSI service
Check the console for the FreeNAS server that no messages appear!
On Cluster Host C1
Choose Control Panel->System and Security->Adminstrative Tools->iSCSI Initiator
Choose Yes to Start the Service
Choose the Targets tab
In the top box (Quick Connect) enter the IP address of the NAS host and click Quick Connect
You should see the Target from above
Start->Run->Diskmgmt.msc
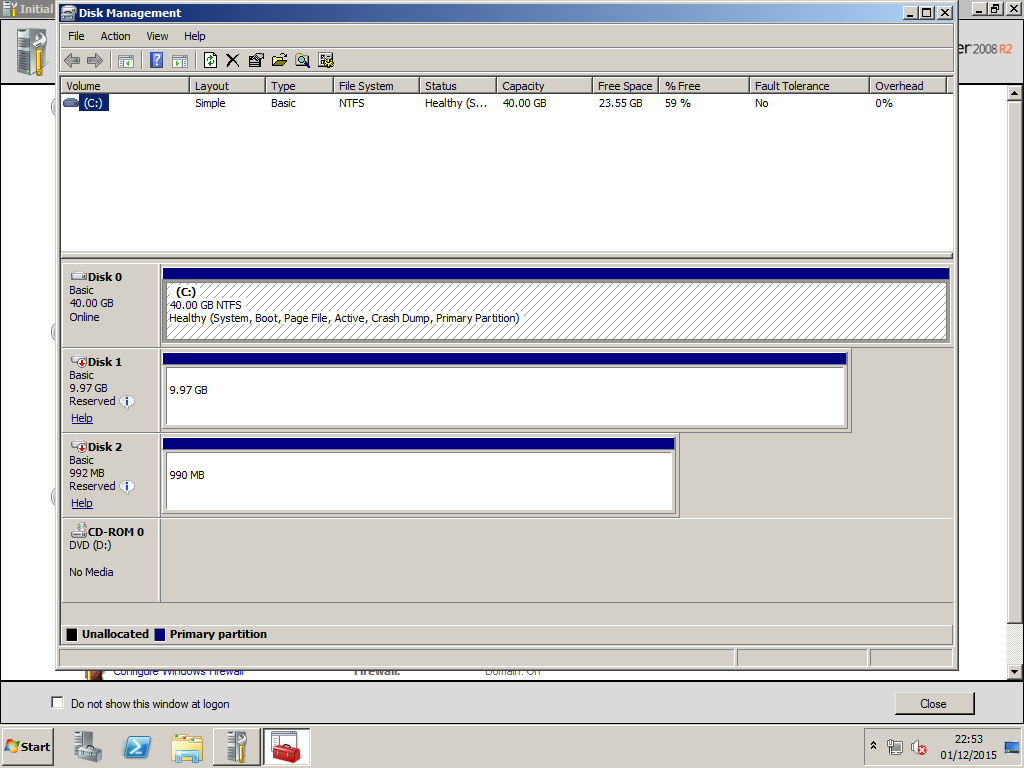
You should see the 10GB drive and it should be offline
Go back to the FreeNAS server
On the left panel choose Services -> iSCSI->Extents->Add Extents
Add Extent Extent2
Path to extent browse and choose /mnt/vol1/extent1
Change Extent Size to 1GB
On the left panel choose Services -> iSCSI->Targets/Extents->Add Targets/Extents
Add LUN 1, Target target2,Extent extent2
On the top panel Choose Services, the stop and restart the iSCSI service
On Cluster Host Win-C1
In Disk Management Choose Action->Refresh and the 1GB disk should appear - offline
In the iSCSI Initiator choose Volumes/Devices->Autoconfigure and both devices should appear
In Disk Management, click on the grey panel for each disk where it says offline
Online and initialize each disk with a GPT table,give them new simple volume each and name the volumes
Offline both disks
Go to cluster host Win-C2
Control Panel-System
Choose Control Panel->System and Security->Adminstrative Tools->iSCSI Initiator
In the top box (Quick Connect) enter the IP address of the NAS host and click Quick Connect
In the iSCSI Initiator choose Volumes/Devices->Autoconfigure and both devices should appear
Start->Run->Diskmgmt.msc
Both disks should appear as offline
Final state should be
3.1.12.E Validate and Create Cluster
Shutdown all VMs and copy them elsewhere, once the Failover Clustering feature is installed you cannot for example rerun Sysprep!
On both Cluster Machines C1/C2 in the default Initial Configure Tasks panel add Windows feature Failover Clustering
Restart both C1/C2 and on the Start Menu check the option is Logoff not Shutdown with a yellow icon to install updates otherwise Shutdown then start the host again
Check on C1/C2 Disk Management that both disks are visible
Next we need to logon as a domain user to validate the cluster
Logoff -> Login as other user-> corp\Adminstrator
On C1 next to the Start Menu start Server Manager
In the left panel Choose Features->Failover Cluster Manager (the machine may take a long time collecting feature information!)
In the right pane under Management Choose Validate a Configuration
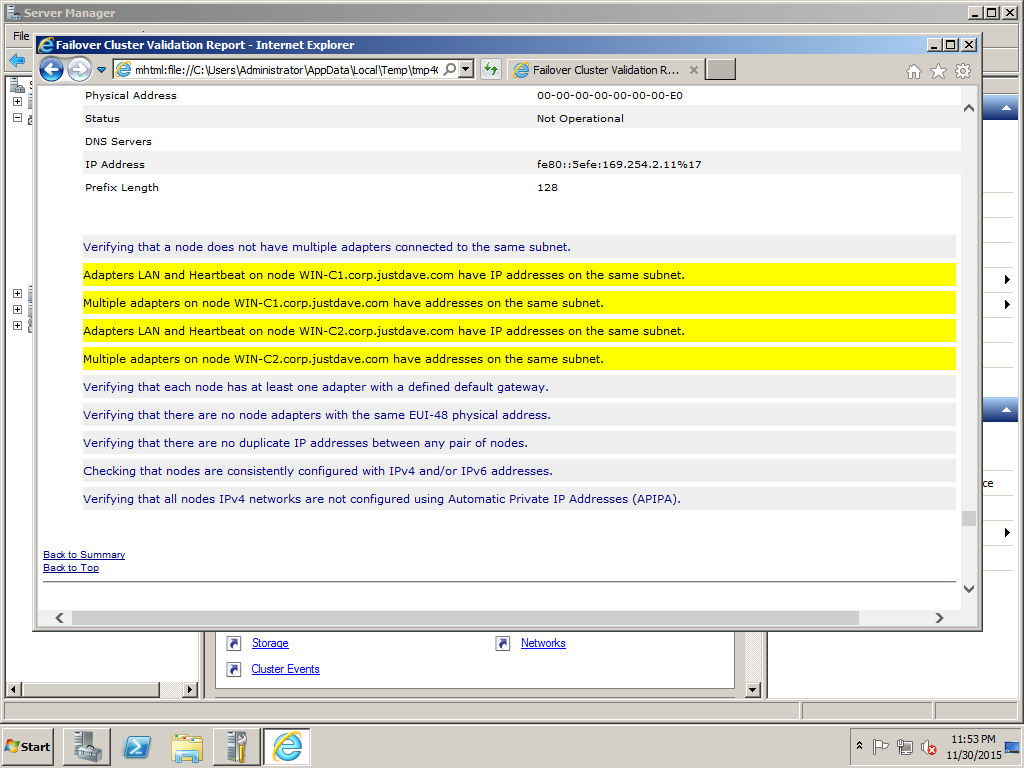
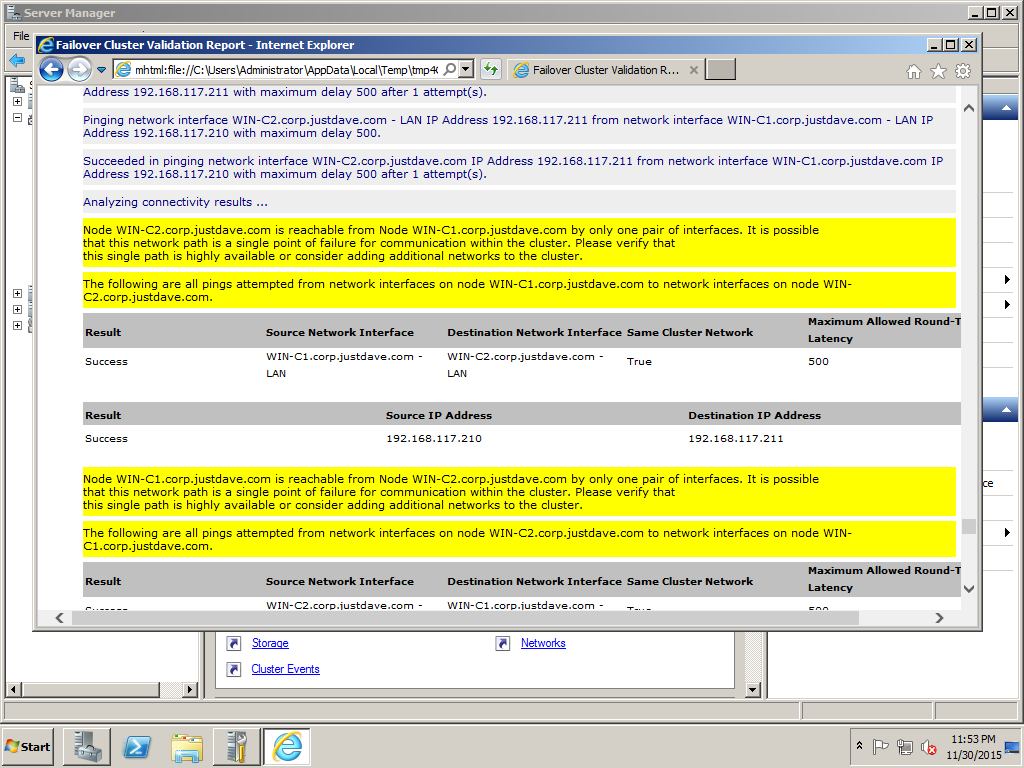
Select Servers C1/C2 and Validate, ignore warnings about same network subnet
Choose Create a Cluster and Select Servers C1/C2
Create a Cluster Name WIN-CL1 and IP address (.240)
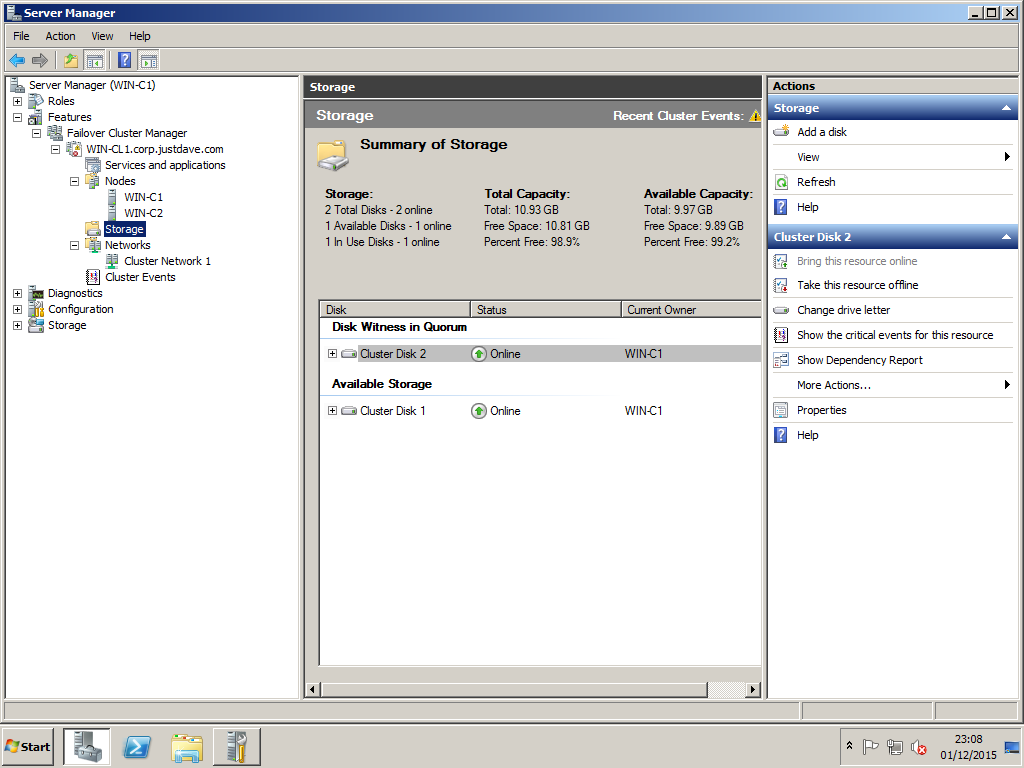
This automatically create the cluster with Node and Disk Quorum using Cluster Disk 2
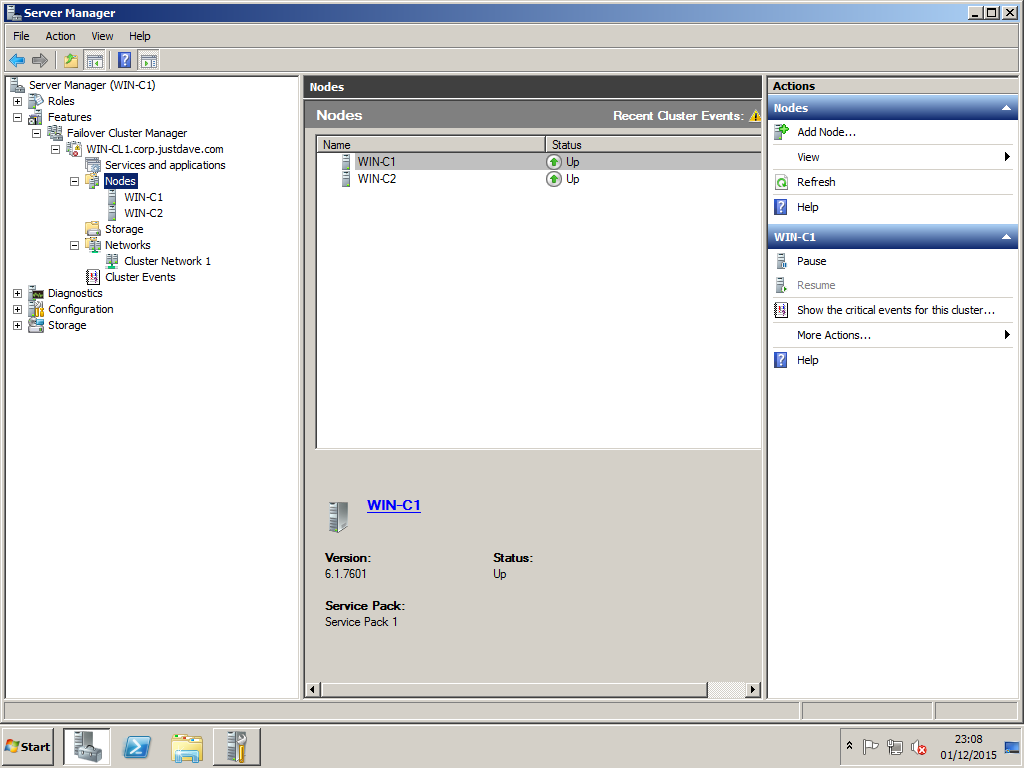
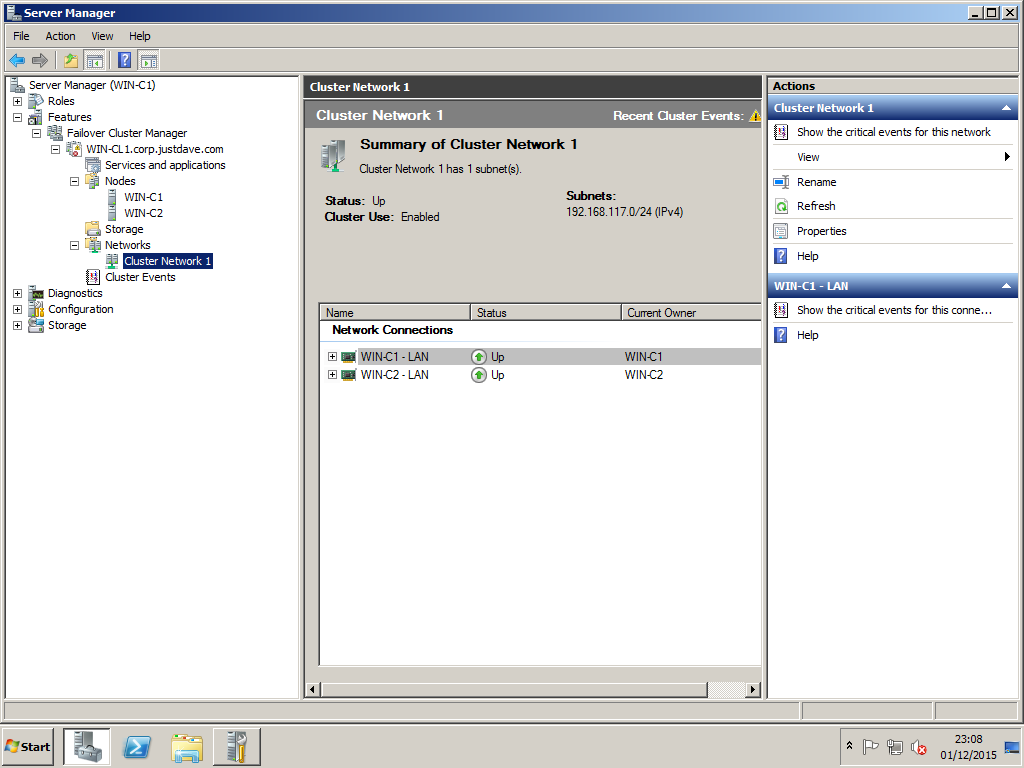
Final state should be
3.1.12.F Create Domain User for SQL Server Installation
On host Win-CP
Start->Adminstration Tools->Active Directory Users and Computers
In the left pane under corp.justdave.com->Users Right New->User
Add user justdave and add a password
Start->Run->mmc
File->Add/Remove Snapin->Group Policy Management
In the left pane drill down through forest to your domain
Right Click on Default Domain Controllers Policy->OK->Edit
Go to Computer Configuration->Policies->Windows Settings->Security Settings->Local Policies->User Rights Assignment
Right Click Allow Logon On Locally->Properties->Add User or Group
Similarly for
- Log on as a service
- Log on as a batch job
- Replace a process-level token
- Bypass traverse checking
- Adjust memory quotas for a process
- Impersonate a client after authentication
3.1.12.G Install SQL Server 2016 CTP 3.1 as Cluster Version on the first node
On host Win-C1 mount the CTP 3.1 ISO image and run setup64.exe from the ISO image
Installation->New SQL Server failover cluster installation
On Feature Selection screen just choose Database Engine and Analysis Services only
On instance configuration add Network Name/Instance Name SQL2016CX1
For Cluster Resource Group Leave as SQL2016CX1
For Cluster Network Configuration Select the IPv4 network and enter IP address 192.168.117(.241)
On the Server Configuration Screen Run SQL Server Agent,SQL Server Database Engine and SQL Server Analysis Services as CORP\justdave
On the Database Engine Configuration/Analysis Services Configuration screens add CORP\justdave
At this point I hit the issue where the install fails when starting the DB Engine
Checking logs under C:\Program Files\Microsoft SQL Server\130\Setup Bootstrap\Log
just showed a stack dump could not be produced due to a stack overflow, retry showed the function InitializePaths
This is as per SQL Server failover cluster installation fails on primary node
3.1.13 Windows Server 2016 Technical Preview 4 Cluster Build and SQL Server Installation - multi-subnet with Windows iSCSI disks
All VMs need to be sysprep'ed with Generalize option to generate unique machine SIDs!3.1.13.A Windows Server 2016 Technical Preview 4 Domain Controller Build
Install VM with Windows Server 2016 Technical Preview 4
In VM Settings go to USB Controller and unselect "Share Bluetooth devices with Virtual Machine"
Change SID with c:\Windows\System32\sysprep\sysprep.exe /generalize
In the Server Manager->Local Server click the Computer Name, change the computer name to Win-CP
VMWare will configure 1 network adapter using NAT,change this to Custom and VMNet0
In Windows Click Start-Control Panel-Network and Internet-View Network Status and tasks-Change Adapter Settings
In Windows Right click on Network Adapter and rename to LAN
In Windows click back arrow to get to Network and Sharing Centre
p>In VMware change VM settings and add another network adapter using Custom and VMNet2In Windows Control Panel -> Hardware -> Device Manager -> Network Adapters->Right Click, Refresh
In Windows Click Start-Control Panel-Network and Internet-View Network Status and tasks-Change Adapter Settings
In Windows Right click on Network Adapter and rename to Heartbeat
In Windows click back arrow to get to Network and Sharing Centre
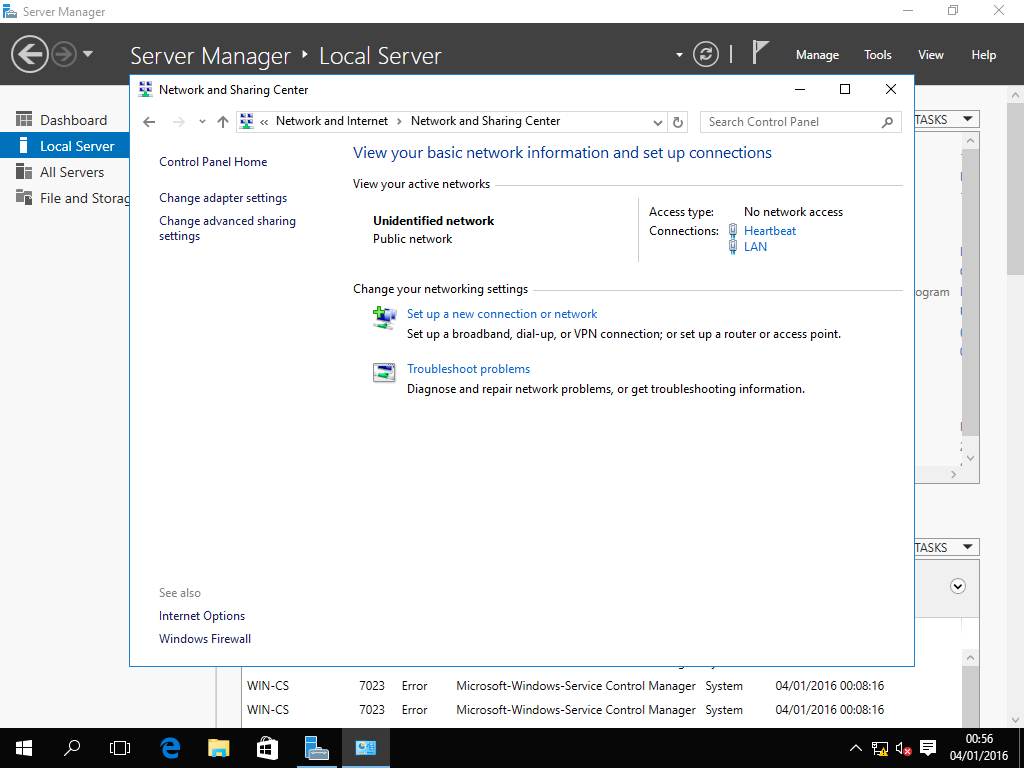
Both network adapters should appear in the middle of the screen under "View your active Network"
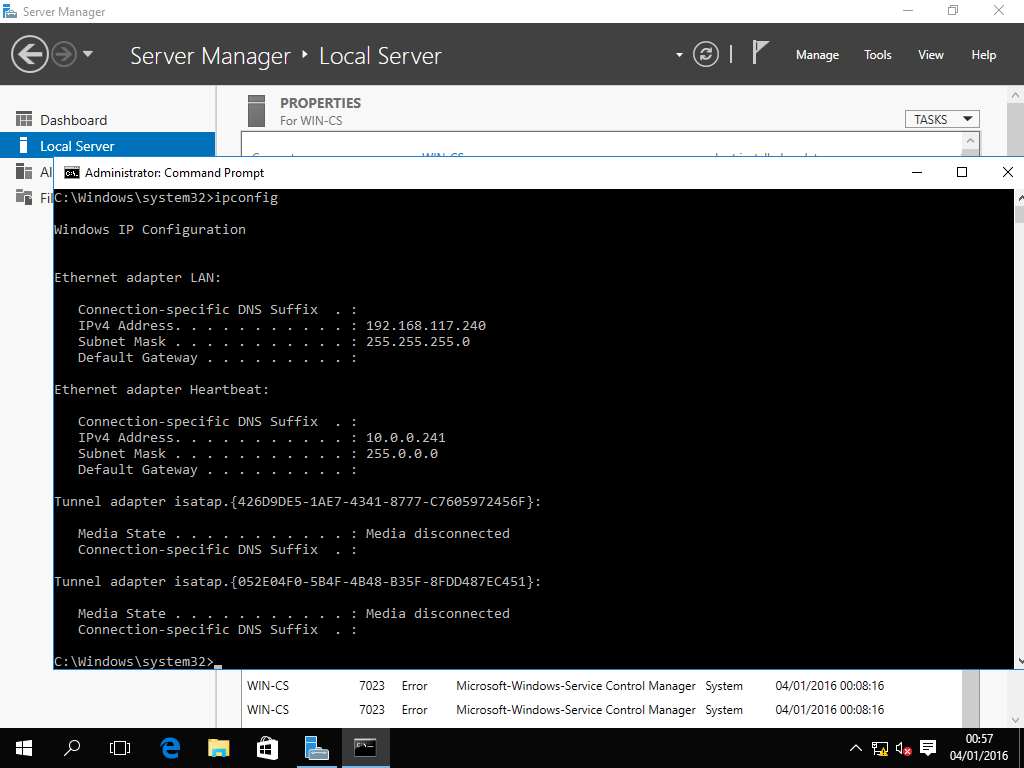
In a Command prompt run ipconfig /all and check windows settings
The network adapter should appear in the middle of the screen under "View your active Network" under Public
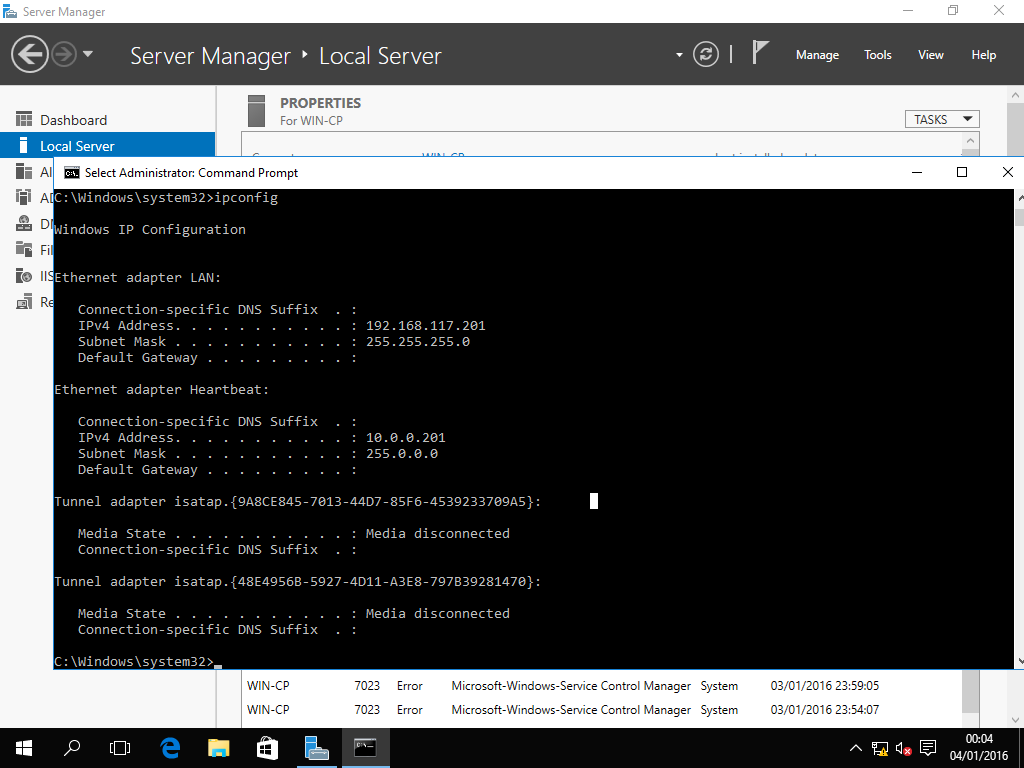
In Windows Click on LAN and change properties to disable IPV6 and set IPV4 to a static IP 192.168.117(.201) with default subnet mask,default gateway 192.168.117(.201) and 192.168.117(.201) for the DNS server
In Windows Click on Heartbeat and change properties to disable IPV6 and set IPV4 to a static IP 10.0.0(.201) with default subnet mask,no default gateway and 10.0.0(.201) for the DNS server
Choose Start Menu->Device Manager->View->Show hidden devices
Under Network Adapters disable/uninstall any "Microsoft ISATAP Adapter"/"Microsoft Teredo Tunneling Adapters"/"microsoft kernel debug network adapter"
In a Command prompt run ipconfig /all and check windows settings,all network interfaces should have just static IPv4 addresses
In Server Manger->Local Server, on the menu choose Manage->Add Roles and Features
Click Next->Next->Next
On the Server Roles screen Select "Active Directory Domain Services"
Click Next->Next->Next->Install
Once the progress bar says Installation Succeeded Click on "Promote this server to a domain controller"
Select "Add a new forest"
Enter Root Domain name corp.justdave.com
Leave Forest and Domain Functional Levels as "Windows Server Technical Preview"
Leave "Specify domain controller capabilitites" as DNS server
Enter the Directory Services Restore Mode Password and Click Next
Leave Create DNS delegation blank click Next
On the Additional Options screen, Leave Netbios domain name as CORP, Click Next
Click Next on the Paths screen
Click Next on the Review Options screen
The pre-requistite checks run then Click Install
After install Restart the Server
Final state should be
3.1.13.B Cluster Node 1 Build
Configure new VM (Win-C1) as Cluster Host 1 and Install Windows Server 2008
Change SID with c:\Windows\System32\sysprep\sysprep.exe /generalize
VMWare will configure 1 network adapter using NAT,change this to Custom and VMNet0
In Windows Click Start-Control Panel-Network and Internet-View Network Status and tasks-Change Adapater Settings
In Windows Right click on Network Adapter and rename to LAN
p>In VMware change VM settings and add another network adapter using Custom and VMNet2In Windows Control Panel -> Hardware -> Device Manager -> Network Adapters->Right Click, Refresh
In Windows Click Start-Control Panel-Network and Internet-View Network Status and tasks-Change Adapter Settings
In Windows Right click on Network Adapter and rename to Heartbeat
In Windows click back arrow to get to Network and Sharing Centre
Both network adapters should appear in the middle of the screen under "View your active Network" under Public
In a Command prompt run ipconfig /all and check windows settings
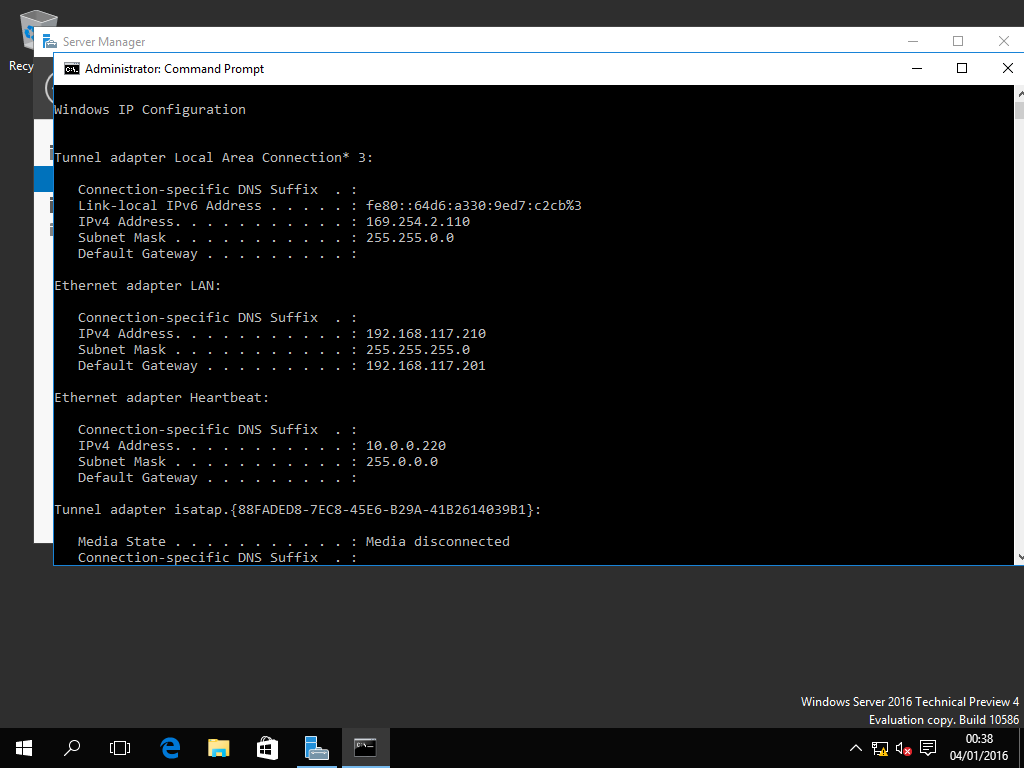
In Windows Click on LAN and change properties to disable IPV6 and set IPV4 to a static IP 192.168.117(.210) with default subnet mask,default gateway 192.168.117(.201) and DNS server 192.168.117(.201)
In Windows Click on Heartbeat and change properties to disable IPV6 and set IPV4 to a static IP 10.0.0(.220) with default subnet mask,no default gateway and DNS server 10.0.0(.201)
Heartbeat and LAN should both on different Networks
In Windows Click Start-Control Panel-Network and Internet-View Network Status and tasks-Change Adapter Settings
Press Alt key to bring up the menu
Choose Advanced and Advanced Settings, move the LAN to the top
In the Server Manager->Local Server click the Computer Name, change the computer name to Win-C1
Join Domain corp.justdave.com
Login as corp\Administrator (Domain Admin) and restart again
Select Control Panel->System and Security->Windows Firewall->Advanced Settings
In the left Panel Select Inbound Rules
In the right pane Right Click on "File and Printer Sharing (Echo Request - ICMPv4-In) ->Enable
Ping the C1 host from the CP Machine
3.1.13.C Cluster Node 2 Build
Configure new VM (C2) as Cluster Host 2
change SID with c:\Windows\System32\sysprep\sysprep.exe /generalize
Choose System Cleanup Action as Out of Box Experience (OOBE) and click Generalize
Leave Shutdown option as Reboot
Configure Networking as above
Use LAN IP 192.168.117(.211)/Heartbeat 10.0.0(.221)
3.1.13.D Enable LAN Routing on Domain Controller
On Host CP,Go to Server Manager, on the left pane select "Local Server"
On the menu choose Manage->Add Roles and Features
Click Next->Next->Next
On the Server Roles screen Select "Remote Access"
Click Next->Next->Next
On the Role Services Screen Select "Routing"
Click Add Features (this will also enable "Direct Access and VPN (RAS)"
Click Next->Next->Next->Install
Once the progress bar says Installation Succeeded Click on "Open the Getting Started Wizard"
Click "Deploy VPN only"
Click on the local machine
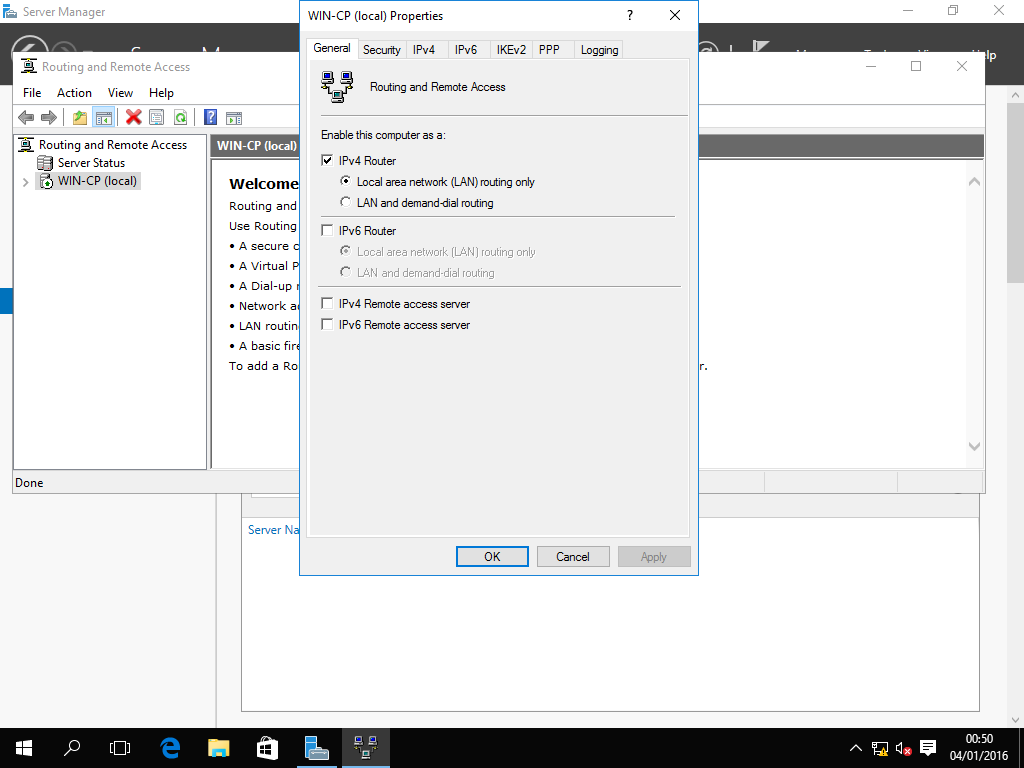
On the Menu select Action->Configure and Enable Routing and Remote Access
Click Next
Select Custom configuration then Click Next
Select just Lan Routing then Click Next
Click Finish
Click Start Service
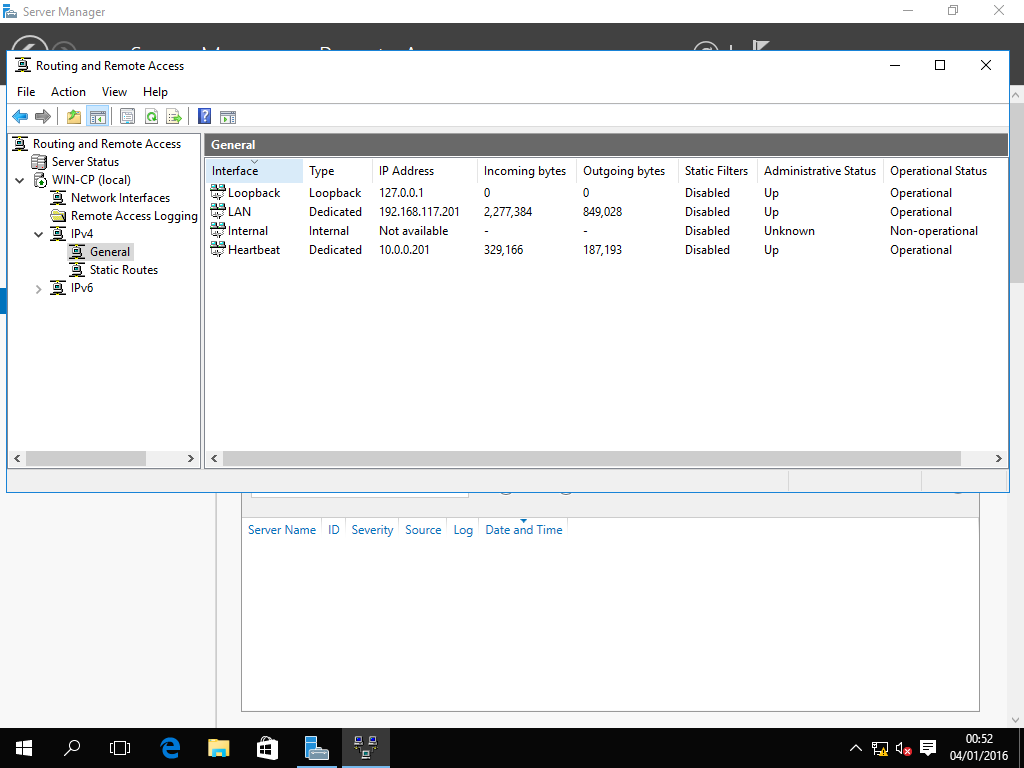
Check with Server Manager->Tools->Routing and Remote Access
Final state should be
3.1.13.E Windows Server 2016 Technnical Preview 4 iSCSI Storage Setup
Configure a new Windows Server 2016 Technnical Preview 4 VM with 20GB Hard Disk 1 and 15GB Hard Disk 2
Change SID with c:\Windows\System32\sysprep\sysprep.exe /generalize
Choose System Cleanup Action as Out of Box Experience (OOBE) and click Generalize
Leave Shutdown option as Reboot
Configure Networking as above
Use LAN IP 192.168.117(.211)/Heartbeat 10.0.0(.221)
On Host CP,Go to Server Manager, on the left pane select "Local Server"
On the menu choose Manage->Add Roles and Features
Click Next->Next->Next
On the Server Roles Screen
Expand File and Storage Services
Expand File and iSCSI Services
Click iSCSI Target Server
This will also add File Server
Click Add Feature->Next->Next->Install
Reboot to complete feature installation
In Server Manager
In the left panel Choose File and Storage Services->iSCSI
Click "To create an iSCSI virtual disk, start the New iSCSI Virtual Disk Wizard
First will appear in the left panel "iSCSI Virtual Disk Location"
Leave as C: drive (this will be in \iSCSIVirtualDisk), click Next
Add iSCSI Virtual Disk Name as iSCSI1, click Next
On iSCSI Virtual Disk Size, set size as 1GB, leave Dynamically Expanding on, Click Next
On iSCSI Target, leave New iSCSI Target selected
For iSCSI Target Name and Access, set Name to target1, Click Next
On the Access Servers Screen, Click Add
Select "Enter value for Select Type"
Change Type to IP Address, add 10.0.0.(220)
Also add Ip addresses 10.0.0.(221)/192.168.117.(210)/192.168.117.(211)
Click Next
For Enable Authentication Services leave blank
On the Confirmation Screen,Click Create
On the iSCSI screen rlight click->Add another iSCSI Virtual Disk
Keep the same location,make the size 5GB,use Target target1
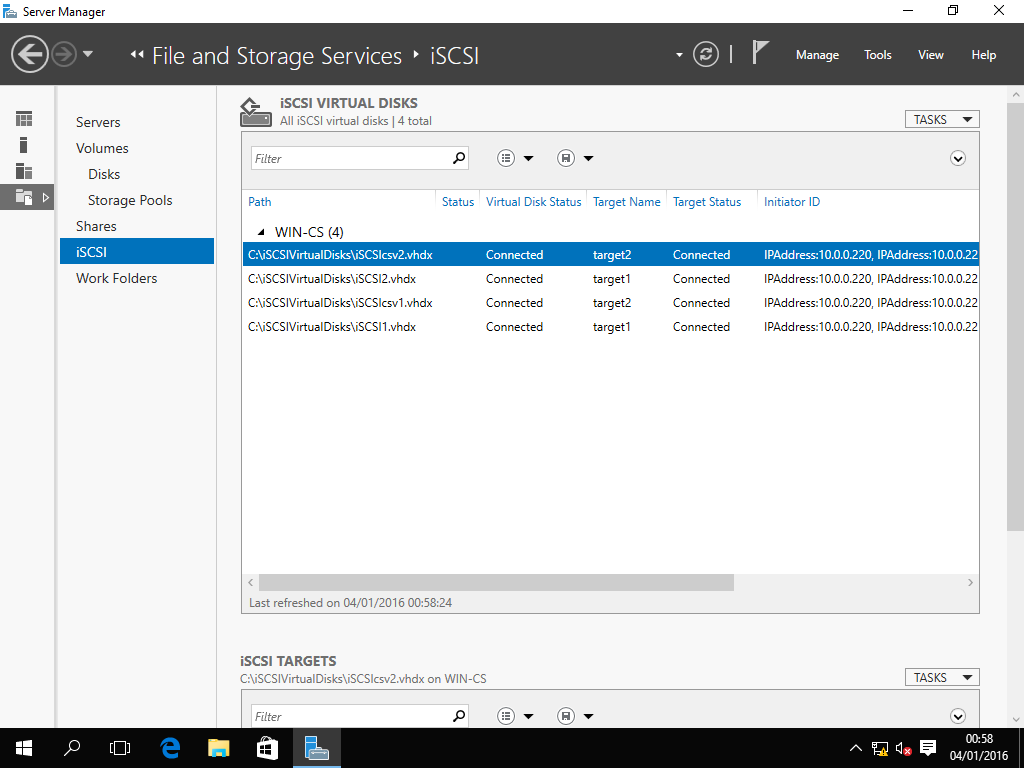
Final state should be (just disks on iscsi target 1 though)
3.1.13.F Add Storage to both Cluster nodes Win-C1 and Win-C2
On Host C1,Go to Server Manager, on the left pane select "Local Server"
On the menu choose Tools->iSCSI Initiator
Click Next to start the Microsoft iSCSI Service
On the targets tab enter target (192.168.117).240 and Click "Quick Connect"
Click Done, then on the Volumes and Details tab click Autoconfigure
2 devices should appear then click ok
Start->Disk Management
Right click on both disks on the disk name and Online both disk
Initialize Both disks with GPT
Right Click on both disks in the unallocated space and add a New Simple Volume with all the defaults
Offline both disksOn Host C2,Go to Server Manager, on the left pane select "Local Server"
On the menu choose Tools->iSCSI Initiator
Click Next to start the Microsoft iSCSI Service
On the targets tab enter target (192.168.117).240 and Click "Quick Connect"
Click Done, then on the Volumes and Details tab click Autoconfigure
2 devices should appear then click ok
Start->Disk Management
Check both iSCSI disks are visible and offline
3.1.13.F Validate and Create Cluster
Shutdown all VMs and copy them elsewhere, once the Failover Clustering feature is installed you cannot for example rerun Sysprep!
On both Cluster Machines C1/C2 in the default Initial Configure Tasks panel add Windows feature Failover Clustering
Restart both C1/C2 and on the Start Menu check the option is Logoff not Shutdown with a yellow icon to install updates otherwise Shutdown then start the host again
Check on C1/C2 Disk Management that both disks are visible
Next we need to logon as a domain user to validate the cluster
Logoff -> Login as other user-> corp\Adminstrator
On C1 next to the Start Menu start Server Manager
In the left panel Choose Features->Failover Cluster Manager (the machine may take a long time collecting feature information!)
In the right pane under Management Choose Validate a Configuration
Select Servers C1/C2 and Validate, ignore warnings about cluser shared voluem SMB test
Choose Create a Cluster and Select Servers C1/C2
Create a Cluster Name WIN-CL1 and IP address 192.168.117(.250)
This automatically create the cluster with Node and Disk Quorum using Cluster Disk 1
In Failover Cluster Manager the left panel,right click on the Cluster->More Actions->Move cluster resources->Select node
Move everything to node Win-C1
In Failover Cluster Manager the left panel,click on Storage->Disks make sure both disks have owning node Win-C1
Otherwise Right Click on Disk->Move Available Storage->Select node
Move everything to node Win-C1
Final state should be
3.1.13.G Create Domain User for SQL Server Installation
On host Win-CP
On the Server Manager Menu choose Tools->Active Directory Users and Computers
In the left pane under corp.justdave.com->Users Right New->User
Add user justdave,User Logon Name justdave, Click Next
Add a password, disable user must change password at next logon and Click Next
Exit Active Directory Users and Computers
On the Server Manager Menu choose Tools->Group Policy Management
In the left pane drill down through forest to your domain
Right Click on Default Domain Controllers Policy->OK->Edit
Go to Computer Configuration->Policies->Windows Settings->Security Settings->Local Policies->User Rights Assignment
Right Click Allow Logon On Locally->Properties->Add User or Group
Similarly for
- Act as part of the operating system
- Adjust memory quotas for a process
- Back up files and directories
- Bypass traverse checking
- Debug programs
- Impersonate a client after authentication
- Increase a process working set
- Increase scheduling priority
- Lock pages in memory
- Log on as a service
- Log on as a batch job
- Manage auditing and security log
- Replace a process-level token
On machine CP in a command prompt as admin run gpupdate /force
3.1.13.H Install SQL Server 2016 CTP 3.2 as Cluster Version on the first host
On host Win-C1 mount the CTP 3.1 ISO image and run setup64.exe from the ISO image
Installation->New SQL Server failover cluster installation
On Feature Selection screen just choose Database Engine and Analysis Services only
On instance configuration add Network Name/Instance Name SQL2016CX1
For Cluster Resource Group Leave as SQL2016CX1
For Cluster Network Configuration Select the IPv4 network and enter IP address 192.168.117(.251)
On the Server Configuration Screen Run SQL Server Agent,SQL Server Database Engine and SQL Server Analysis Services as CORP\justdave
On the Database Engine Configuration/Analysis Services Configuration screens add CORP\justdave
3.1.13.I Install SQL Server 2016 CTP 3.1 as an additional Node on the second host
On host Win-C2 mount the CTP 3.1 ISO image and run setup64.exe from the ISO image
Installation->Add a node to a SQL Server failover cluster
Accept Defaults
On Service Accounts screen enter the password for CORP\justdave
Final state should be
3.1.13.J Multi-path the IO to the storage on both cluster nodes
On Hosts Win-C1/Win-C2,Go to Server Manager and add Windows Feature MultiPath IO to both hosts and reboot
On Hosts Win-C1/Win-C2,Go to Server Manager->Tools->MPIO->Discover Multi-Paths->Add support for iSCSI->Add->Reboot
Go into Failover Cluster Manager->Cluster name->Storage-Disks,make 1 host own any disks
If the disks are owned by the Win-C1 host and the Quorum Disk is still owned by the Win-C2 host
you will need to right click on the Cluster disk which is the Disk Witness in Quorom and take it offline
On host Win-C2 go into Server Manager->Tools->iSCSI Initator
Select the targets tab and disconnect the target
Select the discovery tab and Remove the portal for the target
Click Discover Portal and Enter the first IP address for the iSCSI target (192.168.117).250
Click Discover Portal and enter the second IP address for the iSCSI target (10.0.0).251
Select the targets tab and then properties
Click Add Session
Click Enable multi-path
Click Advanced
For Local Adapter Select "Microsoft iSCSI Initiator"
For Initator IP Select (192.168.117).240
For Target Portal IP Select (192.168.117).250/3260
Click OK
Click Add Session
Click Enable multi-path
Click Advanced
For Local Adapter Select "Microsoft iSCSI Initiator"
For Initator IP Select (10.0.0).241
For Target Portal IP Select (10.0.0).251/3260
Click OK
Click OK again (for the properties screen)
On the Volume and Devices tab click Autoconfigure
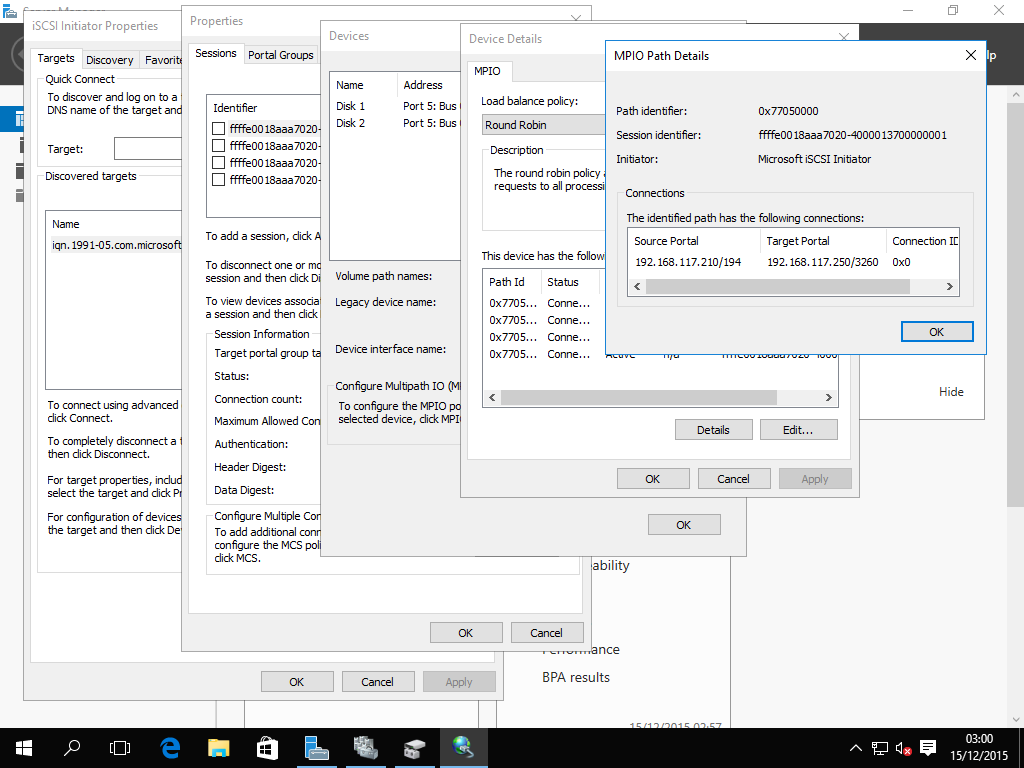
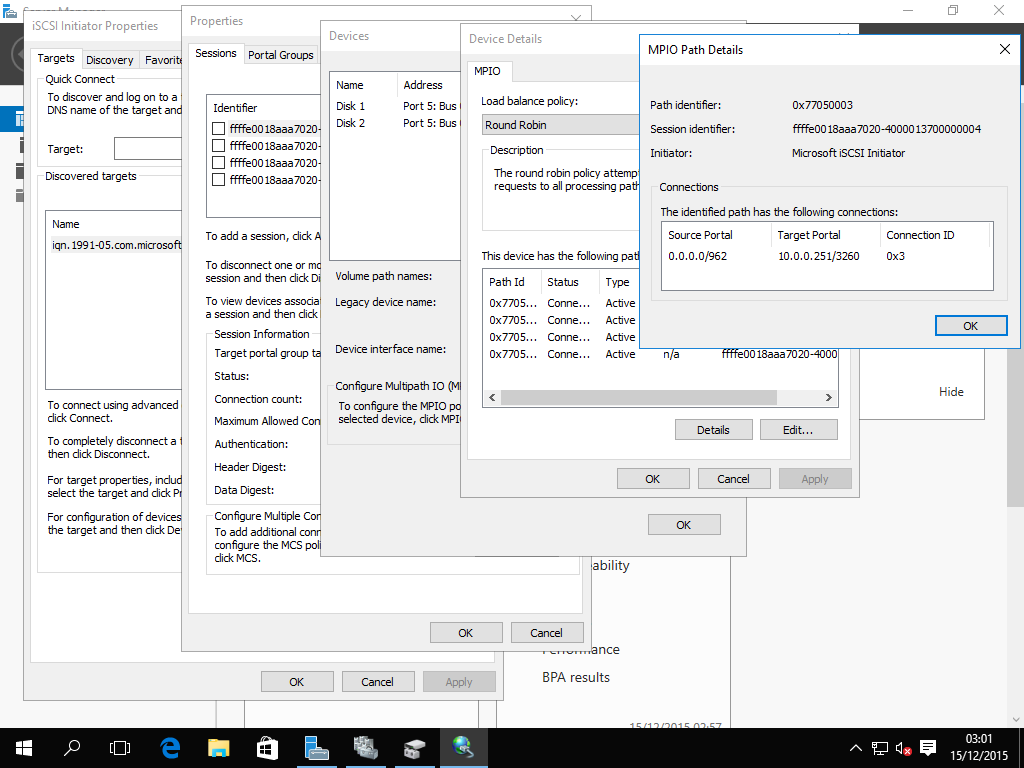
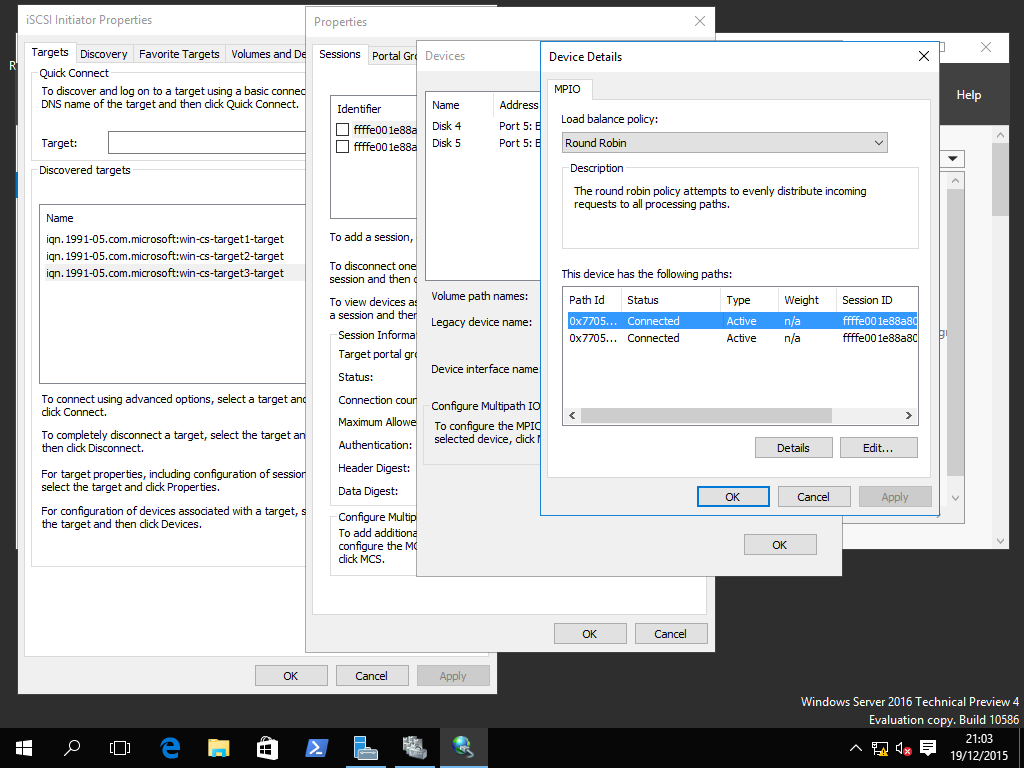
At this point go tp targets tab->Properties->Devices->click a device->MPIO->click each connection in turn and ->Details
The source portal and target portal can be seen for each path to each device!
Click OK until the iSCSI Initiator tool closes
On the Win-C1 machine go back to Failover Cluster Manager and online the cluster disk which is the Disk Witness in Quorom
Repeat the same process for the connections for the disks for host Win-C1
Final state should be
3.1.13.K Multi-path the network to the cluster
In Failover Cluster Manager in the left panel go to Network
Cluster Network 2->Properties->Allow clients to connect through this network
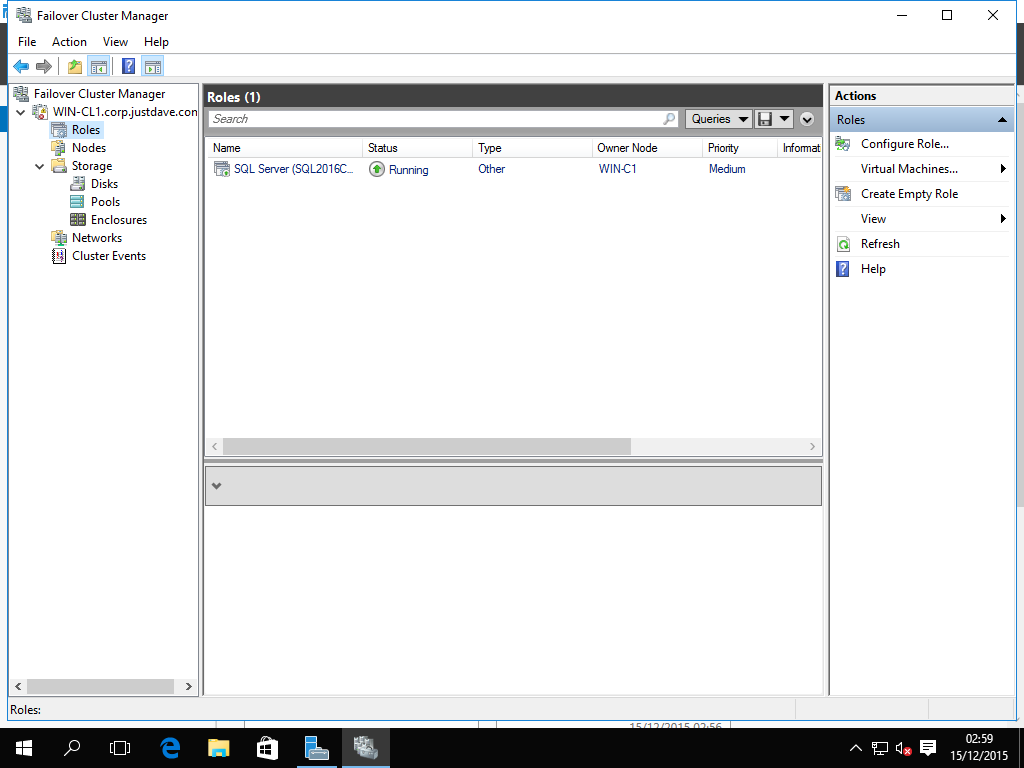
In Failover Cluster Manager in the left panel go to Roles
In the far right Add Resource - Client Access Point->Add (10.0.0).250
In the bottom panel go to the resources tab
Scroll down to the Server Name, right click>Properties
Under IP Address click Add,add the (10.0.0).250 address
In the left panel go to Roles
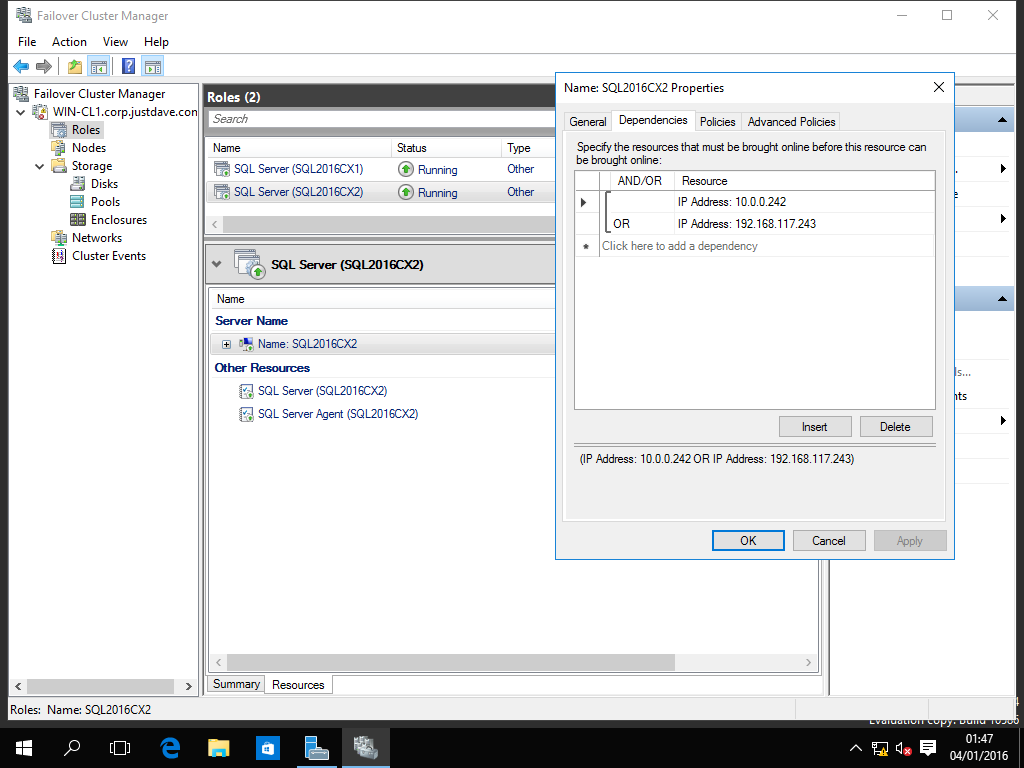
Right click on the SQL Server Role -> More Actions -> Show dependency report
The SQL Agent depends on the Sql Server which depends on Cluster Disk 2 and the Network Name
The Network Name depends on 2 network address, make sure this is an "OR" relationship!
Otherwise in the bottom panel go to the server name again and right click for properties
Go to dependencies and change this to an "OR" rather than and "AND"
Final state should be
3.1.13.L Start another VM with SSMS to test connections
Install another VM Win-SSMS with Windows Server 2016 Technical Preview 4
Sysprep the host
Add 2 Network Adapters (192.168.117).10 and 10.0.0(.11) as LAN/Heartbeat as before
Join the machine to the domain
Login as CORP\Administrator and Install SSMS December 2015 release
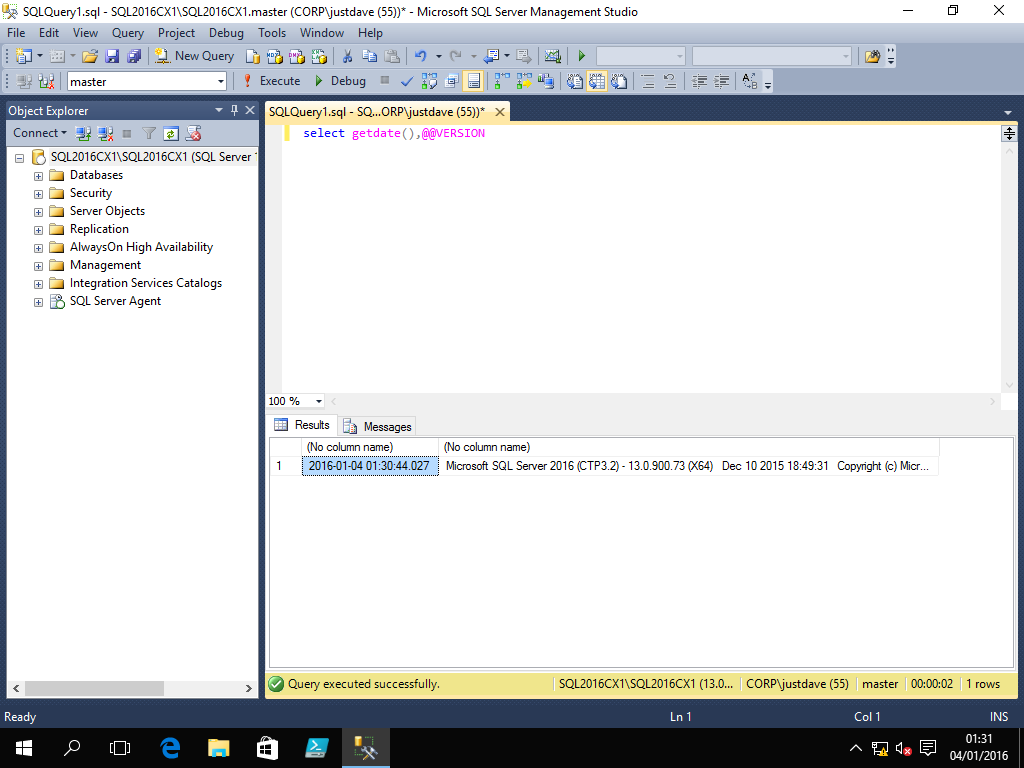
Login as CORP\justdave, browse for Database Engines and connect to SQL2016CX1\SQL2016CX1
Start a new query and select @@VERSION
Final state should be
3.1.13.M Play - configure maximum failures first
In Failover Cluster Manager->Roles->Right Click on the SQL Server Role->Failover tab
Change maximum failures in the specified period e.g to 10
Play with failover,failback,taking down Win-C1/Win-C2, taking down individual network adapaters on Win-C1/Win-C2
1 node with 1 working network adapter should be enough to be able to run the query from Win-SSMS!
Final state should be
3.1.13 4 Windows Server 2016 Technical Preview 4 Cluster Build and SQL Server Installation - multi-subnet with Windows iSCSI - Cluster Shared Volume
Continuing from the previous section
Add new iSCSI Target target2 with 2 disk
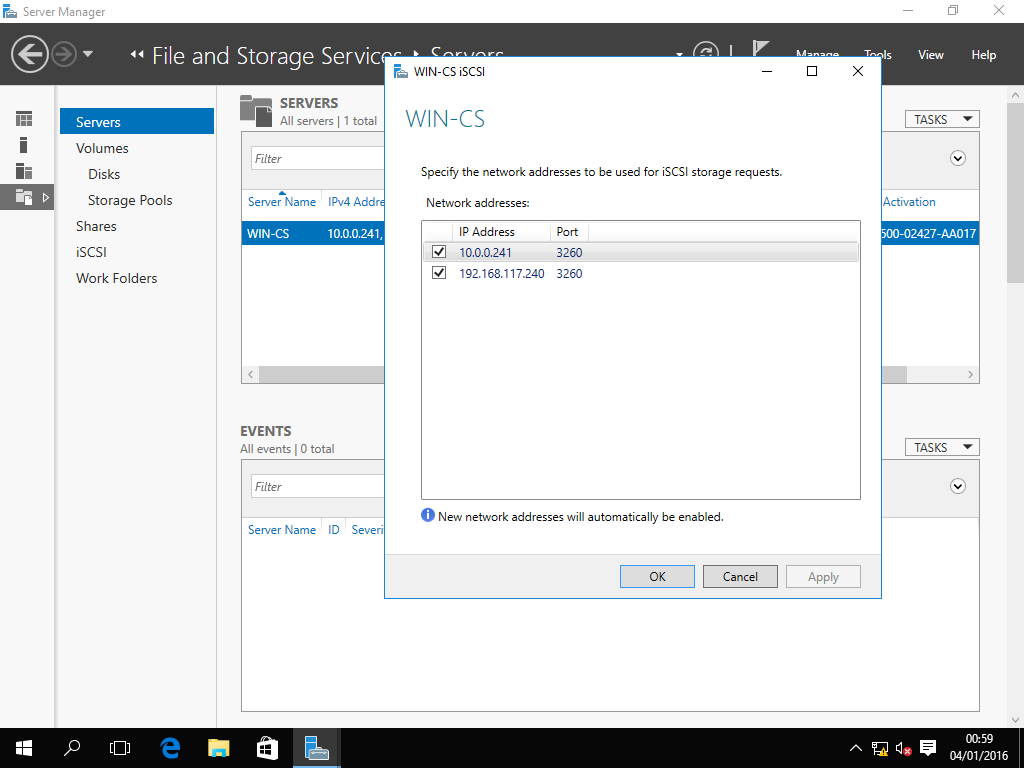
On machine Win-CS
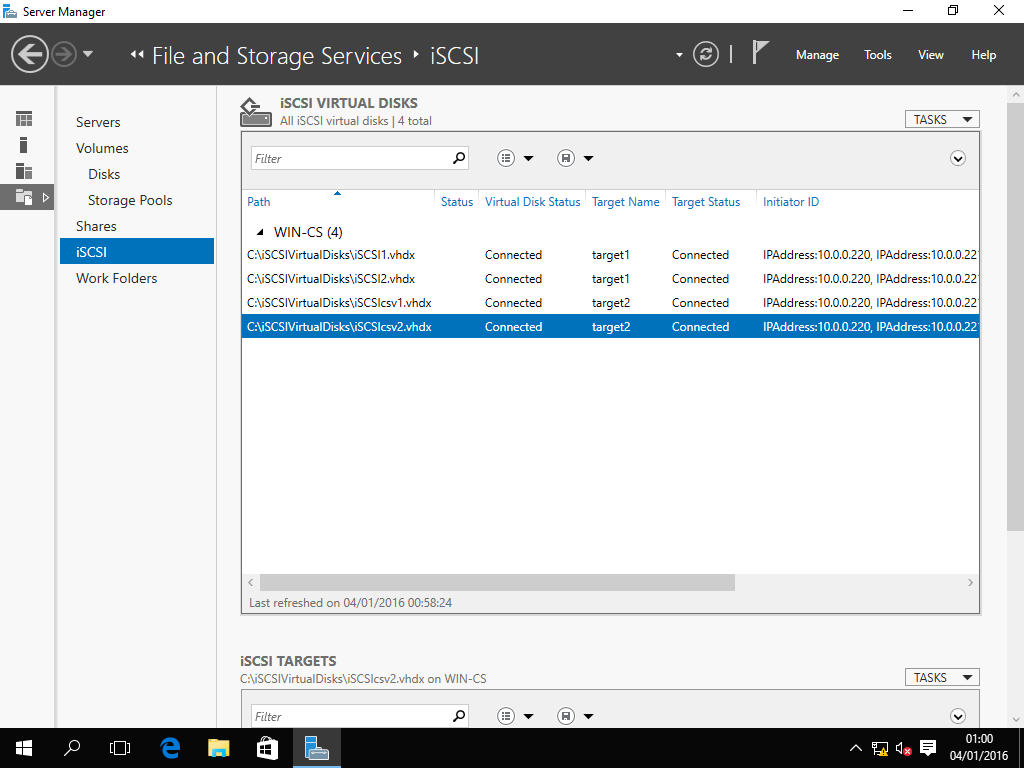
Add a new iSCSI Virtual Disk
Use the same virtual disk location, ivirtual disk name iSCSIcsv1, size 2GB
Create a new iSCSI Target target2
Use the same access servers 10.0.0.(220)/10.0.0.(221)/192.168.117.(210)/192.168.117.(211)
Use no authentication
Add a new iSCSI Virtual Disk
Use the same virtual disk location, ivirtual disk name iSCSIcsv2, size 3GB
Create a new iSCSI Target target2
Use the same access servers 10.0.0.(220)/10.0.0.(221)/192.168.117.(210)/192.168.117.(211)
Use no authentication
On host Win-C1 - first windows cluster node
Server Manager->Tools->iSCSI
Targets tab->under discovered targets click Refresh
target2 should appear
Click Connect
Select enable multi-path and Advanced, add Microsoft iSCSI Initator with first initiator/target portal IP addresses 192.168.117.x
Click on target2 and Properties->Add session
Select enable multi-path and Advanced, add Microsoft iSCSI Initator with first initiator/target portal IP addresses 10.0.0.x
Click OK,OK
On Volumes and Devices tab click Autoconfigure
Repeat on machine Win-C2
Start->Disk Management->Initilize disks with GPT, online,add simple volume,offline
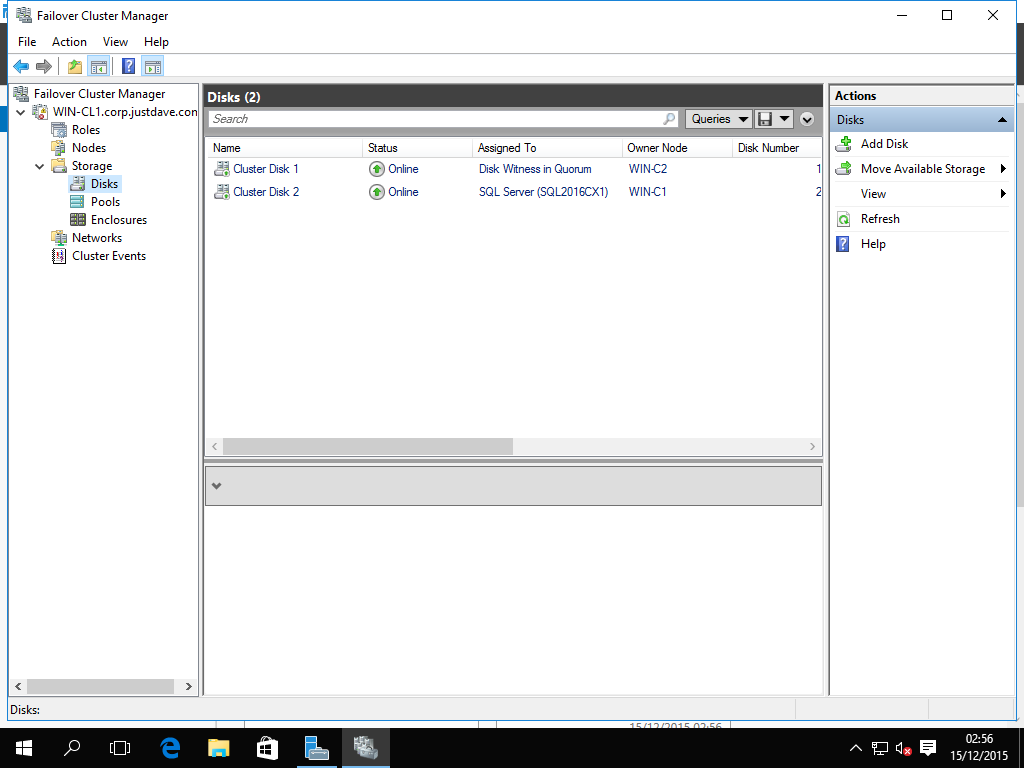
Start->Tools->Failover Cluster Manager->Cluster Name->Storage
Right click on Disks->Add disk, add both disks
Right Click on Cluster Disk 3 (2GB) and "Add to Cluster Shared Volumes"
Goto C:\ClusterStorage, Rename Volume1 to CSV1
Install SQL Server Cluster Win-C1
Install SQL Server Cluster Instance with just DBEngine on Win-C1
SQL Server name SQL2016CX2
For Cluster disk selection leave at the default even if it is not the disk for the cluster shared volume!
For Cluster network configuration choose IP Address (192.168.117).243 and (10.0.0.).242
For Server Configuration add user CORP\justdave
For Database engine configuration go to Data Directories tab
Change Data Root Directoy to C:\ClusterStorage\CSV1
Click Next then Install
Install SQL Server Cluster Win-C2
Install SQL Server FCI Additional Node on Win-C2 - accept defaults
Fixup cluster dependencies for Role SQL2016CX2
In Failover Cluster Manager
Storage->Disks->Disk which is not the Cluster Shared Volume->right click->Remove from SQL2016CX2
Roles->SQL Server (SQL2016CX2)->Bottom Pane->Server Name SQL2016CX2->Properties->Dependencies->Change AND to OR
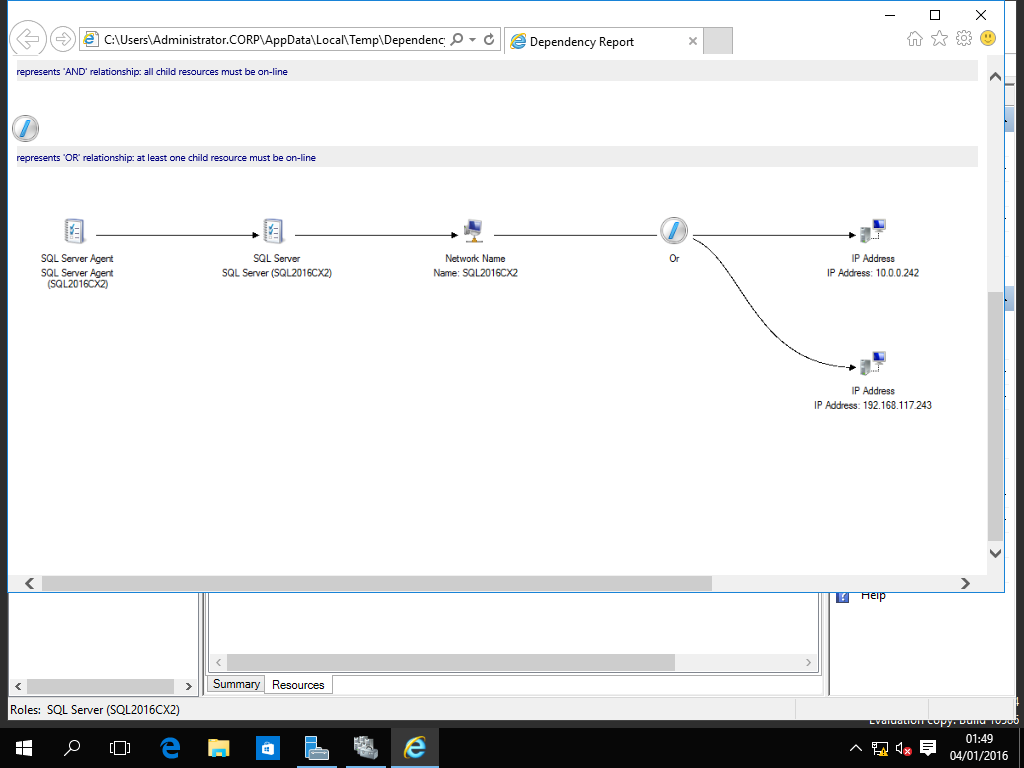
Roles->Right click on SQL Server (SQL2016CX2)->More Actions->Show dependency report
This should show SQL Agent->SQL Server->Network Name->OR relationshop for 2 IP Addresses
Note there is no dependency on disks, the cluster shared volume is always up on all nodes!
Cluster Shared Volumes are a true clustered filesystem with all nodes having read/write access
SMB 3.0 is used as the underlying protocol
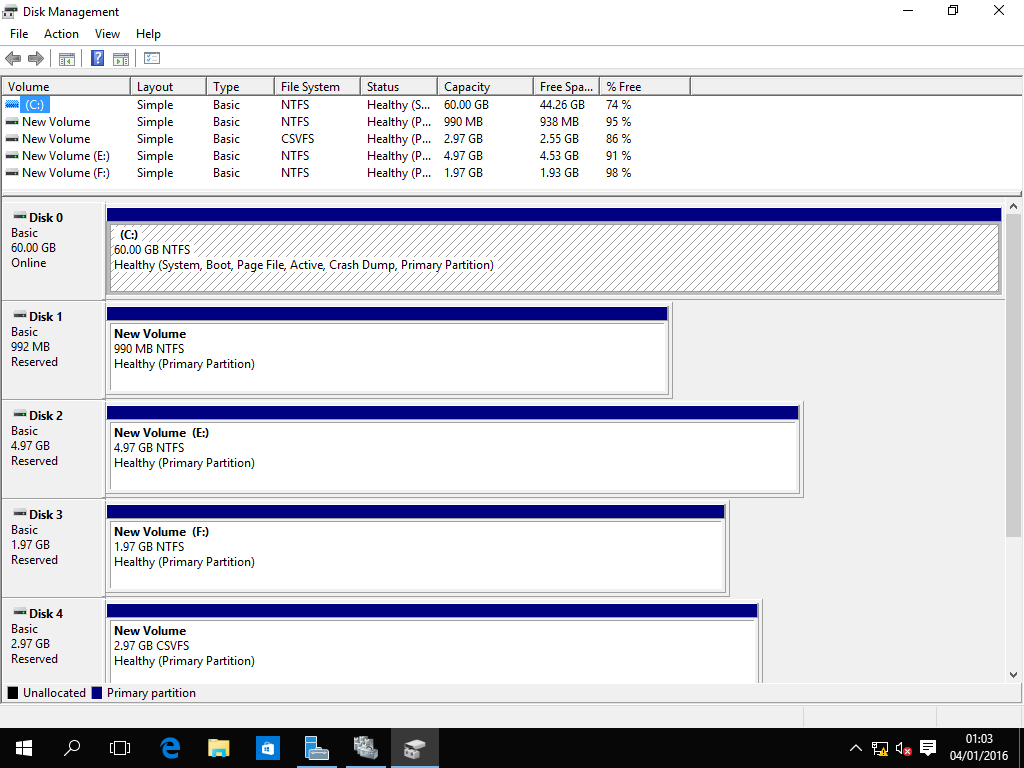
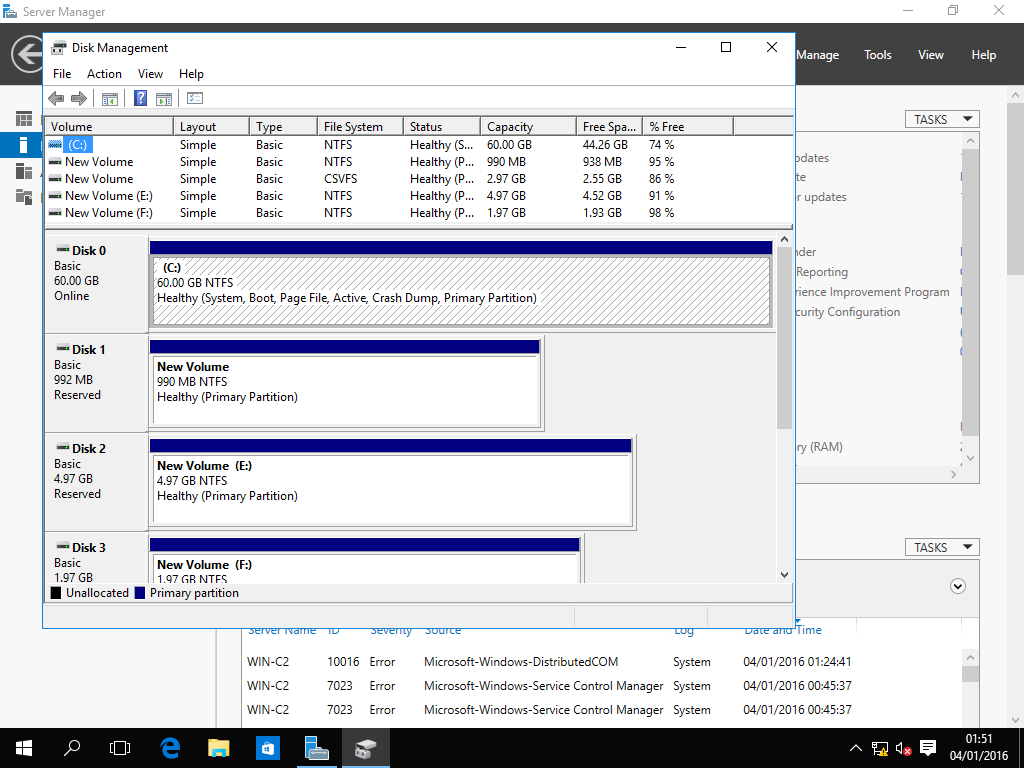
In Disk Management the disk will show a Volume of type CVFS
Final state should be
3.1.15 Windows Server 2016 Technical Preview 4 Cluster Build and SQL Server Installation - multi-subnet with Windows iSCSI - Storage Replica
This is for a play environment only!
This is incomplete - if Node 1 goes offline the SQL Server role fails!
Start off with building a Windows Cluster as per above:
- Machine WIN-CP Domain Controller
- Machine WIN-CS iSCSI Storage
- Machine WIN-C1 Cluster Node 1
- Machine WIN-C2 Cluster Node 2
- Machine WIN-SSMS SQL Server Managment Studio December 2015 - client for connection tests
3.1.15.A Add 2 iSCSI disks (SR data and SR log) on a new iSCSI Target target 3 for machine WIN-C1
Server Manager->File and Storage Services->iSCSI
Right click in top window->New iSCSI Virtual disk
Use default location
Disk Name iSCSIsrd1-C1, Size 6GB
New iSCSI Target target3
Access only to IP addresses (192.168.117).210 and (10.0.0).220
Add a new disk iSCSIsrl1-C1, Size 8GB, use existing iSCSI Target target3
3.1.15.B Add 2 iSCSI disks (SR data and SR log) on a new iSCSI Target target 4 for machine WIN-C2
Server Manager->File and Storage Services->iSCSI
Right click in top window->New iSCSI Virtual disk
Use default location
Disk Name iSCSIsrd1-C2, Size 6GB
New iSCSI Target target4
Access only to IP addresses (192.168.117).211 and (10.0.0).221
Add a new disk iSCSIsrl1-C2, Size 8GB, use existing iSCSI Target target4
Add disks to iSCSI initators on both clusters nodes Win-C1/Win-C2
Server Manager -> Tools -> iSCSI Initiator
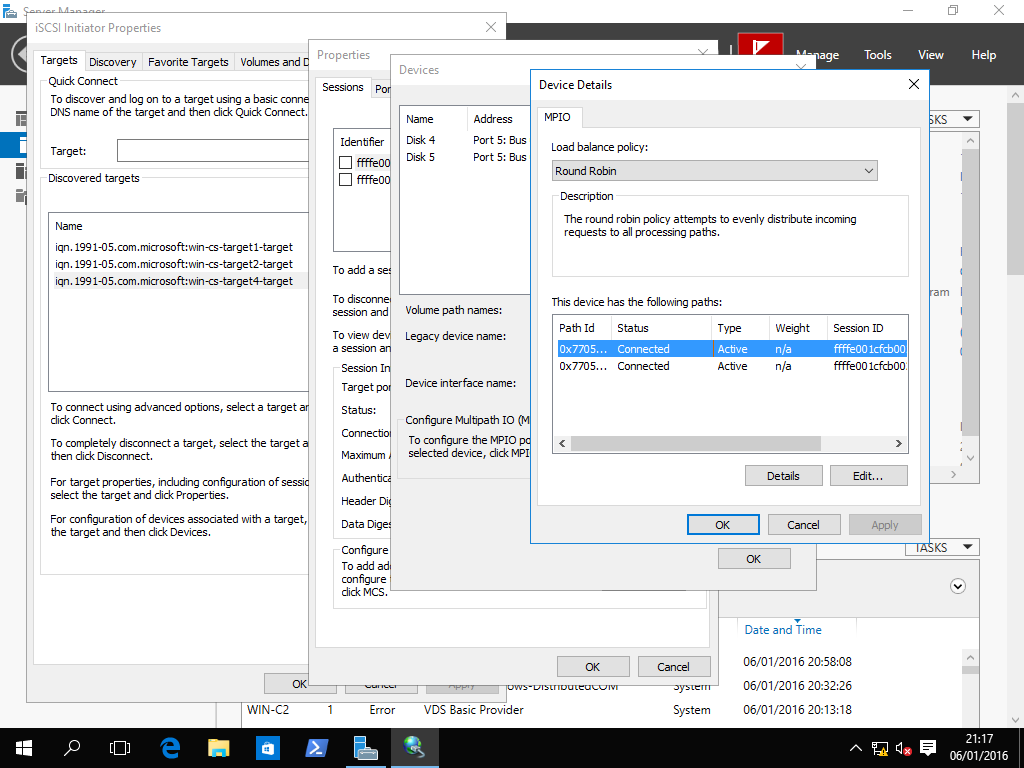
Target tab-> Refresh->Connect->Enable multi-path
Select target3->properties
Disconnect the session, add 2 sessions with multipath using both networks (192.168.117)/(10.0.0) settings source and target ips
For each session click on Devices->MPIO->Details check all devices have 2 paths
Repeat on machine Win-C2 for iSCSI Target target4
3.1.15.C Initialize both sets of disks and start Cluster Shared Volume setup
Initialize both disks as GPT disks with a simple volume and disk letter F: (data)/G:(log)
Start->Disk Management
For each disk Online->Initialize Disk->change to GPT->Add a new simple volume with all defaults
Right click on Volumes, Change drive letter and paths, Make 6GB disk F:, 8GB disk G:
On machine Win-C1
Tools->Failover Cluster Manager->Storage->Disks
Right Click,add both 6GB disks
Scroll right on the list of disks and check which of the 6GB disks in not connected to the node
Pick the 6GB disk which IS connected to the node, right click and "Add to Cluster Shared Volumes
3.1.15.D Add Windows Volume Replication to both cluster nodes
To both cluster nodes add Feature "Windows Volume Replication"
Server Manager -> Manage->Add roles and features
Next until features screen appears
Add "Storage Replica" and any additionla requirements - this is includes Powershell modules!
A reboot is needed to complete the installation
3.1.15.E Enable Replication for the Cluster Shared Volume
Once both nodes have installed and rebooted go back into Failover Cluster Manager
Storage->Disks, right click in right pane->Refresh
Right Click Disks->Add disk, add the remaining disks
Right click on the same 6GB disk from above -> Replication ->Enable
Select the destination data disk,source log disk and destingation log disk
On the seeded disk screen, select default "Overwrite destination volume"
On the consistency group screen, select not "Highest Performance"! but "Enable Write Ordering"
This is needed for SQL Server
3.1.15.F Monitor the sync progress until both disks are ContinuouslyReplicating
We can check the sync progress via Powershell
Once sync is complete the replicas go into ContinuouslyReplicating state
Get-SRGroup ComputerName : WIN-CL1 Description : Id : 37a13276-6451-4a26-97f0-5644e51af699 IsAutoFailover : True IsCluster : True IsInPartnership : True IsPrimary : True IsSuspended : False IsWriteConsistency : True LastInSyncTime : LogSizeInBytes : 8589934592 LogVolume : C:\ClusterStorage\Volume2 Name : Replication 1 NumOfReplicas : 1 Partitions : {ef4cf2ea-2c27-4e47-92c4-1b093b8a1ea9} Replicas : {MSFT_WvrReplica (PartitionId = "ef4cf2ea-2c27-4e47-92c4-1b093b8a1ea9")} ReplicationMode : Synchronous ReplicationStatus : ReplicationSuspended PSComputerName : ComputerName : WIN-CL1 Description : Id : 913be6e8-0769-46a2-b8e4-fccd2d4c1e2c IsAutoFailover : True IsCluster : True IsInPartnership : True IsPrimary : False IsSuspended : False IsWriteConsistency : True LastInSyncTime : LogSizeInBytes : 8589934592 LogVolume : G:\ Name : Replication 2 NumOfReplicas : 1 Partitions : {793cfa23-45f8-4af4-a5f8-4c97b566f10d} Replicas : {MSFT_WvrReplica (PartitionId = "793cfa23-45f8-4af4-a5f8-4c97b566f10d")} ReplicationMode : Synchronous ReplicationStatus : ReplicationSuspended PSComputerName : Get-SRPartnership DestinationComputerName : WIN-CL1 DestinationRGName : Replication 2 SourceComputerName : WIN-CL1 SourceRGName : Replication 1 PSComputerName : NOTE: There are 2 replicas, one for data disk and 1 for log disk! (Get-SRGroup).replicas | Select-Object DataVolume,ReplicationStatus,NumOfBytesRecovered,NumOfBytesRemaining DataVolume ReplicationStatus NumOfBytesRecovered NumOfBytesRemaining ---------- ----------------- ------------------- ------------------- C:\CLUSTERSTORAGE\VOLUME1 InitialBlockCopy 0 0 \\?\VOLUME{793CFA23-45F8-4AF4-A5F8-4C97B566F10D}\ InitialBlockCopy 1061158912 5345640448 (Get-SRGroup).replicas CurrentLsn : 1 DataVolume : C:\CLUSTERSTORAGE\VOLUME1 LastInSyncTime : LastKnownPrimaryLsn : 1 LastOutOfSyncTime : NumOfBytesRecovered : 0 NumOfBytesRemaining : 0 PartitionId : ef4cf2ea-2c27-4e47-92c4-1b093b8a1ea9 PartitionSize : 6406799360 ReplicationMode : Synchronous ReplicationStatus : ContinuouslyReplicating PSComputerName : CurrentLsn : 1 DataVolume : \\?\VOLUME{793CFA23-45F8-4AF4-A5F8-4C97B566F10D}\ LastInSyncTime : 07/01/2016 00:17:04 LastKnownPrimaryLsn : 1 LastOutOfSyncTime : NumOfBytesRecovered : 6406799496 NumOfBytesRemaining : 0 PartitionId : 793cfa23-45f8-4af4-a5f8-4c97b566f10d PartitionSize : 6406799360 ReplicationMode : Synchronous ReplicationStatus : ContinuouslyReplicating PSComputerName : Get-SRGroup ComputerName : WIN-CL1 Description : Id : 37a13276-6451-4a26-97f0-5644e51af699 IsAutoFailover : True IsCluster : True IsInPartnership : True IsPrimary : True IsSuspended : False IsWriteConsistency : True LastInSyncTime : LogSizeInBytes : 8589934592 LogVolume : C:\ClusterStorage\Volume2 Name : Replication 1 NumOfReplicas : 1 Partitions : {ef4cf2ea-2c27-4e47-92c4-1b093b8a1ea9} Replicas : {MSFT_WvrReplica (PartitionId = "ef4cf2ea-2c27-4e47-92c4-1b093b8a1ea9")} ReplicationMode : Synchronous ReplicationStatus : ContinuouslyReplicating PSComputerName : ComputerName : WIN-CL1 Description : Id : 913be6e8-0769-46a2-b8e4-fccd2d4c1e2c IsAutoFailover : True IsCluster : True IsInPartnership : True IsPrimary : False IsSuspended : False IsWriteConsistency : True LastInSyncTime : 07/01/2016 00:17:04 LogSizeInBytes : 8589934592 LogVolume : G:\ Name : Replication 2 NumOfReplicas : 1 Partitions : {793cfa23-45f8-4af4-a5f8-4c97b566f10d} Replicas : {MSFT_WvrReplica (PartitionId = "793cfa23-45f8-4af4-a5f8-4c97b566f10d")} ReplicationMode : Synchronous ReplicationStatus : ContinuouslyReplicating PSComputerName :Final State is:
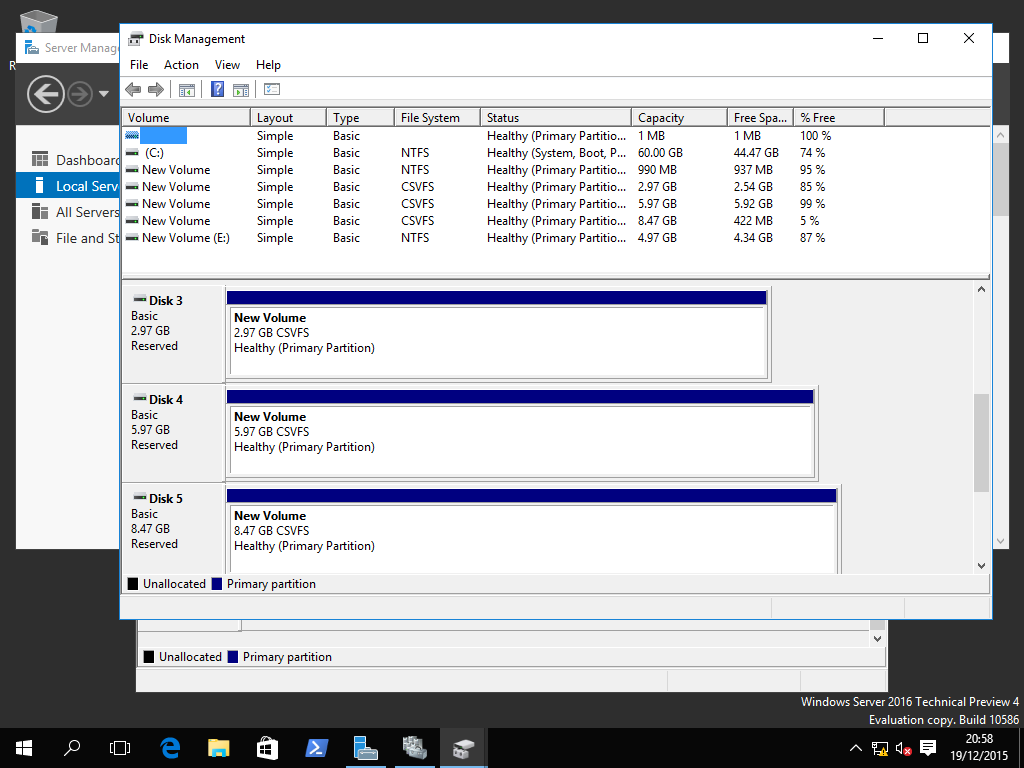
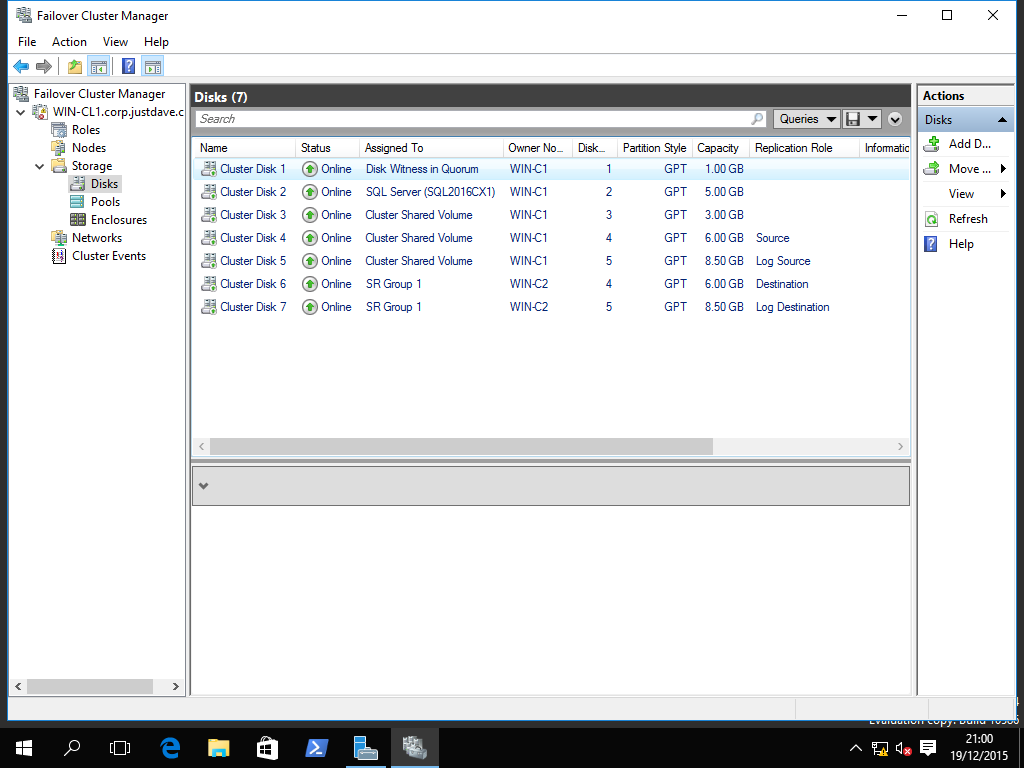
Node WIN-C1 iSCSI (target 3,disks 4 and 5)
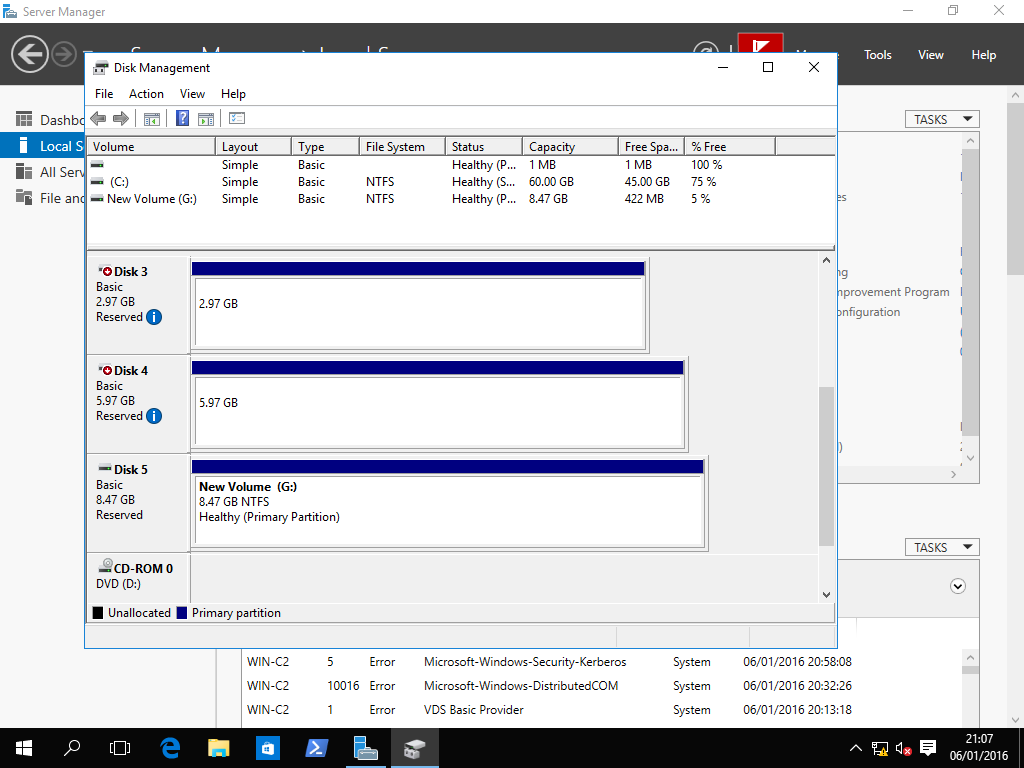
Node WIN-C2 iSCSI (target 4,disks 4 and 5)
Node WIN-C1 Disk Management (disks 4 and 5)
Node WIN-C2 Disk Management (disks 4 and 5)
Failover Cluster Manager->Storage->Disks, Cluster Disks 4-7
3.1.15.G Validate the Cluster again
In Failover Cluster Manager stop all roles,right click on the cluster name and validate the cluster
I received the following warnings
- Cluster Configuration->List Cluster Volumes->Physical Disk resource Cluster Disk 6 has a value for the property named DiskrunChkDsk that is not the default value. The current value is 6, which indicates that the volumes on the physical disk resource will not be mounted and the disk will be in an offline read/write state. Some programs or storage utilities may be able to do I/O with the disk using raw block level I/O.
- Cluster Configuration->Validate Resource State-> Analysis Services was offline, expected as the role was stopped!
- Cluster Configuration->Validate Resource State->Cluster Disk 2 was offline->Checking it was online
- Cluster Configuration->Validate Resource State->Cluster Disk 4/5/6/7 This resource has a dependency configured that makes it is dependent on another resource. This resource type is usually not dependent on other resources.
- Cluster Configuration->Validate Resource State Sql Server,SQL Agent, Cluster IPs were offline, possibly expected as the role was stopped!
- Cluster Configuration->Validate Resource State, Validating cluster resource SR 6e248e8b-7c1b-4361-83d0-ef85937707d5. This resource does not have all the nodes of the cluster listed as Possible Owners. The clustered role that this resource is a member of will not be able to start on any node that is not listed as a Possible Owner. This is cluster disks 6/7, "SR Group 1",the destination disks.
- Network->Validate Multiple Subnet Properties->The RegisterAllProvidersIP property for network name 'Name: SQL2016CX2' is set to 1. For the current cluster configuration this value should be set to 0. See below
- Network->Validate Multiple Subnet Properties->The RegisterAllProvidersIP property for network name 'Name: SQL2016CX1' is set to 1. For the current cluster configuration this value should be set to 0. See below
NOTE: As per as per Create or Configure an Availability Group Listener (SQL Server) "When RegisterAllProvidersIP = 1, any clients whose connection strings do not use MultiSubnetFailover = True, will experience high latency connections. This occurs because these clients attempt connections to all IPs sequentially. In contrast, if RegisterAllProvidersIP is changed to 0, the active IP address is registered in the Client Access Point in the WSFC cluster, reducing latency for legacy clients. Therefore, if you have legacy clients that that need to connect to an availability group listener and cannot use the MultiSubnetFailover property, we recommend that you change RegisterAllProvidersIP to 0." So it is only needed for legacy client.
3.1.15.H Install SQL Server on Clustered Shared Volume, add the Second Node
Use IP address (192.168.117).245 and (10.0.0.).244
Server name SQL2016X3
Login CORP\justdave
On the CLuster Resource Group screen use SRGroup1
On the Cluster Disk Screen add the Data Disk for the Source (the data disk for the target is not an option)
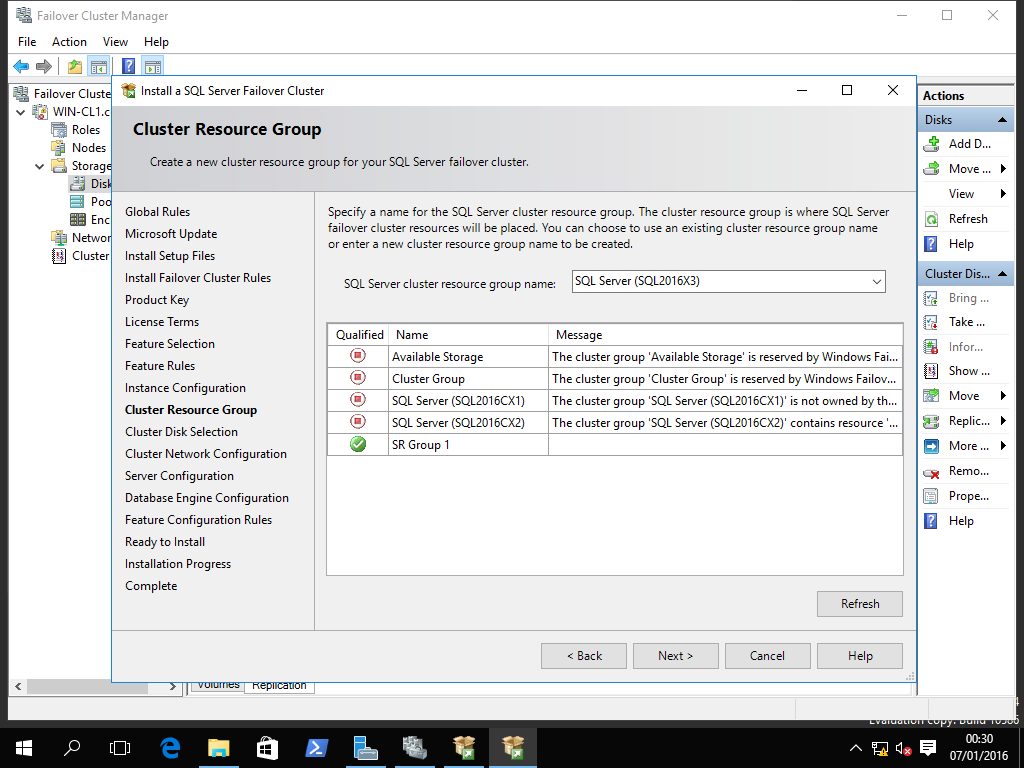
Data Directories/Tempdb will default to be on the Cluster Shared Volume C:\ClusterStorage\Volume1!
As per normal the dependency report for the SQL Server will only include the Network Name and IP addresses
3.1.16 Windows Server 2016 Technical Preview 4 Cluster Build and SQL Server Installation - standalone SQL installs with Storage Replica,floating IP and manual failover
This is for a play environment only!
Create 6 VMS
- Win-SRP - Domain Controller, Static IP Address 192.168.93.200, also DNS server and default gateway for all machines
- Win-SR1 - Standalone 1, Static IP Address 192.168.93.201
- Win-SR2 - Standalone 2, Static IP Address 192.168.93.202
- Win-SRS - To provide iSCSI storage, Static IP Address 192.168.93.203
- Win-SRMS - To provide SQL Server Management Studio, Static IP Address 192.168.93.205
Sysprep each machine and reboot
Give all machine IPv4 static network address and disable IPV6 on all machines
Build Domain Controller with root domain name justdave.contso.com
Join each machine to the domain and reboot
Logout of each machine and login as JUSTDAVE\Administrator - NEED for Test-SRTopology below!
Add iSCSI Target Role to host WinSRS
Add 2 disks iSCSIsrd1 6GB, iSCSIsrdl1 8.5GB to iSCSI Target targeta and permission for ipaddress 192.168.93.201
Add 2 disks iSCSIsrd2 6GB, iSCSIsrdl2 8.5GB to iSCSI Target targetb and permission for ipaddress 192.168.93.202
Use iSCSI Initator on both machines Win-SR1/Win-SR2 to connect to the iSCSI Portal on machine WIN-SRS
Use Disk Management on both machines Win-SR1/Win-SR2 to online both new disks and Initialize them as GPT disks
Use Disk Management on both machines to create a new simple volume on both disks and assign drive letters as Data (F:) and Log (G:)
Download DiskSPD https://gallery.technet.microsoft.com/DiskSpd-a-robust-storage-6cd2f223
Add Windows Feature Storage Replica to machines Win-SR1 and Win-SR2
This can be done in Powershell
Get-WindowsFeature
Install-WindowsFeature -Name Storage-Replica,RSAT-Storage-Replica -Restart
Test the topology, Books Online recommends for as long as possible, at leat 30 minutes or more
Command Prompt: md C:\temp cd c:\temp copy Diskspd-v2.0.15\amd64fre\diskspd.exe . fsutil file createnew f:\diskspd.dat 1073741824 diskspd.exe -c1g �d300 -W5 -C5 -b8k -t2 -o2 -r �w5 �h f:\diskspd.dat The options are: -c1g - create files of 1GB size -d300 - run test for 300 seconds (5 minutes) -W5 - warm up 5 seconds -C5 - cool down 5 seconds -b8k - block size 8k -t2 - thread per target 2 -o2 - number of outstanding I/O requests per target per thread 2 -r - random i/o -w5 - percentage of write requests 5 -h - disable both software caching and hardware write caching c:\temp\test - target testing path Powershell Test-SRTopology -SourceComputerName WIN-SR1 -SourceVolumeNames f: -SourceLogVolumeName g: -DestinationComputerName WIN-SR2 -DestinationVolumeNames f: -DestinationLogVolumeName g: -DurationInMinutes 1 -ResultPath c:\temp Validating data and log volumes... Measuring Storage Replica recovery and initial synchronization performance... Measuring Storage Replica synchronous replication performance... Test completed. Result at c:\temp\TestSrTopologyReport-2016-01-09-09-35-05.htmlSample output:
Storage Replica Test Report DiskSpd Output Now create the Storage Replication using Powershell cmdlet New-SRPartnership
New-SRPartnership -SourceComputerName WIN-SR1 -SourceRGName srg1-a -SourceVolumeName f: -SourceLogVolumeName g: -DestinationComputerName WIN-SR2 -DestinationRGName srg1-b -DestinationVolumeName f: -DestinationLogVolumeName g: -LogSizeInBytes 2gb DestinationComputerName : WIN-SR2 DestinationRGName : srg1-b SourceComputerName : WIN-SR1 SourceRGName : srg1-a PSComputerName : Get-SRGroup ComputerName : WIN-SR1 Description : Id : 7dcd08f4-3258-4293-9431-f77c027c9477 IsAutoFailover : IsCluster : False IsInPartnership : True IsPrimary : True IsSuspended : False IsWriteConsistency : False LastInSyncTime : LogSizeInBytes : 2147483648 LogVolume : g:\ Name : srg1-a NumOfReplicas : 1 Partitions : {d69017e9-6df3-4156-9ed8-24863abaf754} Replicas : {MSFT_WvrReplica (PartitionId = "d69017e9-6df3-4156-9ed8-24863abaf754")} ReplicationMode : Synchronous ReplicationStatus : InitialBlockCopy PSComputerName : Get-SRPartnership DestinationComputerName : WIN-SR2 DestinationRGName : srg1-b SourceComputerName : WIN-SR1 SourceRGName : srg1-a PSComputerName : (Get-SRGroup).replicas | Select-Object DataVolume,ReplicationStatus,NumOfBytesRecovered,NumOfBytesRemaining DataVolume ReplicationStatus NumOfBytesRecovered NumOfBytesRemaining ---------- ----------------- ------------------- ------------------- F:\ ContinuouslyReplicating 0 0We practice failover and failback
Set-SRPartnership -NewSourceComputerName WIN-SR2 -SourceRGName srg1-b -DestinationComputerName WIN-SR1 -DestinationRGName srg1-a Confirm Are you sure you want to perform this action? Performing operation "Set Source Replication Group" to replication group srg1-b. This may result in data loss. Are you sure you want to continue? [Y] Yes [A] Yes to All [N] No [L] No to All [S] Suspend [?] Help (default is "Y"): Y Get-SRGroup ComputerName : WIN-SR1 Description : Id : 7dcd08f4-3258-4293-9431-f77c027c9477 IsAutoFailover : IsCluster : False IsInPartnership : True IsPrimary : False IsSuspended : False IsWriteConsistency : False LastInSyncTime : 09/01/2016 10:19:24 LogSizeInBytes : 2147483648 LogVolume : g:\ Name : srg1-a NumOfReplicas : 1 Partitions : {d69017e9-6df3-4156-9ed8-24863abaf754} Replicas : {MSFT_WvrReplica (PartitionId = "d69017e9-6df3-4156-9ed8-24863abaf754")} ReplicationMode : Synchronous ReplicationStatus : ContinuouslyReplicating PSComputerName : Get-SRPartnership DestinationComputerName : WIN-SR1 DestinationRGName : srg1-a SourceComputerName : WIN-SR2 SourceRGName : srg1-b PSComputerName :Now disable the replication
First remove Partnership from source side:
Get-SRPartnership | Remove-SRPartnership Confirm Are you sure you want to perform this action? This action will remove partnership between source group srg1-b and destination group srg1-a. Are you sure you want to continue? [Y] Yes [A] Yes to All [N] No [L] No to All [S] Suspend [?] Help (default is "Y"): ? Y - Continue with only the next step of the operation. A - Continue with all the steps of the operation. N - Skip this operation and proceed with the next operation. L - Skip this operation and all subsequent operations. S - Pause the current pipeline and return to the command prompt. Type "exit" to resume the pipeline. [Y] Yes [A] Yes to All [N] No [L] No to All [S] Suspend [?] Help (default is "Y"): YNext remove the Storage Replica Group on both machines
First the source side - note: we had no iSCSI connectivity at the time! Get-SRGroup ComputerName : WIN-SR1 Description : Id : 7dcd08f4-3258-4293-9431-f77c027c9477 IsAutoFailover : IsCluster : False IsInPartnership : False IsPrimary : IsSuspended : IsWriteConsistency : False LastInSyncTime : LogSizeInBytes : 2147483648 LogVolume : g:\ Name : srg1-a NumOfReplicas : 1 Partitions : {d69017e9-6df3-4156-9ed8-24863abaf754} Replicas : {MSFT_WvrReplica (PartitionId = "d69017e9-6df3-4156-9ed8-24863abaf754")} ReplicationMode : Synchronous ReplicationStatus : ReplicationSuspended PSComputerName : Get-SRGroup | Remove-SRGroup WARNING: Failed to deprovision partition d69017e9-6df3-4156-9ed8-24863abaf754, this requires manual clean up for that partition. Next the destination side Get-SRGroup ComputerName : WIN-SR2 Description : Id : 0d08f8d4-6e0a-44d2-8ff3-00c3509bbc32 IsAutoFailover : IsCluster : False IsInPartnership : False IsPrimary : IsSuspended : IsWriteConsistency : False LastInSyncTime : LogSizeInBytes : 2147483648 LogVolume : g:\ Name : srg1-b NumOfReplicas : 1 Partitions : {25c82bf2-0e71-466c-9e5b-d7455abb5bdd} Replicas : {MSFT_WvrReplica (PartitionId = "25c82bf2-0e71-466c-9e5b-d7455abb5bdd")} ReplicationMode : Synchronous ReplicationStatus : ReplicationSuspended PSComputerName : Get-SRGroup | Remove-SRGroup Get-SRGroup | Remove-SRGroup (no output) We fix the Iscsi on the source side and need to clear the Storage Replica metadata. Clear-SRMetadata -AllPartitions (no output) Clear-SRMetadata -AllLogs Confirm Are you sure you want to perform this action? Clearing orphaned log files from Storage Replica log container. Are you sure you want to continue? [Y] Yes [A] Yes to All [N] No [L] No to All [S] Suspend [?] Help (default is "Y"): Y Clear-SRMetadata -AllPartitions Confirm Are you sure you want to perform this action? Clearing partition d69017e9-6df3-4156-9ed8-24863abaf754 from Storage Replica partition database. Are you sure you want to continue? [Y] Yes [A] Yes to All [N] No [L] No to All [S] Suspend [?] Help (default is "Y"): YWe now have the F: and G: drives back on both machines
We install SQL Server with all features changing the data drive to F: both times
Note we need to add .Net Framework 3.5/Java to both machines and update the firewall rules on both machines
We add a user justdave to the domain and use this user during the install
Get-DnsServerZone ZoneName ZoneType IsAutoCreated IsDsIntegrated IsReverseLookupZone IsSigned -------- -------- ------------- -------------- ------------------- -------- _msdcs.justdave.contso.com Primary False True False False 0.in-addr.arpa Primary True False True False 127.in-addr.arpa Primary True False True False 255.in-addr.arpa Primary True False True False justdave.contso.com Primary False True False False On machine Win-SRP: Add-DnsServerResourceRecordA -Name "WIN-SRC1" -ZoneName "justdave.contso.com" -AllowUpdateAny -IPv4Address "192.168.93.210" On machine Win-SR1: Get-NetIPInterface ifIndex InterfaceAlias AddressFamily NlMtu(Bytes) InterfaceMetric Dhcp ConnectionState PolicyStore ------- -------------- ------------- ------------ --------------- ---- --------------- ----------- 5 isatap.{9D4A443A-6C55-4B3C-B... IPv6 1280 50 Disabled Disconnected ActiveStore 1 Loopback Pseudo-Interface 1 IPv6 4294967295 50 Disabled Connected ActiveStore 7 Ethernet0 IPv4 1500 10 Disabled Connected ActiveStore 1 Loopback Pseudo-Interface 1 IPv4 4294967295 50 Disabled Connected ActiveStore New-NetIPAddress -IPAddress "192.168.93.210" �InterfaceIndex 7 IPAddress : 192.168.93.210 InterfaceIndex : 7 InterfaceAlias : Ethernet0 AddressFamily : IPv4 Type : Unicast PrefixLength : 32 PrefixOrigin : Manual SuffixOrigin : Manual AddressState : Tentative ValidLifetime : Infinite ([TimeSpan]::MaxValue) PreferredLifetime : Infinite ([TimeSpan]::MaxValue) SkipAsSource : False PolicyStore : ActiveStore IPAddress : 192.168.93.210 InterfaceIndex : 7 InterfaceAlias : Ethernet0 AddressFamily : IPv4 Type : Unicast PrefixLength : 32 PrefixOrigin : Manual SuffixOrigin : Manual AddressState : Invalid ValidLifetime : Infinite ([TimeSpan]::MaxValue) PreferredLifetime : Infinite ([TimeSpan]::MaxValue) SkipAsSource : False PolicyStore : PersistentStore Get-NetIPAddress �InterfaceIndex 7 IPAddress : 192.168.93.210 InterfaceIndex : 7 InterfaceAlias : Ethernet0 AddressFamily : IPv4 Type : Unicast PrefixLength : 32 PrefixOrigin : Manual SuffixOrigin : Manual AddressState : Preferred ValidLifetime : Infinite ([TimeSpan]::MaxValue) PreferredLifetime : Infinite ([TimeSpan]::MaxValue) SkipAsSource : False PolicyStore : ActiveStore IPAddress : 192.168.93.201 InterfaceIndex : 7 InterfaceAlias : Ethernet0 AddressFamily : IPv4 Type : Unicast PrefixLength : 24 PrefixOrigin : Manual SuffixOrigin : Manual AddressState : Preferred ValidLifetime : Infinite ([TimeSpan]::MaxValue) PreferredLifetime : Infinite ([TimeSpan]::MaxValue) SkipAsSource : False PolicyStore : ActiveStore select @@SERVERNAME WIN-SR1\SQL2016S1 Remove-DnsServerResourceRecord -ZoneName "justdave.contso.com" -RRType "A" -Name "WIN-SRCL"At the point our Management Studio can connect to WIN-SR1\SQL2016S1 as a SQL server!
We move the IP Address to the other machine
On machine WIN-SR1 Remove-NetIPAddress �IPAddress 192.168.93.210 Confirm Are you sure you want to perform this action? Performing operation "Remove" on Target "NetIPAddress -IPv4Address 192.168.93.210 -InterfaceIndex 7 -Store Active" [Y] Yes [A] Yes to All [N] No [L] No to All [S] Suspend [?] Help (default is "Y"): Y Confirm Are you sure you want to perform this action? Performing operation "Remove" on Target "NetIPAddress -IPv4Address 192.168.93.210 -InterfaceIndex 7 -Store Persistent" [Y] Yes [A] Yes to All [N] No [L] No to All [S] Suspend [?] Help (default is "Y"): Y Get-NetIPAddress �InterfaceIndex 7 IPAddress : 192.168.93.201 InterfaceIndex : 7 InterfaceAlias : Ethernet0 AddressFamily : IPv4 Type : Unicast PrefixLength : 24 PrefixOrigin : Manual SuffixOrigin : Manual AddressState : Preferred ValidLifetime : Infinite ([TimeSpan]::MaxValue) PreferredLifetime : Infinite ([TimeSpan]::MaxValue) SkipAsSource : False PolicyStore : ActiveStore On machine WIN-SR2 Get-NetIPInterface ifIndex InterfaceAlias AddressFamily NlMtu(Bytes) InterfaceMetric Dhcp ConnectionState PolicyStore ------- -------------- ------------- ------------ --------------- ---- --------------- ----------- 7 isatap.{83434799-BD2D-422E-A... IPv6 1280 50 Disabled Disconnected ActiveStore 1 Loopback Pseudo-Interface 1 IPv6 4294967295 50 Disabled Connected ActiveStore 6 Ethernet0 IPv4 1500 10 Disabled Connected ActiveStore 1 Loopback Pseudo-Interface 1 IPv4 4294967295 50 Disabled Connected ActiveStore New-NetIPAddress -IPAddress "192.168.93.210" �InterfaceIndex 6 IPAddress : 192.168.93.210 InterfaceIndex : 6 InterfaceAlias : Ethernet0 AddressFamily : IPv4 Type : Unicast PrefixLength : 32 PrefixOrigin : Manual SuffixOrigin : Manual AddressState : Tentative ValidLifetime : Infinite ([TimeSpan]::MaxValue) PreferredLifetime : Infinite ([TimeSpan]::MaxValue) SkipAsSource : False PolicyStore : ActiveStore IPAddress : 192.168.93.210 InterfaceIndex : 6 InterfaceAlias : Ethernet0 AddressFamily : IPv4 Type : Unicast PrefixLength : 32 PrefixOrigin : Manual SuffixOrigin : Manual AddressState : Invalid ValidLifetime : Infinite ([TimeSpan]::MaxValue) PreferredLifetime : Infinite ([TimeSpan]::MaxValue) SkipAsSource : False PolicyStore : PersistentStore Get-NetIPAddress �InterfaceIndex 6 IPAddress : 192.168.93.210 InterfaceIndex : 6 InterfaceAlias : Ethernet0 AddressFamily : IPv4 Type : Unicast PrefixLength : 32 PrefixOrigin : Manual SuffixOrigin : Manual AddressState : Preferred ValidLifetime : Infinite ([TimeSpan]::MaxValue) PreferredLifetime : Infinite ([TimeSpan]::MaxValue) SkipAsSource : False PolicyStore : ActiveStore IPAddress : 192.168.93.202 InterfaceIndex : 6 InterfaceAlias : Ethernet0 AddressFamily : IPv4 Type : Unicast PrefixLength : 24 PrefixOrigin : Manual SuffixOrigin : Manual AddressState : Preferred ValidLifetime : Infinite ([TimeSpan]::MaxValue) PreferredLifetime : Infinite ([TimeSpan]::MaxValue) SkipAsSource : False PolicyStore : ActiveStore Now use SSMS to connect to WIN-SRC1\SQL2016S1 select @@SERVERNAME WIN-SR2\SQL2016S2 Remove-NetIPAddress �IPAddress 192.168.93.210 Confirm Are you sure you want to perform this action? Performing operation "Remove" on Target "NetIPAddress -IPv4Address 192.168.93.210 -InterfaceIndex 6 -Store Active" [Y] Yes [A] Yes to All [N] No [L] No to All [S] Suspend [?] Help (default is "Y"): Y Confirm Are you sure you want to perform this action? Performing operation "Remove" on Target "NetIPAddress -IPv4Address 192.168.93.210 -InterfaceIndex 6 -Store Persistent" [Y] Yes [A] Yes to All [N] No [L] No to All [S] Suspend [?] Help (default is "Y"): Y Get-NetIPAddress �InterfaceIndex 6 IPAddress : 192.168.93.202 InterfaceIndex : 6 InterfaceAlias : Ethernet0 AddressFamily : IPv4 Type : Unicast PrefixLength : 24 PrefixOrigin : Manual SuffixOrigin : Manual AddressState : Preferred ValidLifetime : Infinite ([TimeSpan]::MaxValue) PreferredLifetime : Infinite ([TimeSpan]::MaxValue) SkipAsSource : False PolicyStore : ActiveStoreWe now go into Services, stop all SQL Server services on both machines and set them to manual
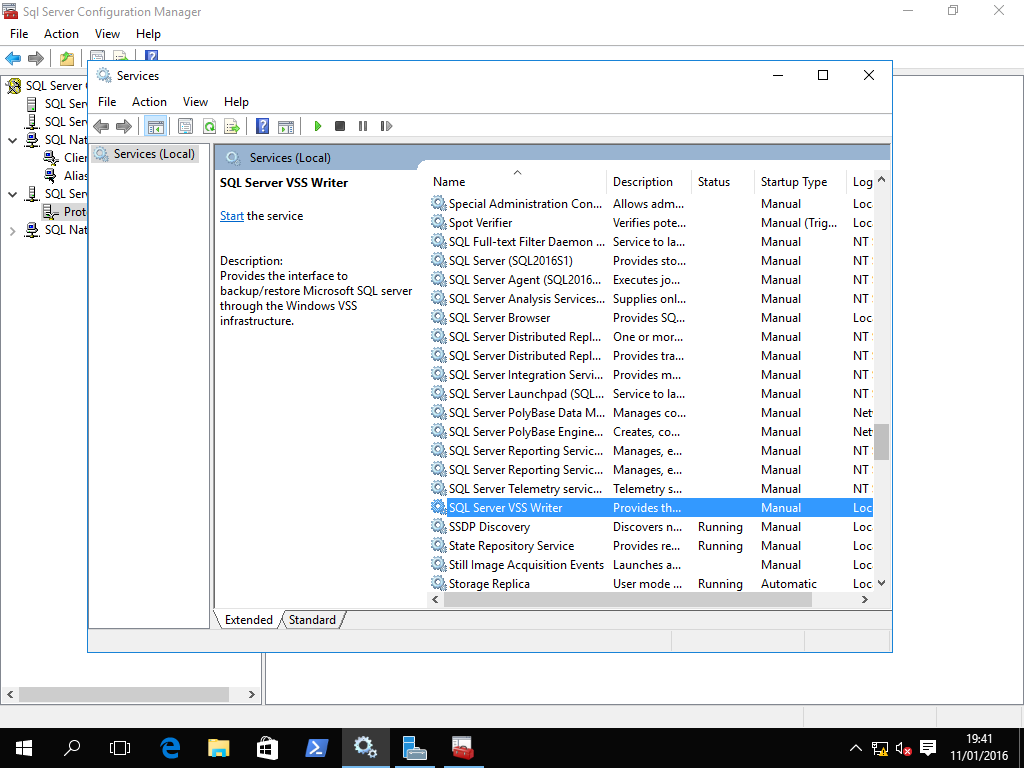
We stop both VMs WIN-SR1 and WIN-SR2 and back them up
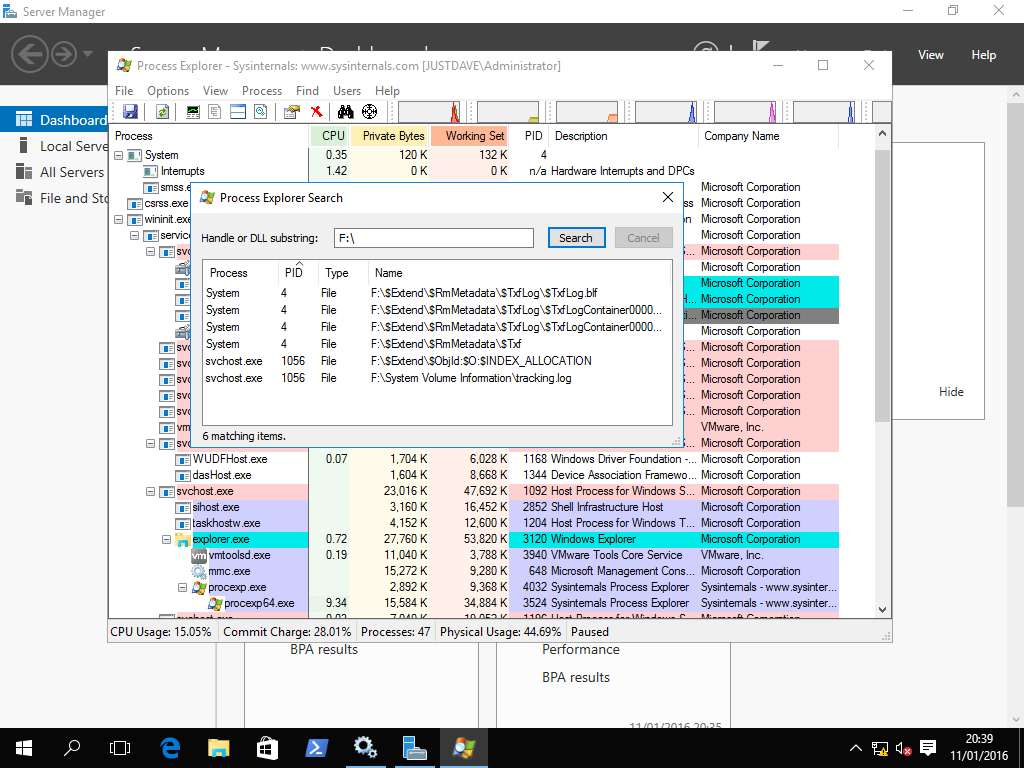
We next use Process Explorer - Find on both machines to check nothing is using the F: and G: drives
Now we enable Storage Replication from machine Win-SR1 to Win-SR2!
New-SRPartnership -SourceComputerName WIN-SR1 -SourceRGName srg1-a -SourceVolumeName f: -SourceLogVolumeName g: -DestinationComputerName WIN-SR2 -DestinationRGName srg1-b -DestinationVolumeName f: -DestinationLogVolumeName g: -LogSizeInBytes 2gb -EnableConsistencyGroups DestinationComputerName : WIN-SR2 DestinationRGName : srg1-b SourceComputerName : WIN-SR1 SourceRGName : srg1-a PSComputerName : (Get-SRGroup).replicas | Select-Object DataVolume,ReplicationStatus,NumOfBytesRecovered,NumOfBytesRemaining DataVolume ReplicationStatus NumOfBytesRecovered NumOfBytesRemaining ---------- ----------------- ------------------- ------------------- F:\ LogRecordCopyToDestination 0 0 (Get-SRGroup).replicas | fl CurrentLsn : 290 DataVolume : F:\ LastInSyncTime : LastKnownPrimaryLsn : 290 LastOutOfSyncTime : NumOfBytesRecovered : 0 NumOfBytesRemaining : 0 PartitionId : d69017e9-6df3-4156-9ed8-24863abaf754 PartitionSize : 6406799360 ReplicationMode : Synchronous ReplicationStatus : ContinuouslyReplicating PSComputerName : Now use SSMS and add a table "create table a(int b)" Shutdown the SQL Server services in Services,remove the Net-IPAddress and failover the Storage Replica Remove-NetIPAddress �IPAddress 192.168.93.210 Set-SRPartnership -NewSourceComputerName WIN-SR2 -SourceRGName srg1-b -DestinationComputerName WIN-SR1 -DestinationRGName srg1-a Confirm Are you sure you want to perform this action? Performing operation "Set Source Replication Group" to replication group srg1-b. This may result in data loss. Are you sure you want to continue? [Y] Yes [A] Yes to All [N] No [L] No to All [S] Suspend [?] Help (default is "Y"): Y Move to Machine Win-SR2 Use Get-SRGroup to ensure the Group is in Partnership and ReplicationStatus ContinuouslyReplicating Start the SQL Server services Add the Network Address New-NetIPAddress -IPAddress "192.168.93.210" �InterfaceIndex 6 Connect from SSMS and check the tables - table a is there! We shutdown machine WIN-SR1 and "create table b (c int); checkpoint;" The SQL Server is still up and writing! We check and whilst we created the table/checkpointed the LSN increased (Get-SRGroup).replicas | fl CurrentLsn : 547 DataVolume : F:\ LastInSyncTime : LastKnownPrimaryLsn : 547 LastOutOfSyncTime : NumOfBytesRecovered : 261152 NumOfBytesRemaining : 0 PartitionId : 25c82bf2-0e71-466c-9e5b-d7455abb5bdd PartitionSize : 6406799360 ReplicationMode : Synchronous ReplicationStatus : WaitingForDestination PSComputerName : (Get-SRGroup).replicas | fl CurrentLsn : 574 DataVolume : F:\ LastInSyncTime : LastKnownPrimaryLsn : 574 LastOutOfSyncTime : NumOfBytesRecovered : 261152 NumOfBytesRemaining : 0 PartitionId : 25c82bf2-0e71-466c-9e5b-d7455abb5bdd PartitionSize : 6406799360 ReplicationMode : Synchronous ReplicationStatus : WaitingForDestination PSComputerName : (Get-SRGroup).replicas | fl CurrentLsn : 576 DataVolume : F:\ LastInSyncTime : LastKnownPrimaryLsn : 576 LastOutOfSyncTime : NumOfBytesRecovered : 261152 NumOfBytesRemaining : 0 PartitionId : 25c82bf2-0e71-466c-9e5b-d7455abb5bdd PartitionSize : 6406799360 ReplicationMode : Synchronous ReplicationStatus : WaitingForDestination PSComputerName :We restart machine Win-SR1 and failback and shutdown machine Win-SR2
Remove-NetIPAddress �IPAddress 192.168.93.210 Start Machine Win-SR1 Set-SRPartnership -NewSourceComputerName WIN-SR1 -SourceRGName srg1-a -DestinationComputerName WIN-SR2 -DestinationRGName srg1-b If we check it quickly we get (Get-SRGroup).replicas | fl CurrentLsn : DataVolume : F:\ LastInSyncTime : LastKnownPrimaryLsn : LastOutOfSyncTime : NumOfBytesRecovered : NumOfBytesRemaining : PartitionId : d69017e9-6df3-4156-9ed8-24863abaf754 PartitionSize : ReplicationMode : Synchronous ReplicationStatus : ReplicationSuspended PSComputerName : (Get-SRGroup).replicas | fl CurrentLsn : 709 DataVolume : F:\ LastInSyncTime : LastKnownPrimaryLsn : 709 LastOutOfSyncTime : NumOfBytesRecovered : 1782496 NumOfBytesRemaining : 23383040 PartitionId : d69017e9-6df3-4156-9ed8-24863abaf754 PartitionSize : 6406799360 ReplicationMode : Synchronous ReplicationStatus : RecoveringFromReplicationLog PSComputerName : (Get-SRGroup).replicas | fl CurrentLsn : 729 DataVolume : F:\ LastInSyncTime : LastKnownPrimaryLsn : 729 LastOutOfSyncTime : NumOfBytesRecovered : 1782496 NumOfBytesRemaining : 0 PartitionId : d69017e9-6df3-4156-9ed8-24863abaf754 PartitionSize : 6406799360 ReplicationMode : Synchronous ReplicationStatus : ContinuouslyReplicating PSComputerName : On machine Win-SR1 New-NetIPAddress -IPAddress "192.168.93.210" �InterfaceIndex 7 Start the SQL Server services Stop machine WIN-SR2 In SSMS delete table a and b and checkpoint When we start machine Win-SR2 and check on the source Win-SR1 we get: (Get-SRGroup).replicas | fl CurrentLsn : 909 DataVolume : F:\ LastInSyncTime : LastKnownPrimaryLsn : 909 LastOutOfSyncTime : NumOfBytesRecovered : 1782496 NumOfBytesRemaining : 0 PartitionId : d69017e9-6df3-4156-9ed8-24863abaf754 PartitionSize : 6406799360 ReplicationMode : Synchronous ReplicationStatus : WaitingForDestination PSComputerName : (Get-SRGroup).replicas | fl CurrentLsn : 909 DataVolume : F:\ LastInSyncTime : LastKnownPrimaryLsn : 909 LastOutOfSyncTime : NumOfBytesRecovered : 1782496 NumOfBytesRemaining : 0 PartitionId : d69017e9-6df3-4156-9ed8-24863abaf754 PartitionSize : 6406799360 ReplicationMode : Synchronous ReplicationStatus : LogRecordCopyToDestination PSComputerName : (Get-SRGroup).replicas | fl CurrentLsn : 909 DataVolume : F:\ LastInSyncTime : LastKnownPrimaryLsn : 909 LastOutOfSyncTime : NumOfBytesRecovered : 1782496 NumOfBytesRemaining : 0 PartitionId : d69017e9-6df3-4156-9ed8-24863abaf754 PartitionSize : 6406799360 ReplicationMode : Synchronous ReplicationStatus : ContinuouslyReplicating PSComputerName : Get-WinEvent -LogName *StorageReplica/admin -max 20 | ft ProviderName: Microsoft-Windows-StorageReplica TimeCreated Id LevelDisplayName Message ----------- -- ---------------- ------- 12/01/2016 00:33:28 5015 Information Successfully established a connection to a partner replica.... 12/01/2016 00:28:38 5014 Error Connection lost to the share hosting the partner replica.... 12/01/2016 00:24:27 5015 Information Successfully established a connection to a partner replica.... 12/01/2016 00:24:26 5002 Information Source entered ready state.... 12/01/2016 00:24:26 5004 Information Source entered wait-for-quorum state.... 12/01/2016 00:24:26 1237 Information Block copy is in progress.... 12/01/2016 00:24:23 1237 Information Block copy is in progress.... 12/01/2016 00:24:18 5001 Information Entered preparation state.... 12/01/2016 00:24:18 2200 Information Start replication for replica.... 12/01/2016 00:24:18 9004 Warning Resetting the recovery bitmap.... ProviderName: Microsoft-Windows-StorageReplica-Service TimeCreated Id LevelDisplayName Message ----------- -- ---------------- ------- 12/01/2016 00:24:05 12007 Information Made this replication group the source of replication.... ProviderName: Microsoft-Windows-StorageReplica TimeCreated Id LevelDisplayName Message ----------- -- ---------------- ------- 12/01/2016 00:24:05 2202 Information Stop replication for replica.... 12/01/2016 00:24:05 5011 Information Attempted to take Replication Group offline.... 12/01/2016 00:24:05 2202 Information Stop replication for replica.... 12/01/2016 00:24:05 5014 Error Connection lost to the share hosting the partner replica.... 12/01/2016 00:20:59 5020 Information Destination entered synchronous replication state.... 12/01/2016 00:20:59 5009 Information Destination attempted to enter synchronous replication state.... 12/01/2016 00:20:59 1237 Information Block copy is in progress.... 12/01/2016 00:20:58 5001 Information Entered preparation state.... 12/01/2016 00:20:57 5015 Information Successfully established a connection to a partner replica....We have manual failover using a floating IP and Storage Replica!
3.1.17 Windows Server 2016 Technical Preview 4 Cluster Build and SQL Server CTP 3.2 - Availablity Group
We do NOT need shared storage
We use the iSCSI Targets 3 and 4 from 3.1.15 above, these are already permissioned so they can only be access via machine WIN-C1 and WIN-C2 respectively
We add 2 4GB Disks iSCSIag1-c1 (target3) and iSCSIag1 (target 4) and make these the H: drive on both machines
We add 2 standalone SQL Servers SQL2016AG1 (WIN-C1) and SQL12016AG2 (WIN-C2) with databases on the H: drive
Go into SQL Server Configuration Manager->SQL Server Services
Right click on SQL Server (SQL2016AG1)->Properties->High Availability tab->Enable AlwaysOn Availability Groups
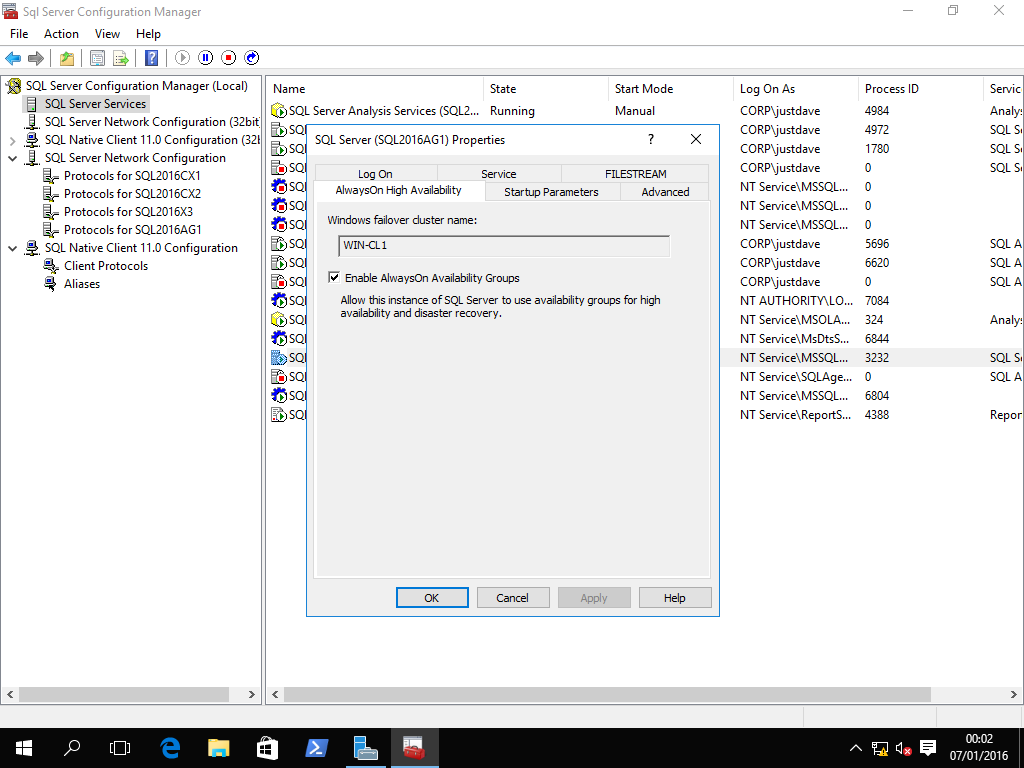
Also go into SQL Server Network Configuration->Protocols for SQL2016AG1->TCP/IP->Properties
IP Addresses tab->Edit IPAll at the bottom
Remove the 0 next to TCP Dynamic Ports
Change TCP Port to 1444
Goto into Control Panel->System and Security->Administrrative Tools->Services and restart both SQL Server services
In a command prompt Admin run
netsh advfirewall firewall add rule name="SQL Server 2016AG1" dir=in action=allow protocol=TCP localport=1444Repeat for the other SQL Server SQL2016AG2
Go into SSMS and connect to SQL2016AG1 and SQL2016AG2
Create a database on server SQL2016AG1 - justdave1 which will default to Full Recovery Model
Take a full backup and log backup of the database justdave1
In SSMS Right Click on the Database->Tasks->Backup, leave Backup Type as Full and Click OK
In SSMS Right Click on the Database->Tasks->Backup, change Backup Type to "Transaction Log" and Click OK
In the left pane go to "Always on High Availability"->Availability Groups->Right Click->New Availability Group Wizard
Set the name DemoAG1, leave the other options unticked
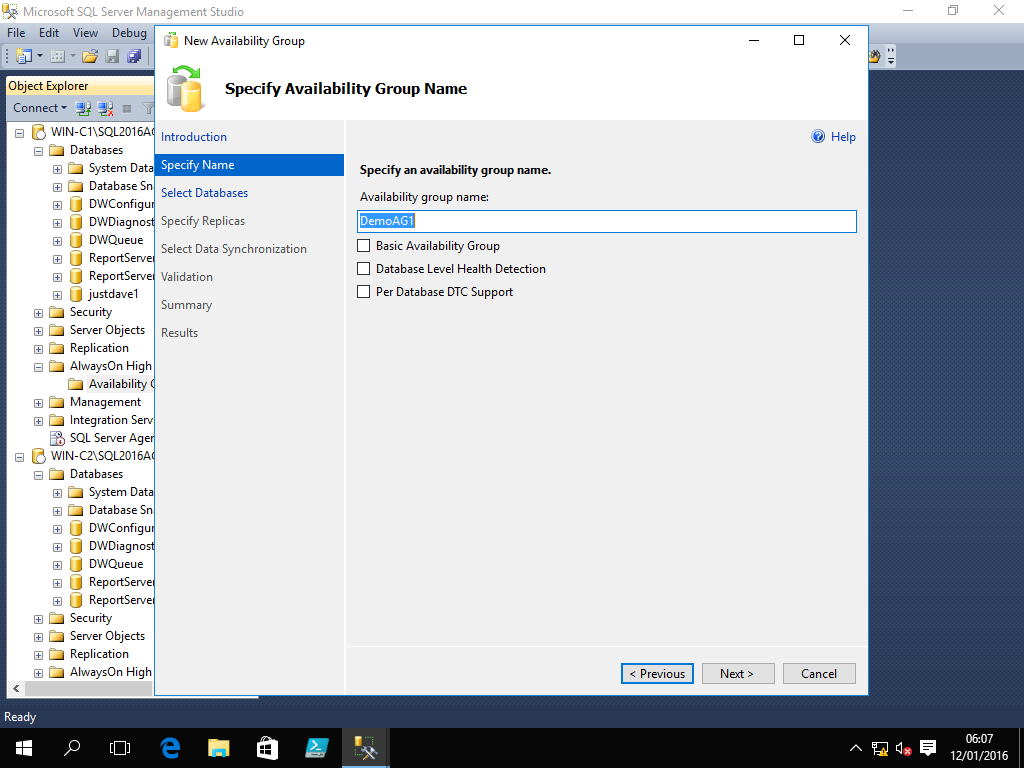
Select database justdave1, it meets the pre-requesites
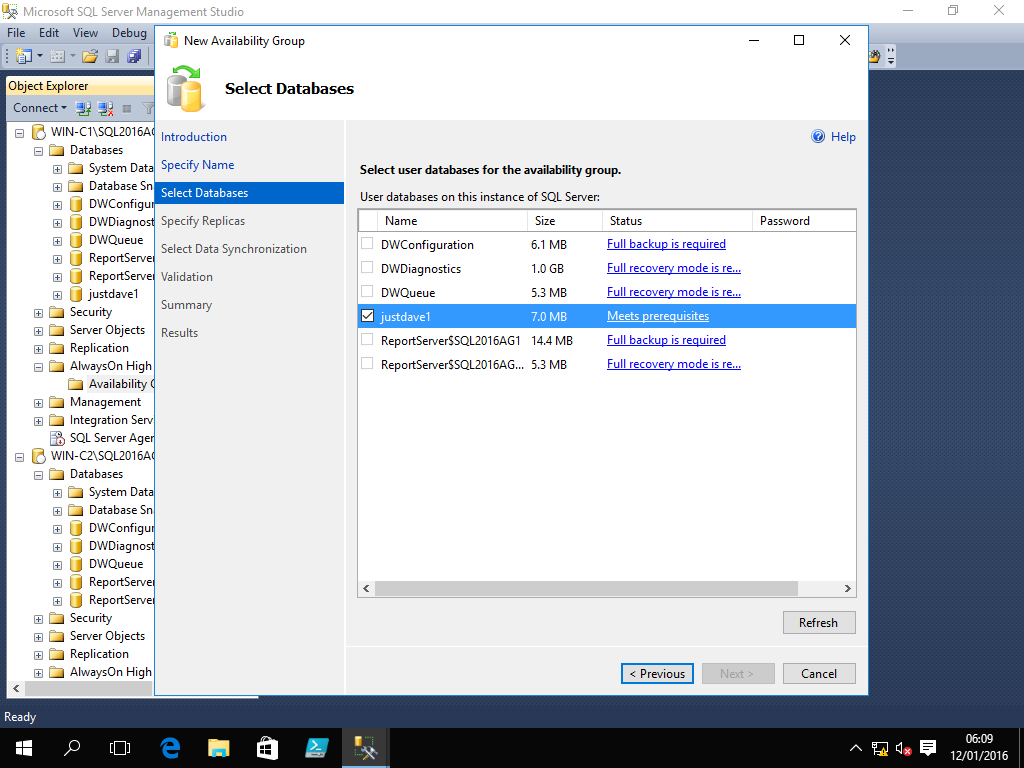
Add SQL2016AG2, enable Synchronous Commit on both the Primary and Seconday Replicas and change Readable Secondary to Yes
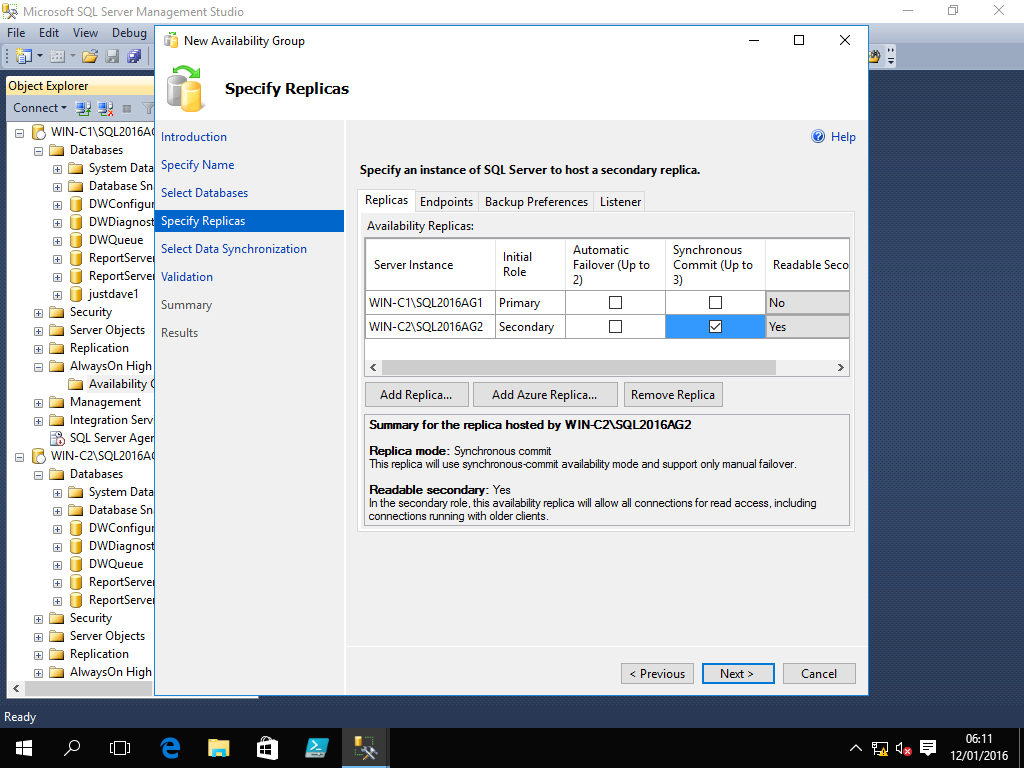
Note on the backup tab the default is to prefer the secondary
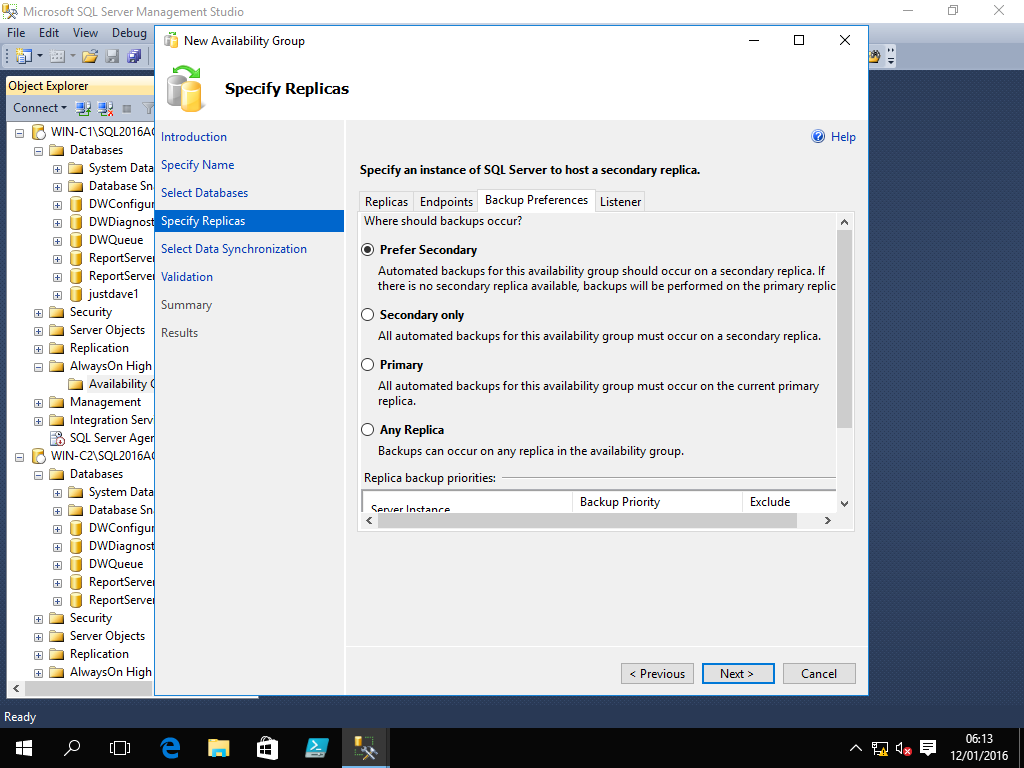
Note that for Windows authentication to be used on the communication endpoints the SQL Server must be running under a domain account
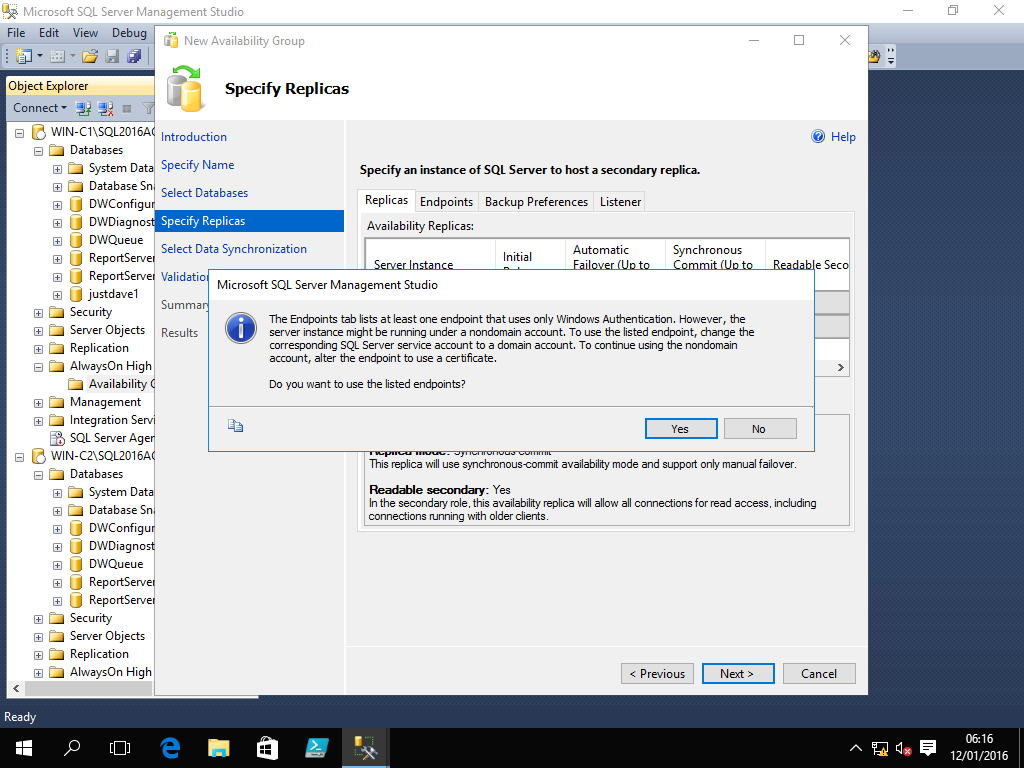
On machine Win-SSMS add a folder C:\Backups and share the folder with Advanced Sharing
Given the domain account used for the SQL Server service write access to the folder
Start another copy of SSMS and backup database justdave1 to the folder using
BACKUP DATABASE justdave1 TO DISK = '\\WIN-SSMS\Backups\justdave1.bak'Delete the backup file justdave1.bak
Open firewall port 5022 on both machines WIN-C1 and WIN-C2 for AG
netsh advfirewall firewall add rule name="SQL AG" dir=in action=allow protocol=TCP localport=5022On the "Select Data Syncronization" screen use this folder \\WIN-SSMS\Backups
Next the Validation screen appears, we will configure the listener later.
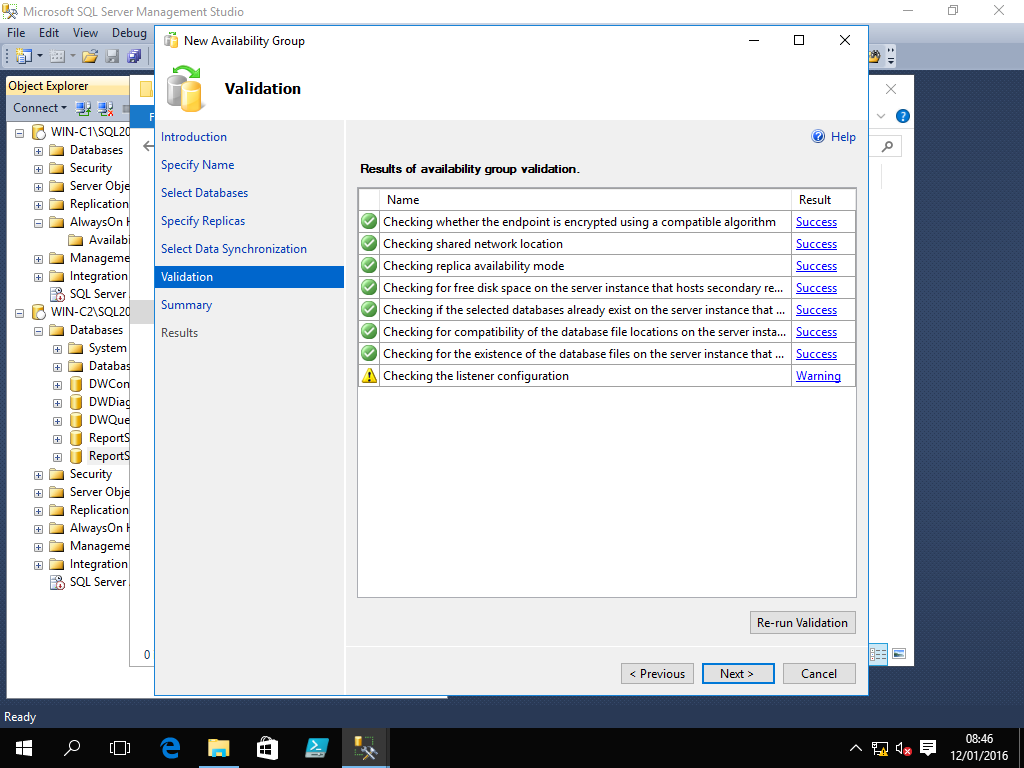
On the Summary screen click Finish
The progress is then displayed
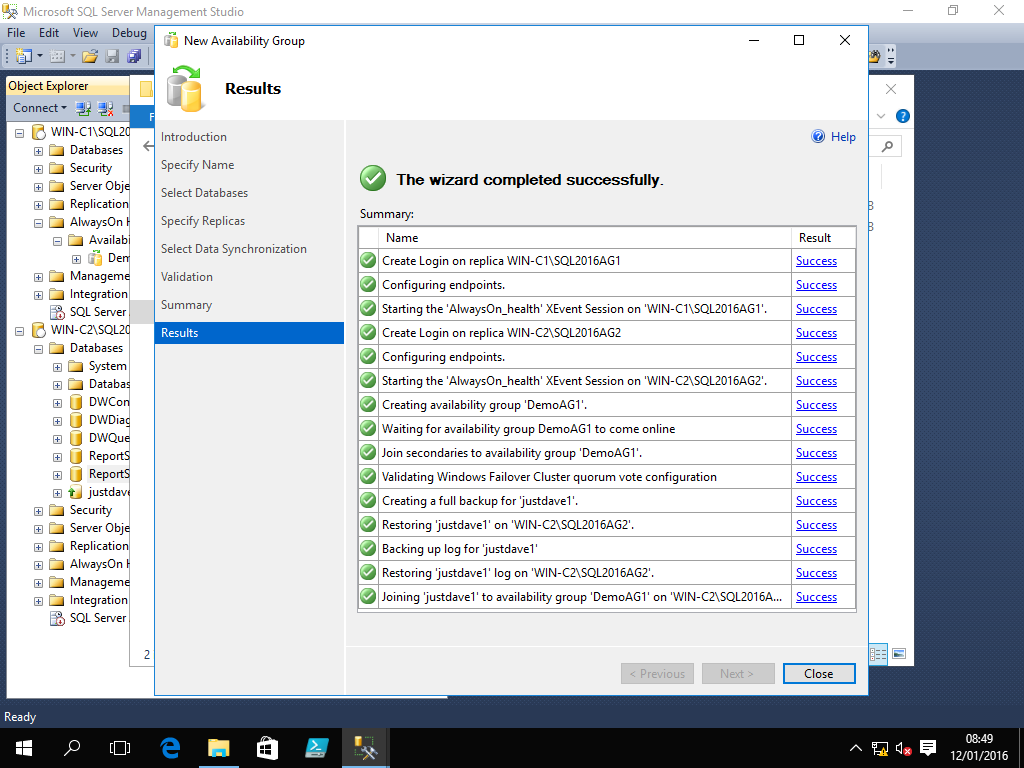
Add a Availability Group Listener
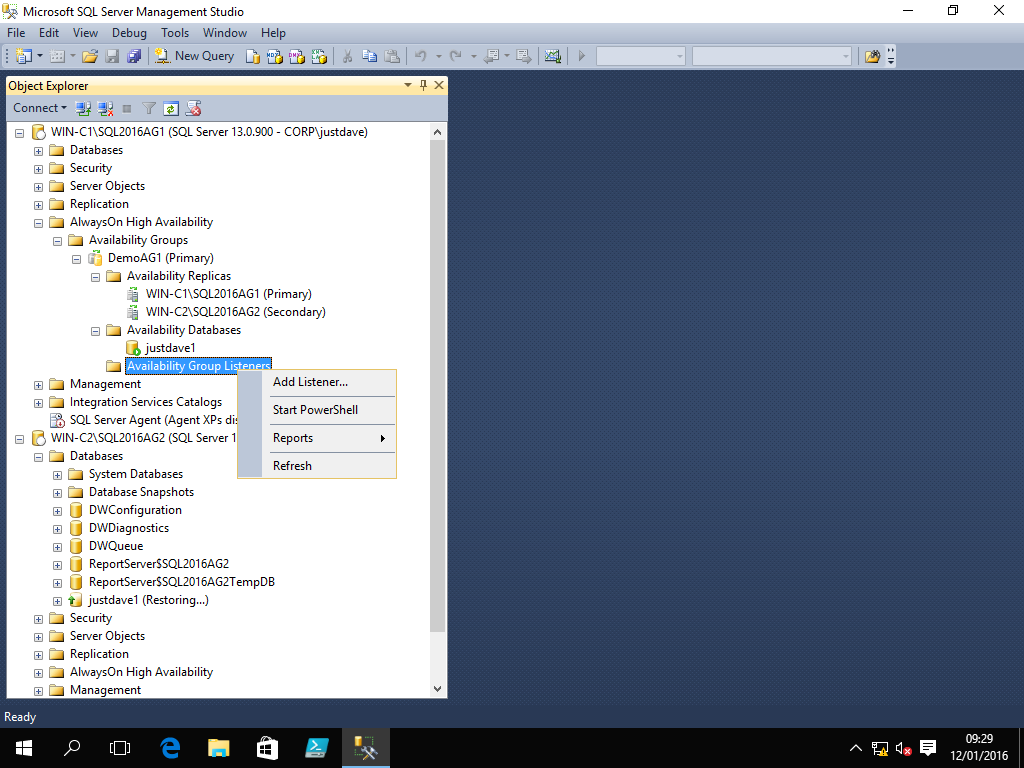
First add a firewall rule on both machines WIN-C1 and WIN-C2
netsh advfirewall firewall add rule name="SQL Server 2016AG1 Listener" dir=in action=allow protocol=TCP localport=1445Add the listener with port 1445, static ip 192.168.117.230
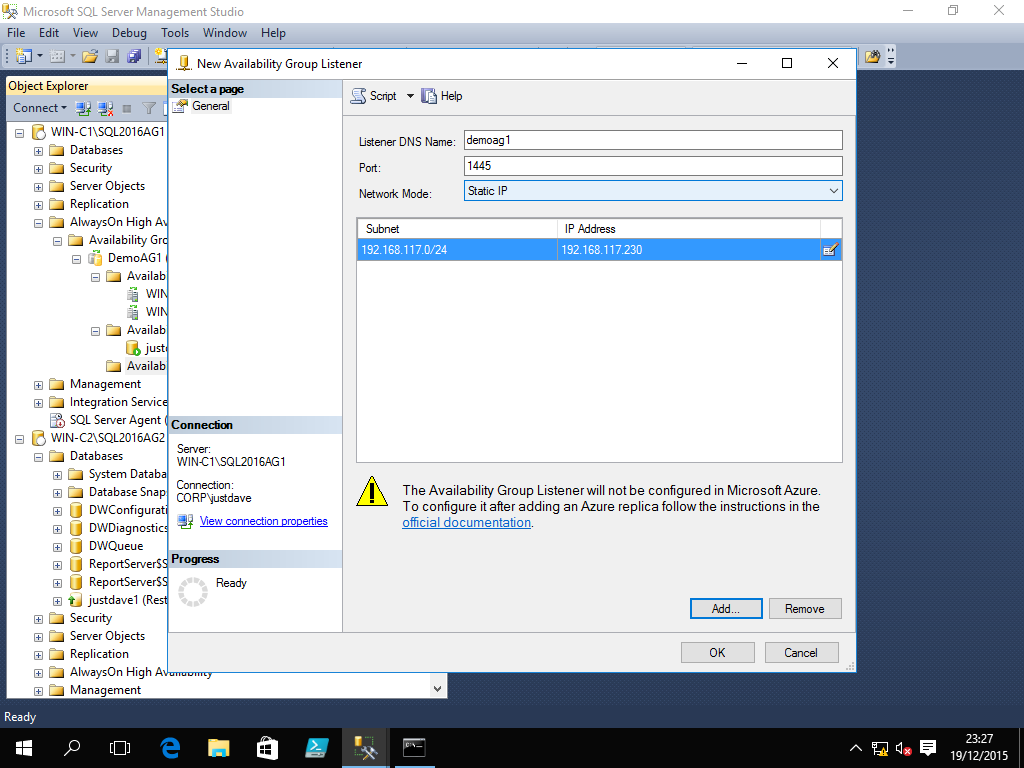
We now have a database on the replica which is syncronized and read-only
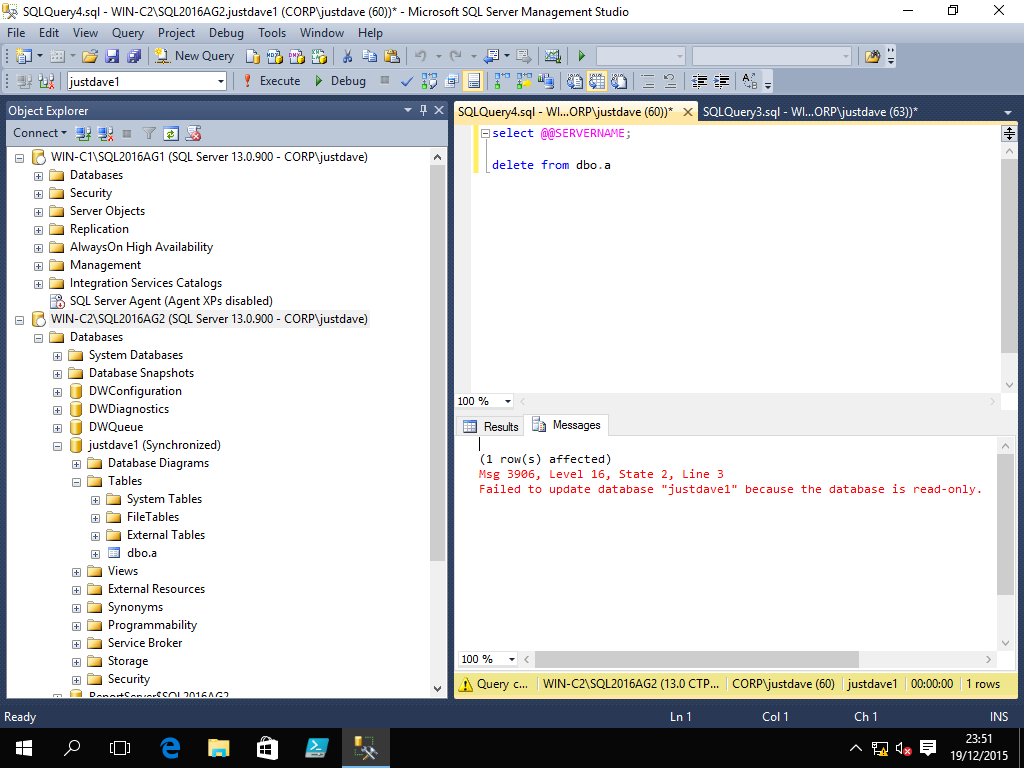
We can connect using the listener and port demoagl1,1445
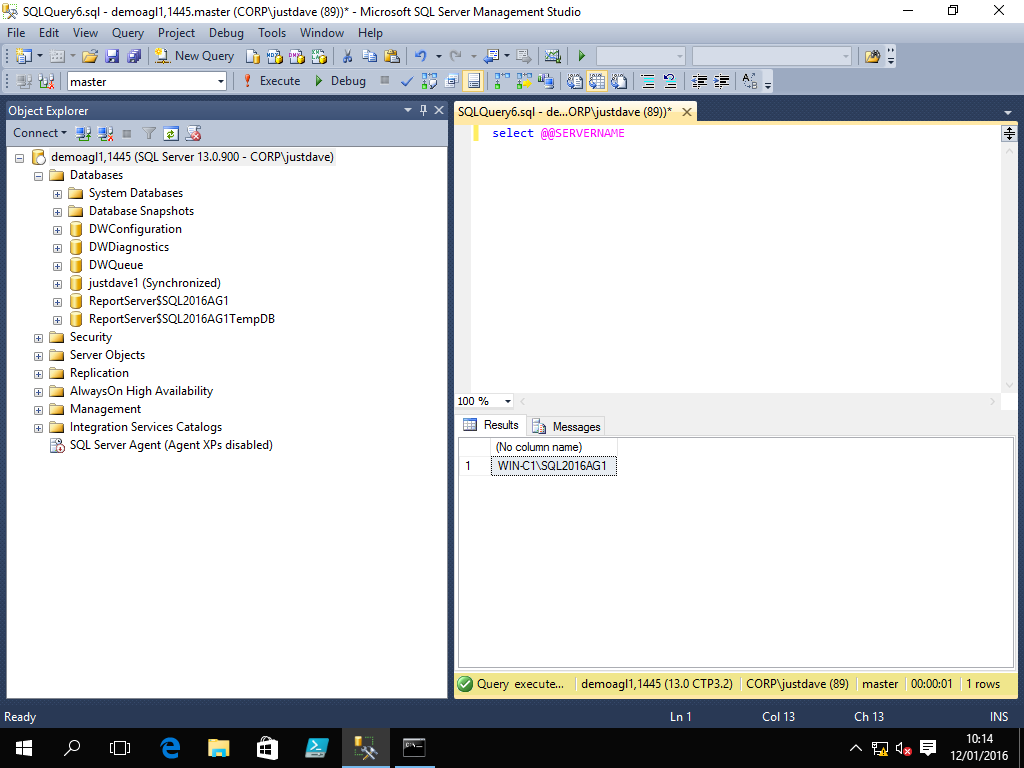
Next we perform a planned failover of the Availablity Group
NOTE: We do not specify the target for failover, the target is always assumed to be the sql server from where we issue the command!
Connect to SQL12016AG2 (planned target for failover) ALTER AVAILABILITY GROUP DemoAG1 FAILOVER;If we reconnect using the listener and select @@SERVERNAME we get to server SQL2016AG2
Similarly to failback
Connect to SQL12016AG2 (planned target for failover) ALTER AVAILABILITY GROUP DemoAG1 FAILOVER; -- Same command!We can also right click on the Availability Group in SSMS and Choose "Show Dashboard"
We can enable automatic failover
ALTER AVAILABILITY GROUP DemoAG1 MODIFY REPLICA ON 'WIN-C1\SQL2016AG1' WITH (FAILOVER_MODE = AUTOMATIC);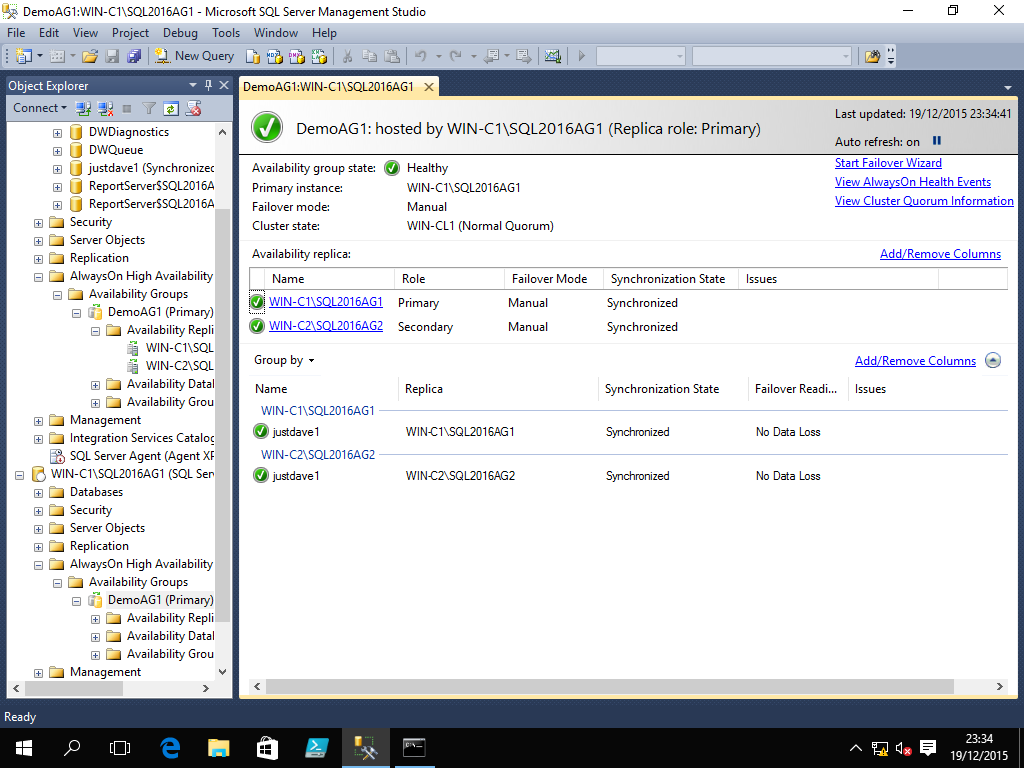
3.1.18 Windows Server 2016 Technical Preview 4 Cluster Build and SQL Server CTP 3.2 - Basic Availablity Group
We do NOT need shared storage OR a domain!
We create 4 VMs
- WIN-BAGS1 - iSCSI Storage/DNS,Static IPv4 192.168.93.200
- WIN-BAG1 - Cluster Node 1,Static IPv4 192.168.93.201
- WIN-BAG2 - Cluster Node 2,Static IPv4 192.168.93.202
- WIN3-SSMS - SSMS machine, Windows 10,Static IPv4 192.168.93.203
3.1.18.A Machine Setup
We give all machines their static IPv4 addresses,disable IPv6,keep the same DNS 192.168.93.2 and default gateway 192.168.93.2
On boths machines WIN-BAG1/WIN-BAG2, update the computer names and add a Primary DNS suffix
On boths machines WIN-BAGS1/WIN3-SSMS, update the computer names
We add a iSCSI 4GB disk (iSCSIbag1-c1) on target targetb1 permissions to IP address 192.168.93.201
We add a iSCSI 4GB disk (iSCSIbag1-c2) on target targetb2 permissions to IP address 192.168.93.202
On both machines WIN-BAG1/WIN-BAG2 using iSCSI Initiator to see the disks
On both machines WIN-BAG1/WIN-BAG2, initialize the 4GB disks as GPT disks and add a new simple volume as drive E:
Server Manger->click on computer name->Change->More, add Primary DNS suffix justdave2.contso.com
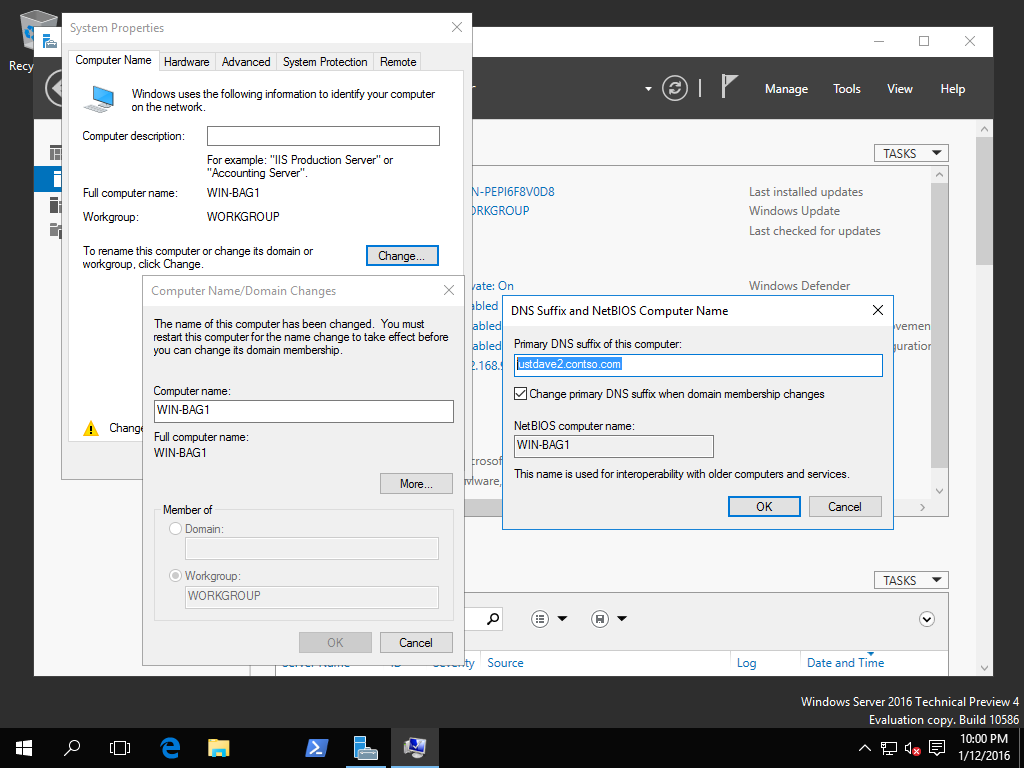
On both machines WIN-BAG1/WIN-BAG2 add local user justdave with a password
On both machines WIN-BAG1/WIN-BAG2 add a firewall rule for port 5022
netsh advfirewall firewall add rule name="SQL AG" dir=in action=allow protocol=TCP localport=50223.1.18.B SQL Server installation
Install a standlone SQL Server on both machines called SQL2016BAG1 with data on the E: drive
3.1.18.C Install Failover Clustering and Setup DNS
Add Windows Feature failover clustering to both machines WIN-BAG1/WIN-BAG2
Add Windows role DNS server to machine WIN-BAGS1
Check for Windows updates on all machines and reboot
Update all machines to use 192.168.93.200 as the DNS server
On machine WIN-BAGS1 go to Server Manager->Tools->DNS
Under WIN-BAGS1.justdave2.contso.com add a Reverse Lookup Zone
Add as a primary zone,IPV4 Reverse Lookup Zone,Network ID 192.168.93, add a new zone file
Do not allow dynamic updates
Under WIN-BAGS1.justdave2.contso.com add a Forward Lookup Zone justdave2.contso.com
Add machines both machines WIN-BAG1/WIN-BAG2 to the forward Lookup Zone and tick the checkbox to create the associated PTR record
On machines WIN-BAGS1/WIN-BAG1/WIN-BAG2 go into Control Panel->System and Security->Windows Firewall
Under Advanced Settings->inbounding rules enable rule "File and Printer Sharing (Echo Request - ICMPv4-In)"
On machines WIN-BAGS1/WIN-BAG1/WIN-BAG2 ping all the other machine using FQDN names
Eg. ping WIN-BAGS1.justdave2.contso.com
3.1.18.D Test and create Active Directory-Detached Cluster
Now we deploy a Active Directory-Detached Cluster
As per Deploy an Active Directory-Detached Cluster
We have to use Powershell to create the cluster
Test-Cluster �Node WIN-BAG1,WIN-BAG2 WARNING: System Configuration - Validate Active Directory Configuration: The test reported some warnings.. WARNING: Network - Validate Network Communication: The test reported some warnings.. WARNING: Test Result: 41 Testing has completed successfully. The configuration appears to be suitable for clustering. However, you should review the report because it may contain warnings which you should address to attain the highest availability. Test report file path: C:\Users\Administrator\AppData\Local\Temp\Validation Report 2016.01.13 At 00.18.11.xml.htm Mode LastWriteTime Length Name ---- ------------- ------ ---- -a---- 1/13/2016 12:19 AM 735928 Validation Report 2016.01.13 At 00.18.11.xml.htm We get warnings that there is only 1 network interface and that the servers are not joined to a domain! New-Cluster WIN-BAGCL1 �Node WIN-BAG1,WIN-BAG2 �StaticAddress 192.168.93.204 -NoStorage �AdministrativeAccessPoint Dns WARNING: There were issues while creating the clustered role that may prevent it from starting. For more information view the report file below. WARNING: Report file location: C:\Windows\cluster\Reports\Create Cluster Wizard WIN-BAGCL1 on 2016.01.13 At 00.23.50.htm We get a warning "An appropriate disk was not found for configuring a disk witness. The cluster is not configured with a witness. As a best practice, configure a witness to help achieve the highest availability of the cluster. If this cluster does not have shared storage, configure a File Share Witness or a Cloud Witness."3.1.18.E Setup SQL Server, Enable AlwaysOn Availability group and SQL authentication
As per above go SQL Server Configuration Manager and enable each SQL Server for AlwaysOn Availability group
Restart each SQL Server
On both machines WIN-BAG1/WIN-BAG2, login to the sql servers with SSMS
Security->Logins->sa->Properties, under general set the password, under status enable the login/p>
In the left pane right click on the SQL Server->Properties->General
Change Server Authentication to SQL Server and Windows Authentication Mode
Restart both SQL Servers
3.1.18.F Setup SSMS client machine WIN3-SSMS
On machine WIN3-SSMS right click on My Computer->Properties change machine name and add Primary DNS suffix justdave2.contso.com and reboot
Pings machines WIN-BAG1/WIN-BAG2 from this machine
3.1.18.G Create certificates on both machines
From machine WIN3-SSMS connect to both SQL Servers in SSMS using SQL Authentication as sa
On server WIN-BAG1\SQL2016BAG1 add a database justdave, take a full backup and a Transaction Log backup
Create the SQL Server EndPoints for mirroring on both SQL Servers, these need to be certificate based
On both machines/SQL Servers
In command prompt (Admin): MD C:\Keys In T-SQL: CREATE MASTER KEY ENCRYPTION BY PASSWORD='MyPass1';On SQL Server WIN-BAG1\SQL2016BAG1
CREATE CERTIFICATE ServerCertBAGs1 WITH SUBJECT='Basic Availability Groups'; BACKUP CERTIFICATE ServerCertBAGs1 TO FILE='C:\Keys\ServerCertBAGs1.cer' WITH PRIVATE KEY (FILE='C:\Keys\ServerCertBAGs1.key', ENCRYPTION BY PASSWORD='BackupPass1'); CREATE ENDPOINT [Hadr_endpoint] STATE=STARTED AS TCP (LISTENER_PORT = 5022, LISTENER_IP = ALL) FOR DATA_MIRRORING (ROLE = ALL, AUTHENTICATION = CERTIFICATE ServerCertBAGs1, ENCRYPTION = REQUIRED ALGORITHM AES ) GRANT CONNECT on ENDPOINT::Hadr_endpoint TO [NT Service\MSSQL$SQL2016BAG1]On SQL Server WIN-BAG2\SQL2016BAG1
CREATE CERTIFICATE ServerCertBAGs2 WITH SUBJECT='Basic Availability Groups'; BACKUP CERTIFICATE ServerCertBAGs2 TO FILE='C:\Keys\ServerCertBAGs2.cer' WITH PRIVATE KEY (FILE='C:\Keys\ServerCertBAGs2.key', ENCRYPTION BY PASSWORD='BackupPass2'); CREATE ENDPOINT [Hadr_endpoint] STATE=STARTED AS TCP (LISTENER_PORT = 5022, LISTENER_IP = ALL) FOR DATA_MIRRORING (ROLE = ALL, AUTHENTICATION = CERTIFICATE ServerCertBAGs2, ENCRYPTION = REQUIRED ALGORITHM AES ) GRANT CONNECT on ENDPOINT::Hadr_endpoint TO [NT Service\MSSQL$SQL2016BAG1] copy backup certificate files from WIN-BAG1 to WIN-BAG2 folder C:\Keys CREATE CERTIFICATE ServerCertBAGs1 FROM FILE='C:\Keys\ServerCertBAGs1.cer' WITH PRIVATE KEY (FILE = 'C:\Keys\ServerCertBAGs1.key', DECRYPTION BY PASSWORD = 'BackupPass1');On SQL Server WIN-BAG1\SQL2016BAG1
CREATE CERTIFICATE ServerCertBAGs2 FROM FILE='C:\Keys\ServerCertBAGs2.cer' WITH PRIVATE KEY (FILE = 'C:\Keys\ServerCertBAGs2.key', DECRYPTION BY PASSWORD = 'BackupPass2');Check the certificates and endpoints are setup correctly on both SQL Servers
SELECT name,subject FROM sys.certificates WHERE subject='Basic Availability Groups'; SELECT A.name,A.type_desc,B.protocol_desc,B.port,A.state_desc,A.role_desc,A.connection_auth_desc, A.encryption_algorithm_desc FROM sys.database_mirroring_endpoints A,sys.tcp_endpoints B WHERE A.endpoint_id = B.endpoint_id AND B.port=5022; SELECT A.name,C.name FROM sys.database_mirroring_endpoints A, sys.certificates C WHERE A.certificate_id = C.certificate_id; SELECT EP.name, SP.STATE, CONVERT(nvarchar(38), suser_name(SP.grantor_principal_id)) AS GRANTOR, SP.TYPE AS PERMISSION, CONVERT(nvarchar(46),suser_name(SP.grantee_principal_id)) AS GRANTEE FROM sys.server_permissions SP , sys.tcp_endpoints EP WHERE SP.major_id = EP.endpoint_id AND EP.type_desc = 'DATABASE_MIRRORING' ORDER BY Permission,grantor, grantee;On SQL Server WIN-BAG1\SQL2016BAG1
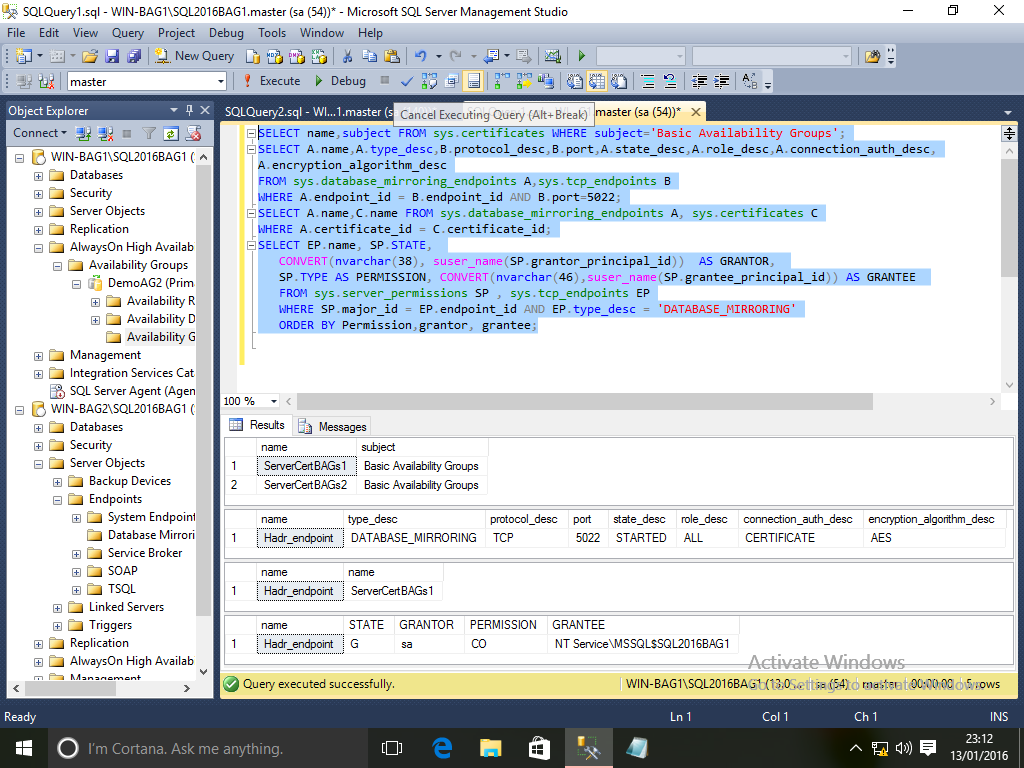
On SQL Server WIN-BAG2\SQL2016BAG1
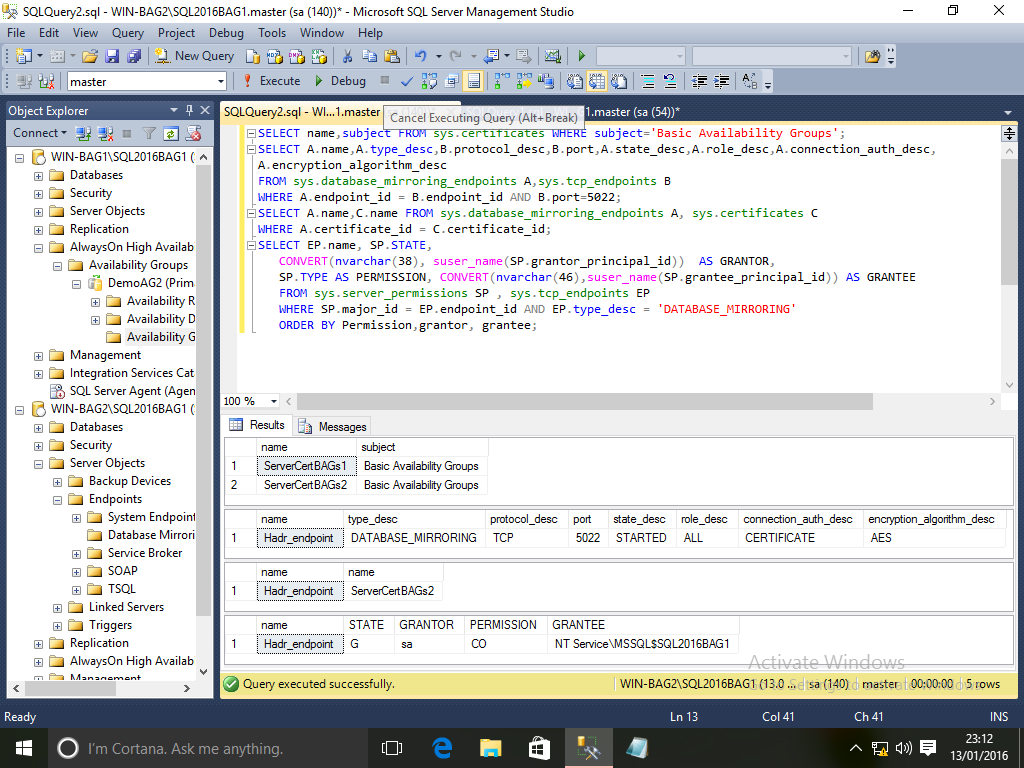
3.1.18.H Backup/restore database justdave
Backup and restore database justdave from WIN-BAG1\SQL2016BAG1 to WIN-BAG2\SQL2016BAG1
Backup database justdave on SQL Server WIN-BAG1\SQL2016BAG1 and restore to server WIN-BAG2\SQL2016BAG1
On SQL Server WIN-BAG1\SQL2016BAG1 BACKUP DATABASE justdave TO DISK = 'C:\Temp\justdaveData.bak' BACKUP LOG justdave TO DISK = 'C:\Temp\justdaveLog.bak' Copy the backup files from machine WIN-BAG1 to machine WIN-BAG2 - folders C:\Temp On SQL Server WIN-BAG2\SQL2016BAG1 RESTORE DATABASE justdave FROM DISK = 'C:\Temp\justdaveData.bak' WITH NORECOVERY RESTORE LOG justdave FROM DISK = 'C:\Temp\justdaveLog.bak' WITH NORECOVERY3.1.18.I Create the Basic Availability group
On SQL server WIN-BAG1\SQL2016BAG1 in the left panel click on "AlwaysOn High Availability
Right click on Availability Groups->New Availability Group Wizard
Add DemoAG2 as a Basic Availability Group
Choose database justdave
Add replica WIN-BAG2\SQL2016BAG1
Set both instances to syncronous commit
NOTE: With a Basic Availability Group we cannot have a readonly secondary or redirect backups to the Secondary
On the "Select Data Syncronization" screen choose Join, we have already syncronized the databases
On the "Validation" screen click Next
On the summary screen click Finish
The progress is then displayed
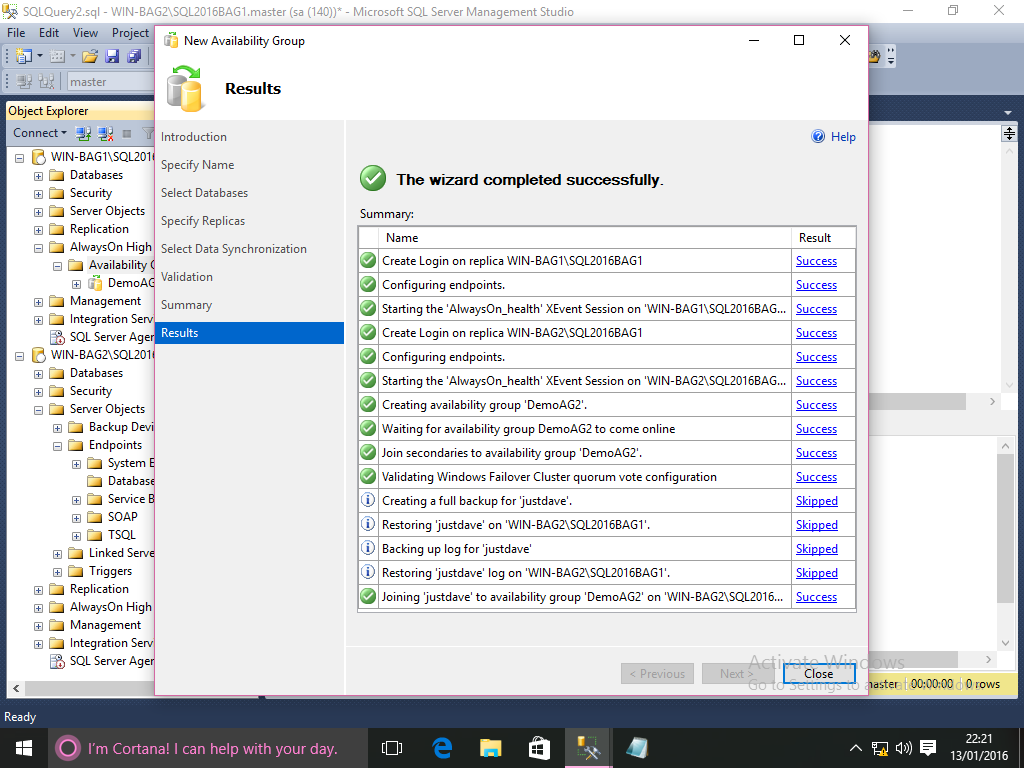
NOTE: Basic availability groups do not support listeners!
3.1.18.J Check and failover/failback the Basic Availability group
We check the availability group from SQL Server WIN-BAG1\SQL2016BAG1
SELECT cluster_name,quorum_type_desc,quorum_state_desc FROM sys.dm_hadr_cluster; SELECT member_name,member_type_desc,member_state_desc,number_of_quorum_votes FROM sys.dm_hadr_cluster_members ORDER BY member_name; SELECT primary_replica,primary_recovery_health_desc,synchronization_health_desc FROM sys.dm_hadr_availability_group_states; SELECT * FROM sys.dm_hadr_availability_replica_cluster_nodes ORDER BY replica_server_name; SELECT A.replica_server_name,A.join_state_desc,B.role_desc,B.operational_state_desc, B.connected_state_desc,B.recovery_health_desc,B.synchronization_health_desc FROM sys.dm_hadr_availability_replica_cluster_states A, sys.dm_hadr_availability_replica_states B WHERE A.replica_id = B.replica_id and A.group_id = B.group_id ORDER BY replica_server_name; SELECT A.replica_server_name,B.database_name,B.is_failover_ready,B.is_database_joined, C.synchronization_state_desc,C.synchronization_health_desc,C.database_state_desc FROM sys.dm_hadr_availability_replica_cluster_states A, sys.dm_hadr_database_replica_cluster_states B, sys.dm_hadr_database_replica_states C WHERE A.replica_id = B.replica_id and B.replica_id = C.replica_id and B.group_database_id = C.group_database_id ORDER BY replica_server_name;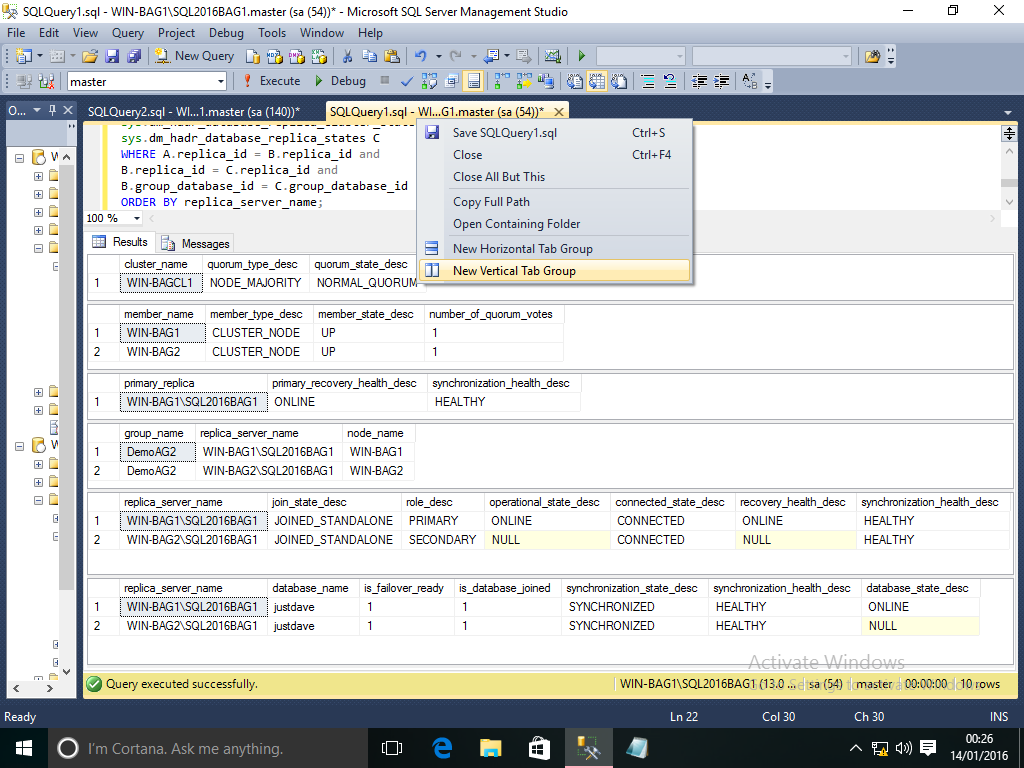
We failover, note both replicas must be set for syncronous commit for this to work!
On SQL Server WIN-BAG1\SQL2016BAG2 ALTER AVAILABILITY GROUP DemoAG2 FAILOVER;We check the situation again from SQL Server WIN-BAG1\SQL2016BAG1 using the sql above
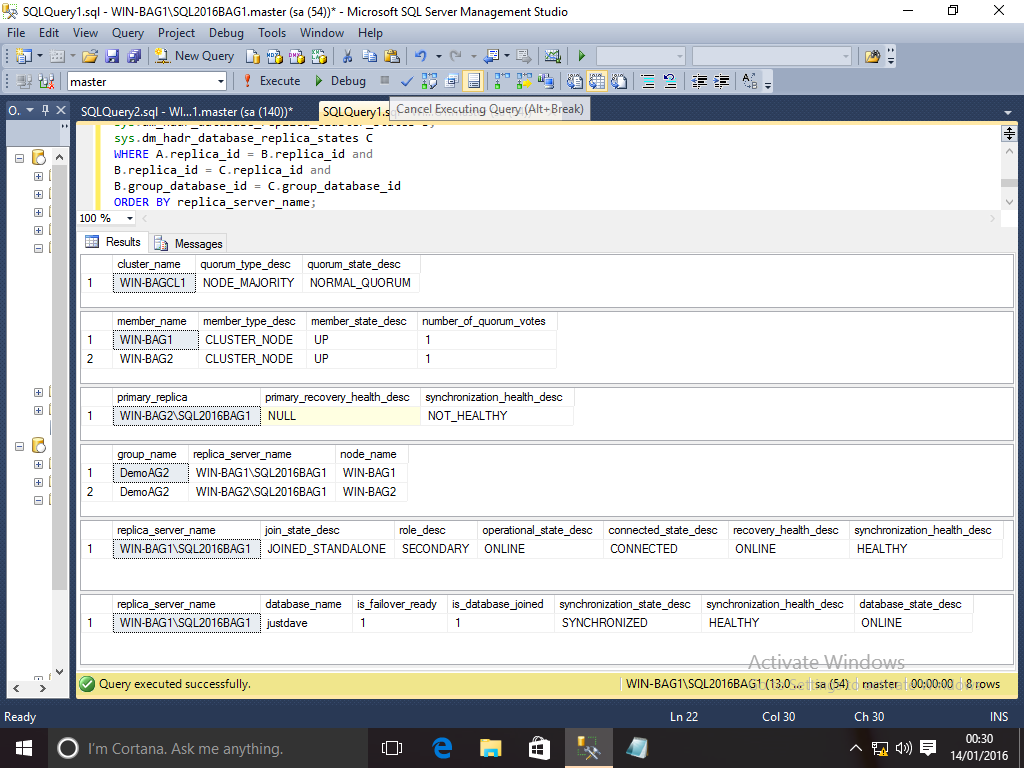
We failback
On SQL Server WIN-BAG1\SQL2016BAG1 ALTER AVAILABILITY GROUP DemoAG2 FAILOVER;We check the situation again from SQL Server WIN-BAG1\SQL2016BAG1 using the sql above
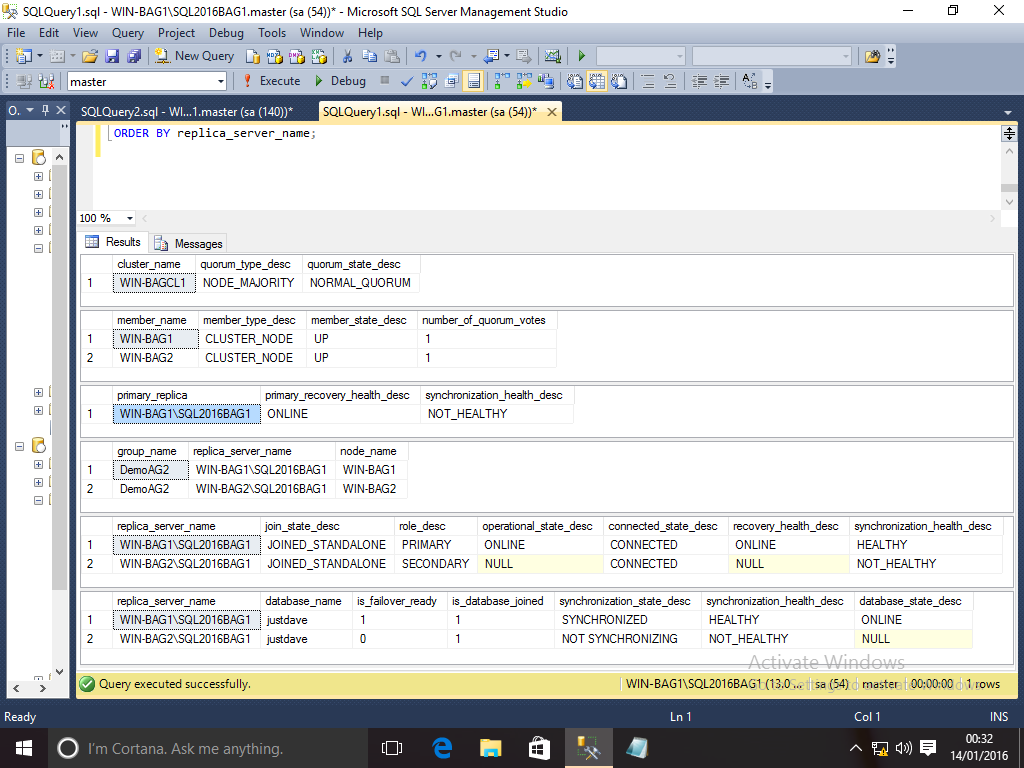
3.1.19 SQL Server 2016 RC3/RTM
No requirement for .NET Framework 3.5., just the firewall rules need to be done!
The firewall rules still need to be done and Java installed
Notice that Visual Studio 2015 redistributable components will be installed compared with Visual Studio 2013 components in earlier SQL Server releases
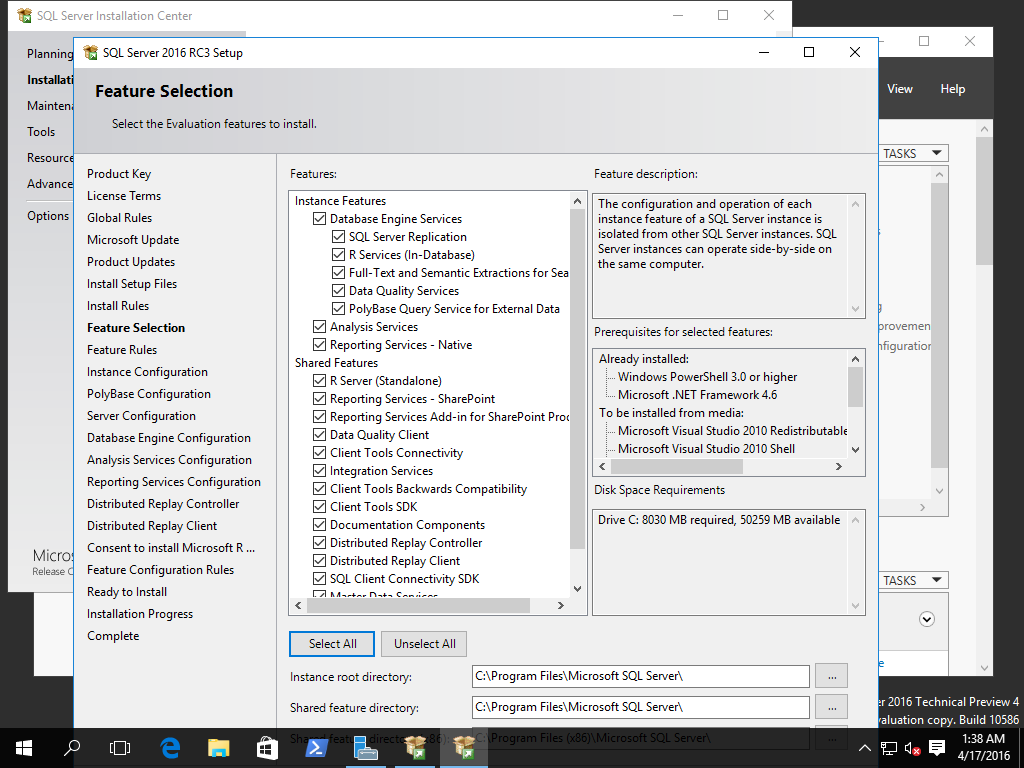
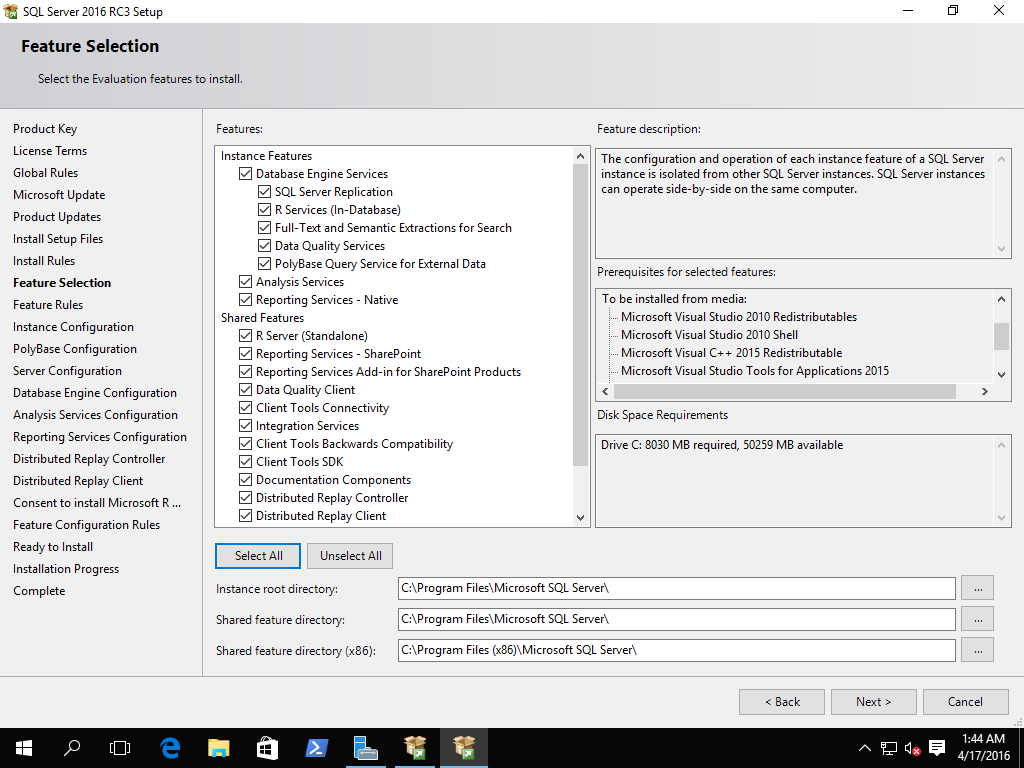
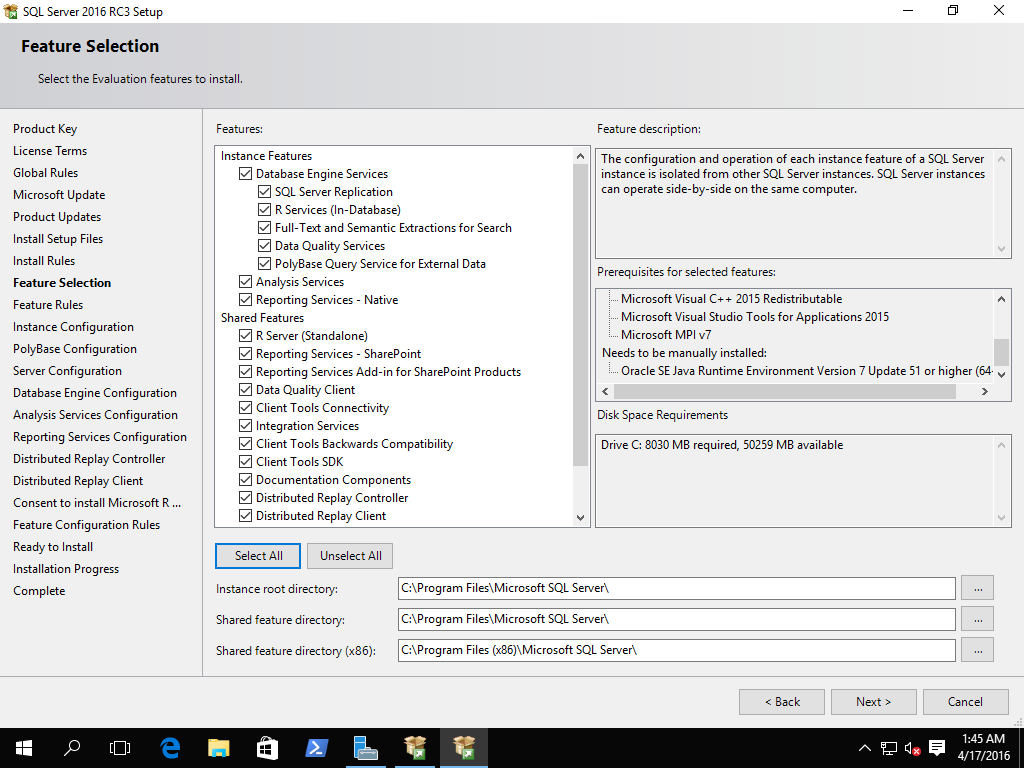
3.1.20 SQL Server 2017 CTP1
Note the new firewall rule for the SSIS Scale Out Master above
Accept the defaults on the Scale Out Master/Worker screens
I am naming my servers SQL2017X1!
3.1.21 SQL Server 2017 SSIS Scale Out Master
We are doing a setup with 1 Master and 2 worker machines
It is possible to have a worker on the master machine
I choose to have no workers on the master machine to show the remote execution with no tricks!
Setup machines
We are using 3 VMs, 1 Master and 2 Workers
Sysprep the Worker machines with c:\Windows\System32\sysprep\sysprep.exe /generalize enable Generalize option
The machines are:
- Win2016-SQL2017CTP2.0-SOM (WIN-9Q6ODT3PQDA 192.168.96.137) = Scale Out Master
- Win2016-SQL2017CTP2.0-SOW1 (WIN-M9MH8PK775B 192.168.96.158) = Scale Out Worker 1
- Win2016-SQL2017CTP2.0-SOW2 (WIN-DMA0LTBM1KS 192.168.96.158) = Scale Out Worker 1
Scale Out Master machine setup
- User justdave
- Firewall rules from Firewall rules which include a Scale Out Master rule
Install SQL Server on the Scale Out Master machine - everything but a Scale Out Worker
On the Scale Out Master
- Install Java JDK
- Install SQL Server 2017 CTP 2.0
- - Feature Select screen - all features, remove Integration Services->Scale Out Worker
- - Instance Configuration screen - servername SQL2017SOM
- - Server Configuration screen - collation Latin1_General_100 Accent/Width/Kana-sensitive
- - Database Engine Configuration - Mixed mode installation with current user and set sa password (SSISDB Catalog needs sa authentication)
- - Integration Services Scale Out Master screen - Leave as create certificate.
The Certificate for the Scale Out Master will be put in C:\Program Files\Microsoft SQL Server\140\DTS\Binn\SSISScaleOutMaster.cer
Copy Scale Out Master certificate to Scale Out Worker machines
Copy the certificate from the Scale Out Master to a temporary folder on each Scale Out Worker machine.
Install SQL Server on the Scale Out Worker machines - just a Scale Out Worker!
On each worker machine install SQL Server
- On the Feature Selection screen - Unselect all features, Select Integration Services -> Scale Out Worker only
- On the Integration Services Scale Out Worker Configuration screen Add an endpoint
- Enter the machine/port for the Scale Out Master server e.g. https://WIN-9Q6ODT3PQDA:8391
- Browse and choose the certificate copied from the Scale Out Master machine, THIS AUTO-INSTALLS THE MASTER CERTIFICATE ON THE WORKER MACHINES
Check certificates on the Scale Out Worker machines
On each worker machine run powershell:
dir Cert:\LocalMachine\Root
There will be a 2 certificates
- 1 certificate with the ipaddress of the master machine
- 1 with the ipaddress of this worker machines
On each worker machine the worker certificates go into C:\Program Files\Microsoft SQL Server\140\DTS\Binn as file SSISScaleOutWorker.cer
Copy Scale Out Worker certificates to Scale Out Master machine
Copy each Scale Out Worker certificate to to a temporary folder on the Scale Out Master machine.
As we copy we rename the certificate files to SSISScaleOutWorker1.cer and SSISScaleOutWorker2.cer
Use SSMS to create the SSIS Catalog on the Scale Out Master machine
Connect with SSIS 17.0 to the Scale Out Master machine
- Right Click on "Integration Services Options" choose create catalog
- On the "Create Catalog" screen select "Enable CLR integration"
- "Enable this server as SSIS scale out master" will be already selected
- Enter a password and click OK
Import Copy Scale Out Worker certificates into Scale Out Master machine
On the Scale Out Master machine
- Start->Run->certlm.msc
- In the left pane Click on "Trusted Root Certification Authorities"
- In the right panel Click on "Certificates"
- On the menu select Actions->All tasks -> Import
- This will load into the local machine, click Next
- Browse to the Certificate file SSISScaleOutWorker1.cer/li>
- On the Certificate Store screen "Trusted Root Certification Authorities" is already selected, click Next, then Click Finish
- Simmilarly import Certificate file SSISScaleOutWorker2.cer
Check the Certificates on the Scale Out Master machine
On the Scale Out Master Machine run Powershell:
dir Cert:\LocalMachine\Root
There will be a 3 certificates
- 1 certificate with the ipaddress of the master machine
- 2 with the ipaddress of the 2 worker machines
Check the Scale Out services are running on the Master and Worker machines
On each machine run services.msc then Check all services are started:
- SSISScaleOutMaster140 ("SQL Server Integration Services Scale Out Master 14.0") on the master machine
- SSISScaleOutWorker140 ("SQL Server Integration Services Scale Out Worker 14.0") on the Worker machines
Check the logfiles from the Scale Out services
On the master machine check the Scale Out Master service log under C:\Users\SSISScaleOutMaster140\AppData\Local\SSIS\ScaleOut\Master
On the worker machine check the Scale Out Worker Service log under :\Users\SSISScaleOutWorker140\AppData\Local\SSIS\ScaleOut\Agent
Use SSMS to register the worker agents on the Scale Out Master SQL Server
Connect to the master machine with SSMS and run:
- SELECT * FROM [SSISDB].[catalog].[worker_agents]
It can take a few minutes for the workers to be registered.
We can see when the workers were last online by checking the LastOnlineTime column in [SSISDB].[catalog].[worker_agents]
Once this completes use the workers WorkerIdAgentId to register these on the master e.g.:
- EXEC [SSISDB].[catalog].[enable_worker_agent] '6BCFB582-F61A-473A-A627-E01BB05D2E37'
- EXEC [SSISDB].[catalog].[enable_worker_agent] 'DE0D3C1B-E3D8-44BF-8B6E-E5E1CB8E0D12'
Use SSDT to create a project with a simple Script Task including creating the script
We now create a SSDT Project to deploy a package we can run in parallel on the worker machines
On the Scale Out Master server add a Windows user for deployment with sysadmin privileges WIN-9Q6ODT3PQDA\justdave
Also add a user mapping to the SSISDB database and add them as ssisadmin
Next Install Visual Studio 2015 Community Edition and repeatedly run Tools->Extensions and Updates until all updates are installed
From Download SQL Server Data Tools (SSDT) download SSDT for Visual Studio 2015 and install this as well.
Start SSDT as a Windows user who has sa on the Scale Out Master
runas /netonly /user:WIN-9Q6ODT3PQDA\justdave "C:\Program Files (x86)\Microsoft Visual Studio 14.0\Common7\IDE\devenv.exe"Create a new Visual Studio 2015 Project - Integration Services Project Business Intelligence
Call the project SSIS_Master_1
From the SSIS Toolbox on the left add a "Execute Process" Task
From the properties box in the bottom right Change the name and description to "RunSimpleTask"
Then create a batch file C:\x\myscript.batwhich writes the hostname and time to a file in folder C:\x
@echo off set myfile=C:\x\%COMPUTERNAME%.txt for /F %%i in ('date /t') do set mydate=%%i for /F %%i in ('time /t') do set mytime=%%i echo %mydate%_%mytime% > %myfile%Change the Executable on the task to C:\x\myscript.bat
On the menu click Start and the output file should be produced
Click the symbol to stop debugging
Use SSDT to deploy the project to the Scale Out Master SQL Server using the Project Deployment model
Choose Project->Deploy
Click Next
Browse for the destination server name
In network servers select the Scale Out Master SQL Server (WIN-9Q6ODT3PQDA\SQL2017X1)
Browse for the path for folder for deployement
Add a new folder SSIS_Master_1 and click OK
On the Review screen click Deploy
On the Results screen click Close
Setup script execution on the SSIS Worker machines
Copy script C:\x\myscript.bat from the SSDT machine to each worker machine
Grant everyone full permission on the C:\x so the SSIS Workers can write to it - DEMO PURPOSES ONLY SHOULD REALLY SETUP PROPER PERMISSIONS
Use SSMS to run the SSIS Task on the SSIS Workers
We now run the package
Restart SSMS as a user who has windows authentication on the Scale Out Master
runas /netonly /user:WIN-9Q6ODT3PQDA\justdave "C:\Program Files (x86)\Microsoft SQL Server\140\Tools\Binn\ManagementStudio\Ssms.exe"Expand Integration Services Catalog
Right Click on SSISDB and Choose "Execute In Scale Out"
Select the package to run SSIS_Master_1\Pcakage.dstx
Select the machines to run on
Click OK and the execution is queued
Check the script task ran on a machine
On each worker machine start a command prompt and run type C:\x\*.txt
We can see a file is created on one of the machines containing the current time!
If we run again and choose just the other worker the file is created on the other worker machine!
Microsoft have confirmed the first free worker is used for execution
I also suggested that from error messages I had seen that it appears the SSIS Worker is using SOAP to talk to the SSIS Master
It would be good to have a test program to in Java to connect to the SOAP Service for the Master and use wsdl to enumerate the service
This would be a good test program to connect from the machine running the Scale Out Master service and eliminate issues with networking/missing Certificates on the worker machine.
Microsoft have said they should be able to create a small test program to help diagnose connection issues and have filed a task to track this effort
So far it appears that the file is created on the 1st worker by default
It does not appear round-robin, perhaps load based (?) - more to follow!
In SSMS we can right click on SSISDB->Reports->Standard Reports and see executions and success/failure
We can then click on 1 execution and see which machine was used for execution
3.1.22 SQL Server 2014 with Database Experimentation Assistant 2.0
Database Experimentation Assistant is used to make Distributed Replay easier to use form comparing workloads e.g. during SQL Server or hardware upgrades
We use Machine WIN-9Q6ODT3PQDA containing the SQL Servers SQL2014X1/SQL2014X2
Setup SQL Servers SQL2014X1/SQL2014X2 at 2016 SP1 CU2
We use Window Server 2016 with all latest updates applied.
We then install 2 SQL Servers with 2014 SP2 called SQL2014X1/SQL2014X2
Install both servers with all features
**** Ensure that the Distributed Replay Controller is named the same as the machine (run hostname -> WIN-9Q6ODT3PQDA) ****
Use SQL Server Configuration Manager to change the server ports:
- SQL Server SQL2014X1 use SQL Server Configuration Manager to change IPAll to static port 1433
- SQL Server SQL2014X2 use SQL Server Configuration Manager to change IPAll to static port 1443
Use the standard filewall rules at Firewall rules
Next we add a firewall rule to open the port for the 2nd SQL Server
netsh advfirewall firewall add rule name="SQL Server2" dir=in action=allow protocol=TCP localport=1443Install SSMS 17.00 to connect to both servers
Install SSMS 17.0 RTM
Use SSMS 17.0 to connect to both servers
Run a new query on each server and select @@VERSION on both servers.
Attach the AdventureWorks2008R2 database to both servers
Get the AdventureWorks2008R2 database from AdventureWorks Databases � 2012, 2008R2 and 2008
Copy the .mdf and .ldf files onto the SQL Server machine into both
- C:\Program Files\Microsoft SQL Server\MSSQL12.SQL2014X1\MSSQL\DATA
- C:\Program Files\Microsoft SQL Server\MSSQL12.SQL2014X2\MSSQL\DATA
Attach the databases to both databases
First change the owner of all files to the owner for the instance
- icacls "C:\Program Files\Microsoft SQL Server\MSSQL12.SQL2014X1\MSSQL\DATA\AdventureWorks2008R2_Data.mdf" /setowner MSSQL$SQL2014X1
- icacls "C:\Program Files\Microsoft SQL Server\MSSQL12.SQL2014X1\MSSQL\DATA\AdventureWorks2008R2_log.ldf" /setowner MSSQL$SQL2014X1
- icacls "C:\Program Files\Microsoft SQL Server\MSSQL12.SQL2014X2\MSSQL\DATA\AdventureWorks2008R2_Data.mdf" /setowner MSSQL$SQL2014X2
- icacls "C:\Program Files\Microsoft SQL Server\MSSQL12.SQL2014X2\MSSQL\DATA\AdventureWorks2008R2_log.ldf" /setowner MSSQL$SQL2014X2
Next I forced the attach to work by change the properties on each file
First on the general tab turn off the readonly tickbox
This is bad - need to work out a better way!
On the Security tab -> Advanced -> Click Disable Inheritance and accept the first option to change to explict permissions -> Apply
On the Security tab -> Edit -> Add -> Advanced -> Find Now -> Select Everyone and give them Full Control
Back to the good - run sql to attach the databases to each instance
On SQL2014X1 CREATE DATABASE AdventureWorks2008R2 ON (FILENAME = 'C:\Program Files\Microsoft SQL Server\MSSQL12.SQL2014X1\MSSQL\DATA\AdventureWorks2008R2_Data.mdf'), (FILENAME = 'C:\Program Files\Microsoft SQL Server\MSSQL12.SQL2014X1\MSSQL\DATA\AdventureWorks2008R2_log.ldf') FOR ATTACH; On SQL2014X2 CREATE DATABASE AdventureWorks2008R2 ON (FILENAME = 'C:\Program Files\Microsoft SQL Server\MSSQL12.SQL2014X2\MSSQL\DATA\AdventureWorks2008R2_Data.mdf'), (FILENAME = 'C:\Program Files\Microsoft SQL Server\MSSQL12.SQL2014X2\MSSQL\DATA\AdventureWorks2008R2_log.ldf') FOR ATTACH;Use Jonathan Kehayias Books Online Workload generator to run a readonly workload against the first server
Download Jonathan Kehayias Books Online Workload generator from The AdventureWorks2008R2 Books Online Random Workload Generator
FYI I modified this to remove queries contains COMPUTE as they were failing in my initial tests on SQL Server 2016
Put this in C:\x
Start an admin copy of Powershell from the Start Menu and run
Set-ExecutionPolicy UnrestrictedStart a copy of Powershell running as the SQL Server sysadmin and run the workload generator as a test
runas /netonly /user:WIN-9Q6ODT3PQDA\justdave "C:\Windows\System32\WindowsPowerShell\v1.0\powershell.exe" cd C:\x & '.\Run AdventureWorks BOL Workload.ps1' -server WIN-9Q6ODT3PQDA\SQL2014X1 Ctrl-C the workload & '.\Run AdventureWorks BOL Workload.ps1' -server WIN-9Q6ODT3PQDA\SQL2014X2 Ctrl-C the workloadOpen the firewall for the Distributed Replay Controller and Client
Open the firewall for Distributed Replay Controller binary
netsh advfirewall firewall add rule name="allow dreplay controller" dir=in program="C:\Program Files (x86)\Microsoft SQL Server\120\Tools\DReplayController\DReplayController.exe" action=allowOpen the firewall for Distributed Replay Client
netsh advfirewall firewall add rule name="allow dreplay client" dir=in program="C:\Program Files (x86)\Microsoft SQL Server\120\Tools\DReplayClient\DReplayClient.exe" action=allowOpen the firewall for DCOM
netsh advfirewall firewall add rule name="DCOM" dir=in action=allow protocol=TCP localport=135Optional edit the configuration files for the Distributed Replay Controller and Distributed Replay Client as per Configure Distributed Replay
FYI I did not make any changes
Setup DCOM Permissions for the Distributed Replay Client to access the Controller
Run dcomcnfg Go to Console Root > Component Services > Computers > My Computer �> DCOM Config -> DReplayController -> Properties -> Security Edit "Launch and Activation Permissions" Add "NT Service\SQL Server Distributed Replay Client",check names and grant "Local Activation" and "Remote Activation" permissions (Local Launch was there by default)
Add remote launch and activation permissions for the user with sa permissions who will be running DEA (WIN-9Q6ODT3PQDA\justdave)
Also setup Access Permissions
Edit "Access Permissions" Add "NT Service\SQL Server Distributed Replay Client" and grant "Local Access" and "Remote Access"
Add Remote Access for the user with sa permissions who will be running DEA (WIN-9Q6ODT3PQDA\justdave)
In Computer Management add the Distributed Replay Client to the Distributed COM Users Group
Go into Computer Management -> Local Users and Groups -> Groups -> Distributed COM Users -> Right Click Add to Group Add "NT Service\SQL Server Distributed Replay Client"
Start the Distributed Replay Controller and Client
In services.msc start the "SQL Server Distributed Replay Controller" service
Check the logfile for the Distributed Replay Controller under C:\Program Files (x86)\Microsoft SQL Server\120\Tools\DReplayController\log
This should end with "Dump support is ready."
In services.msc start the "SQL Server Distributed Replay Client" service
Check the logfile for the Distributed Replay Client under C:\Program Files (x86)\Microsoft SQL Server\120\Tools\DReplayClient\log
The logfile should end with "Registered with Controller"
Logout and login as justdave to run DReplay.exe to check connectivity to the Replay Controller
Start a new Powershell prompt cd "C:\Program Files (x86)\Microsoft SQL Server\140\Tools\Binn" .\DReplay.exe status -m WIN-9Q6ODT3PQDA
Logout and login as Adminstrator
Install DEA and Associated Dependencies
Download the following into C:\x
- DEA 2.0 from Microsoft� Database Experimentation Assistant Technical Preview 2
- R-Interop from Microsoft/R-Interop -> Installation -> Click on download link for RInteropSetup.msi
- CRAN from R-3.4.0 for Windows (32/64 bit) -> Download R 3.4.0 for Windows
Run in order:
- RInteropSetup
- R-3.4.0-win
- DatabaseExperimentationAssistant
Use DEA to Capture a Workload against SQL Server SQL2014X1
Signoff and login as justdave
Edit the permissions on folder c:\x and give user justdave full control
From the start menu run Database Experimentation Assistant
On the left choose capture a workload (the Camera symbol),New Capture and enter
- Tracename AdventureWorksTrace1
- SQL Server Instance Name WIN-9Q6ODT3PQDA\SQL2014X1
- Duration 5 minutes
- Database Name AdventureWorks2008R2
- Directory to store the trace C:\x
- Click Yes, I have taken a backup of the target database(s)
Start a powershell in c:\x and run the workload generator
cd C:\x & '.\Run AdventureWorks BOL Workload.ps1' -server WIN-9Q6ODT3PQDA\SQL2014X1Start the capture
Once the capture completes cancel the workload generator
Edit the permissions on the trace file which was generated in C:\x
Add "NT Service\SQL Server Distributed Replay Controller" and grant read access
Add "justdave" and grant read access
Grant the Distributed Replay Client permissions to run sql in the AdventureWorks2008R2 database
In SSMS connect to server WIN-9Q6ODT3PQDA\SQL2014X1
Under security add a new login "NT Service\SQL Server Distributed Replay Client"
Under database AdventureWorks2008R2 add a new user - Windows user "NT Service\SQL Server Distributed Replay Client"
For Membership give them db_datareader
Use DEA to Start a Replay against SQL Server SQL2014X1
On the left choose replay a workload (the Play Video type symbol),New Replay and enter
- ReplayName AdventureWorksReplay1
- Controller Machine Name WIN-9Q6ODT3PQDA
- Path to source trace file on Controller C:\x\Source_AdventureWorksTrace1506.trc
- SQL Server Instance Name WIN-9Q6ODT3PQDA\SQL2014X1
- Path to store target trace file on SQL Server machine C:\x
- Click Yes, I have restored the database(s)
I can start the replay however this is where I get an error!
The DEA logfiles are under %Temp%\DEA
The error is:
DEA Information: 0 : TraceEvent, 05/06/2017 15:18:48, Data: {"Message":"Completed trigger of replay on the server.","Operation":"ReplayModel","Properties":{"ServerRoleName":"sysadmin","ProductVersion":"12.0.5000.0","TraceId":"2","SelectedDuration":"0","TraceType":"Target","ControllerStatus":"REPLAY_COMPLETED","CaptureStatus":"Stopped","PreprocessTraceStatus":"InProgress","ReplayStatus":"NotStarted","CaptureStartTime":"01/01/0001 00:00:00","CaptureStopTime":"01/01/0001 00:00:00","CaptureDuration":"00:00:00","ErrorCode":"0","Id":"8724bcac-13fb-4895-adb7-da2aaf5bbfdc"},"Timestamp":"2017-05-06T15:18:48.0938793Z"} DEA Error: -2146233088 : ExceptionEvent, 05/06/2017 15:18:50, Data: {"Code":-2146233088,"Message":"Exception thrown in Replay monitor for replay context.","Operation":"ReplayModel","Properties":{"ServerRoleName":"sysadmin","ProductVersion":"12.0.5000.0","TraceId":"2","SelectedDuration":"0","TraceType":"Target","ControllerStatus":"REPLAY_COMPLETED","CaptureStatus":"Stopped","PreprocessTraceStatus":"InProgress","ReplayStatus":"Error","CaptureStartTime":"01/01/0001 00:00:00","CaptureStopTime":"01/01/0001 00:00:00","CaptureDuration":"00:00:00","ErrorCode":"1409","Id":"8724bcac-13fb-4895-adb7-da2aaf5bbfdc"},"Timestamp":"2017-05-06T15:18:50.1219201Z"}, Exception: [Exception Info]:System.ComponentModel.Composition.CompositionException, Message:The composition produced a single composition error. The root cause is provided below. Review the CompositionException.Errors property for more detailed information. 1) String was not recognized as a valid DateTime. Resulting in: An exception occurred while trying to create an instance of type 'Microsoft.DEA.BusinessLogic.Actions.GetReplayProgress'. Resulting in: Cannot activate part 'Microsoft.DEA.BusinessLogic.Actions.GetReplayProgress'. Element: Microsoft.DEA.BusinessLogic.Actions.GetReplayProgress --> Microsoft.DEA.BusinessLogic.Actions.GetReplayProgress --> DirectoryCatalog (Path="C:\Program Files (x86)\Microsoft Corporation\Database Experimentation Assistant") Resulting in: Cannot get export 'Microsoft.DEA.BusinessLogic.Actions.GetReplayProgress (ContractName="GetReplayProgress")' from part 'Microsoft.DEA.BusinessLogic.Actions.GetReplayProgress'. Element: Microsoft.DEA.BusinessLogic.Actions.GetReplayProgress (ContractName="GetReplayProgress") --> Microsoft.DEA.BusinessLogic.Actions.GetReplayProgress --> DirectoryCatalog (Path="C:\Program Files (x86)\Microsoft Corporation\Database Experimentation Assistant") Resulting in: Cannot set import 'Microsoft.DEA.BusinessLogic.Bootstrappers.ReplayProgress..ctor (Parameter="getReplayProgress", ContractName="GetReplayProgress")' on part 'Microsoft.DEA.BusinessLogic.Bootstrappers.ReplayProgress'. Element: Microsoft.DEA.BusinessLogic.Bootstrappers.ReplayProgress..ctor (Parameter="getReplayProgress", ContractName="GetReplayProgress") --> Microsoft.DEA.BusinessLogic.Bootstrappers.ReplayProgress --> DirectoryCatalog (Path="C:\Program Files (x86)\Microsoft Corporation\Database Experimentation Assistant") Resulting in: Cannot get export 'Microsoft.DEA.BusinessLogic.Bootstrappers.ReplayProgress (ContractName="ReplayProgress")' from part 'Microsoft.DEA.BusinessLogic.Bootstrappers.ReplayProgress'. Element: Microsoft.DEA.BusinessLogic.Bootstrappers.ReplayProgress (ContractName="ReplayProgress") --> Microsoft.DEA.BusinessLogic.Bootstrappers.ReplayProgress --> DirectoryCatalog (Path="C:\Program Files (x86)\Microsoft Corporation\Database Experimentation Assistant") StackTrace: at System.ComponentModel.Composition.Hosting.CompositionServices.GetExportedValueFromComposedPart(ImportEngine engine, ComposablePart part, ExportDefinition definition) at System.ComponentModel.Composition.Hosting.CatalogExportProvider.GetExportedValue(CatalogPart part, ExportDefinition export, Boolean isSharedPart) at System.ComponentModel.Composition.Hosting.CatalogExportProvider.CatalogExport.GetExportedValueCore() at System.ComponentModel.Composition.Primitives.Export.get_Value() at System.ComponentModel.Composition.ExportServices.GetCastedExportedValue[T](Export export) at System.ComponentModel.Composition.ReflectionModel.ExportFactoryCreator.LifetimeContext.GetExportLifetimeContextFromExport[T](Export export) at System.ComponentModel.Composition.ReflectionModel.ExportFactoryCreator.<>c__DisplayClass5_0`1.b__0() at System.ComponentModel.Composition.ExportFactory`1.CreateExport() at Microsoft.DEA.BusinessLogic.BootstrapperFactory. d__31.MoveNext() --- End of stack trace from previous location where exception was thrown --- at System.Runtime.CompilerServices.TaskAwaiter.ThrowForNonSuccess(Task task) at System.Runtime.CompilerServices.TaskAwaiter.HandleNonSuccessAndDebuggerNotification(Task task) at Microsoft.DEA.BusinessLogic.BootstrapperFactory. d__24.MoveNext() NOTE: If in a powershell session we then try to manually run a replay this works
cd "C:\Program Files (x86)\Microsoft SQL Server\140\Tools\Binn" dreplay replay -m WIN-9Q6ODT3PQDA -d C:\x -s WIN-9Q6ODT3PQDA\SQL2014X1 -w WIN-9Q6ODT3PQDA
3.1.23 SQL Server Operations Studio preview 0.23.6
Download SQL Server Operations Studio from Download and install Microsoft SQL Operations Studio (preview)
Install on latest Windows Server evaluation
Extract to C:\sqlops-windows-0.23.6, takes a long time to extract 16819 items!
Run with
runas /netonly /user:justdave "C:\sqlops-windows-0.23.6\sqlops-windows\bin\sqlops.cmd"3.1.24 SQL Server Operations Studio preview 2017-Dec-18
Download SQL Server Operations Studio from Microsoft/sqlopsstudio
This is a 2017-Dec-18 pre-release
Download and run the Windows installer
Accept the license agreement
Choose where to install
Choose where the program shortvcuts go in the start menu
Additional tasks-add to PATH is optional!, I choose NOT to add to PATH as I run it via batch files
Ready to install
Extracts a LOT of files but MUCH faster than 0.23.6 about 2 minutes!
Ready to launch
Properties on the desktop icon gives me what I need to add to the batch file!
It remembers my connection from testing with release 0.23.6 even though installed in a different folder!
We can use view to get to the command palette
Then enter "Run Current Query with Actual Plan"
We see the actual plan, here and an Adaptive Join done as a nested loop!
Here an Adaptive Join done as a hash match!
The Adaptive Join operator does not show "Actual Join Type" like SSMS
Top Operations includes Actual Rows.Actual Executions and potentially rebinds/rewinds
3.2 Informix on Windows
3.2.1 Informix 11.70.FC8 on Windows 2008R2
Right click on zipfile and extract files to a folder, run ids_install.
- Install to default location C:\Program Files\IBM\Informix\11.70
- Custom install
- Nothing to change on Product Selection screen (Client SDK is already selected as well)
- Accept default (User informix account) on User Athentication Settings screen Ensure informix password meets password complexity rules - default is Passwords must meet complexity requirements
- Do not enable role seperation
- Do not enable create an instance
If issues installing then uninstall
- Start-Control Panel-under programs "uninstall a program"
- Removed bundle first then other entries including GSKit"
- Start-All Programs-Administrative Tools-Server Manager
- Configuration-Local Users and Groups-remove user informix
- Start-regedit
- Remove HKEY-LocalMachine\Software\Informix
- Remove C:\Program Files\IBM
- Reboot and reinstall
3.2.2 Informix 11.70.FC8 on Windows 2008R2 HADR
Two instances
- ifx2 on WIN-8TER3P9MA6N
- ifx3 on WIN-8TER3P9MA6N
Make sure both hosts can ping each other. For vmware
- Change hostname to unique
- Set network adapters to to bridged automatic with replicate network state
- In Windows File Explorer go to Network and turn on default network sharing
Setup connectivity both ways between servers
- Edit c:\Windows\System32\drivers\etc\services and sync up entires at the bottom
- Run Start-All Programs-Informix Client SDK-setnet32 and add entries for both server on both hosts
- Open ports using netsh firewall set portopening TCP NNN on both hosts for the other server
- Create c:\Windows\System32\drivers\etc\hosts.equiv on both hosts and add hostname of the other server
- Test with cmd prompt to the other server Start-All Programs-Informix-current servername on both servers
- Error -956 means hosts.equiv entry is missing, add hostname from online.log of remote server
- dbaccess sysmaster@otherservername
Setup HDR
- Backup primary to shared folder ontape -s -L 0 -t STDIO > Z:\cache\x\bkup
- Stop Secondary onmode -ky
- Edit onconfig for secondary under C:\Program Files\IBM\Informix\11.70\etc and change ROOTPATH to match primary
- Make sure same device paths/files for the primary exist on the seconday
- On primary run onstat -d primary secondaryservername
- Monitor server errorlog on primary with onstat -m and wait for connection to timeout
- Restore secondary with ontape -p -t STDIO < Z:\cache\x\bkup
- On secondary run onmode -d secondary primaryservername
- Primary and secondary will then connect to each other
- The primary will realizing the secondary needs failure recovery and send the missing logs
- The secondary will realize it needs recovery
- The secondary completes restore by clearing logs and start receivng logs from the primary
- The primary will finish sending logs and mark itself operational
- The secondary will mark itself operational
- Also move primary to the next log (onmode -l) and check secondary online.log that it is applied
Primary online.log C:\PROGRA~1\IBM\Informix\11.70\ifx2.log (visible from onstat -m)
NOTE: Logical log 4 generate AFTER HDR is operational
17:45:43 DR: Reservation of the last logical log for log backup turned on 17:45:43 DR: new type = primary, secondary server name = ifx3 17:45:43 DR: Trying to connect to secondary server = ifx3 17:46:04 System Error: Wait on network event fai led 17:46:04 Socket: 556, Mask: 16, Error: 10060 17:47:05 System Error: Wait on network event fai led 17:47:05 Socket: 556, Mask: 16, Error: 10060 17:47:45 DR: Cannot connect to secondary server 17:47:45 DR: Turned off on primary server 17:49:15 DR: Primary server connected 17:49:15 DR: Secondary server needs failure recovery 17:49:20 Logical Log 3 Complete, timestamp: 0x29c63. 17:49:20 DR: Sending log 3, size 2500 pages, 70.84 percent used 17:49:21 DR: Sending log 4 (current), size 2500 pages, 0.16 percent used 17:49:23 DR: Sending Logical Logs Completed 17:49:24 DR: Primary server operational 17:49:25 Checkpoint Completed: duration was 1 seconds. 17:49:25 Thu Aug 28 - loguniq 4, logpos 0x5018, timestamp: 0x29ca3 Interval: 14 17:49:25 Maximum server connections 1 17:49:25 Checkpoint Statistics - Avg. Txn Block Time 0.000, # Txns blocked 0, Plog used 28, Llog used 19 18:00:31 Logical Log 4 Complete, timestamp: 0x29cab.Secondary online.log C:\PROGRA~1\IBM\Informix\11.70\ifx3.log (visible from onstat -m)
NOTE: Logical log 4 received/applied AFTER HDR is operational
17:48:07 IBM Informix Dynamic Server Started. 17:48:07 Requested shared memory segment size rounded from 32656KB to 32704KB Thu Aug 28 17:48:07 2014 17:48:07 Booting Languagefrom module <> 17:48:07 Loading Module 17:48:07 Booting Language from module <> 17:48:07 Loading Module 17:48:13 DR: DRAUTO is 0 (Off) 17:48:13 DR: ENCRYPT_HDR is 0 (HDR encryption Disabled) 17:48:13 IBM Informix Dynamic Server Version 11.70.FC8TL Software Serial Number AAA#B000000 17:48:13 Your evaluation license will expire on 2014-11-26 00:00:00 17:48:14 IBM Informix Dynamic Server Initialized -- Shared Memory Initialized. 17:48:14 Started 1 B-tree scanners. 17:48:14 B-tree scanner threshold set at 5000. 17:48:14 B-tree scanner range scan size set to -1. 17:48:14 B-tree scanner ALICE mode set to 6. 17:48:14 B-tree scanner index compression level set to med. 17:48:14 Data replication type and state information reset. To start DR, use the 'onmode -d' command and wait for the pair to be operational, before shutting down the database server 17:48:14 Dataskip is now OFF for all dbspaces 17:48:14 Restartable Restore has been ENABLED 17:48:14 Recovery Mode 17:48:22 Physical Restore of rootdbs, ifx2 started. 17:48:23 Checkpoint Completed: duration was 0 seconds. 17:48:23 Thu Aug 28 - loguniq 3, logpos 0x6d6018, timestamp: 0x29b49 Interval: 13 17:48:23 Maximum server connections 0 17:48:23 Checkpoint Statistics - Avg. Txn Block Time 0.000, # Txns blocked 0, Plog used 0, Llog used 0 17:48:23 Checkpoint Completed: duration was 0 seconds. 17:48:23 Thu Aug 28 - loguniq 3, logpos 0x6d6018, timestamp: 0x29b50 Interval: 14 17:48:23 Maximum server connections 0 17:48:23 Checkpoint Statistics - Avg. Txn Block Time 0.000, # Txns blocked 0, Plog used 0, Llog used 0 17:48:23 Physical Restore of rootdbs, ifx2 Completed. 17:48:23 Checkpoint Completed: duration was 0 seconds. 17:48:23 Thu Aug 28 - loguniq 3, logpos 0x6d6018, timestamp: 0x29b59 Interval: 14 17:48:23 Maximum server connections 0 17:49:13 DR: new type = secondary, primary server name = ifx2 17:49:13 DR: Trying to connect to primary server = ifx2 17:49:15 DR: Secondary server connected 17:49:15 DR: Secondary server needs failure recovery 17:49:16 DR: Failure recovery from disk in progress ... 17:49:16 Logical Recovery Started. 17:49:16 10 recovery worker threads will be started. 17:49:16 Start Logical Recovery - Start Log 3, End Log ? 17:49:16 Starting Log Position - 3 0x6d6018 17:49:16 Clearing the physical and logical logs has started 17:49:16 Cleared 100 MB of the physical and logical logs in 0 seconds 17:49:22 Started processing open transactions on secondary during startup 17:49:22 Finished processing open transactions on secondary during startup. 17:49:22 Checkpoint Completed: duration was 0 seconds. 17:49:22 Thu Aug 28 - loguniq 3, logpos 0x6dd018, timestamp: 0x29cb0 Interval: 15 17:49:22 Maximum server connections 0 17:49:22 Checkpoint Statistics - Avg. Txn Block Time 0.000, # Txns blocked 0, Plog used 17, Llog used 0 17:49:22 Logical Log 3 Complete, timestamp: 0x29ce3. 17:49:24 B-tree scanners disabled. 17:49:25 DR: HDR secondary server operational 17:49:25 Checkpoint Completed: duration was 0 seconds. 17:49:25 Thu Aug 28 - loguniq 4, logpos 0x5018, timestamp: 0x29cff Interval: 16 17:49:25 Maximum server connections 0 17:49:25 Checkpoint Statistics - Avg. Txn Block Time 0.000, # Txns blocked 0, Plog used 26, Llog used 0 18:00:31 Logical Log 4 Complete, timestamp: 0x29cff. 18:04:26 Checkpoint Completed: duration was 0 seconds. 18:04:26 Thu Aug 28 - loguniq 5, logpos 0x4018, timestamp: 0x29d21 Interval: 17 18:04:26 Maximum server connections 0 18:04:26 Checkpoint Statistics - Avg. Txn Block Time 0.000, # Txns blocked 0, Plog used 14, Llog used 0 Failover
- Stop primary with onmode -ky
- On secondary convert to standard (normal server) with onmode -d standard
Secondary online.log
20:24:50 Checkpoint Statistics - Avg. Txn Block Time 0.000, # Txns blocked 0, Plog used 20, Llog used 0 20:24:54 SMX thread is exiting 20:24:54 DR: Receive error 20:24:54 ASF Echo-Thread Server: asfcode = -25582: oserr = 0: errstr = : Network connection is broken. 20:24:54 DR_ERR set to -1 20:24:54 DR: Turned off on secondary server 20:25:46 Skipping failover callback. 20:25:47 Logical Recovery has reached the transaction cleanup phase. 20:25:47 Checkpoint Completed: duration was 0 seconds. 20:25:47 Sat Aug 30 - loguniq 7, logpos 0x8b0018, timestamp: 0x46071 Interval: 251 20:25:47 Maximum server connections 0 20:25:47 Checkpoint Statistics - Avg. Txn Block Time 0.000, # Txns blocked 0, Plog used 2, Llog used 1 20:25:47 Logical Recovery Complete. 8742 Committed, 0 Rolled Back, 0 Open, 0 Bad Locks 20:25:47 Logical Recovery Complete. 20:25:47 Quiescent Mode 20:25:47 Checkpoint Completed: duration was 0 seconds. 20:25:47 Sat Aug 30 - loguniq 7, logpos 0x8b2018, timestamp: 0x46088 Interval: 2524 Centos 6.5 64-bit
4.1 DB2
4.1.1 DB2 v10.5.0.3 Fix Pack 3a
Derived from Install DB2 10.5 on Centos 6.4 and v10.1 64-bit - missing some Linux libraries
Check centos config
- ldconfig -v 2>&1 | grep libstdc++.so.6
- We still needed the 32-bit libstdc++.so.6 and PAM libraries
- yum whatprovides /lib/libpam.so*
- yum update
- Disable SELinux : Edit /etc/selinux/config
- reboot
Unpack and launch the installer
- mkdir /tmp/x
- cd /tmp/x
- tar xvzf /mnt/hgfs/db2.10.5/v10.5_linuxx64_server_t.tar.gz
- cd server_t
- ./db2setup
This installs into /opt/ibm/db2/V10.5/instance.
As part of this it will do the prerequiste checks in the terminal window!
Select "Install a Product" then scroll down in the box on the right, pick the product and press the "Install New"
Pick custom
I choose DB2 Advanced and to save a response file (/root/db2server.rsp) which is the default button.
When I got to "Select the features to install" I added:
- Server support - DB2 Text Search,informix data source support, Spatial Extender server support
- Client support - Spatial Extender client
- Application development tools - Base application development tools
- Oracle data source support
The installer still mentions the DB2 Information Centre rather than IBM Knowledge Centre!
The installer then prompts you for:
- A user for the DB2 Administration Server dasusr1 group dasadm1
- An instance owner db2inst1 group db2iadm1
- User information for a fenced user db2fenc1 group dv2fadm1
- Instance communication and startup - service db2c_db2inst1 port 50000 and to "Autostart the instance at system startup"
- No instance notifications - they still go to the notify log
- Configure Text Search - HTTP Service db2j_db2inst1 port 55000
At the end the installer prompts you login as db2inst1 and to validate your installation files, instance and database functionality using /opt/ibm/db2/V10.5/bin/db2val.
I then created a sample database
- su - db2inst1
- db2pd -utilities - instance should appear as active
- db2sampl - create sample database
- connect to the database - db2 connect to sample
- Query some data - db2 "select tabschema,count(*) from syscat.tables group by tabschema order by tabschema"
Create a new instance
- groupadd dasadm2
- groupadd db2iadm2
- groupadd db2fadm2
- useradd dasusr2 -g dasadm2
- useradd db2inst2 -g db2iadm2
- useradd db2fenc2 -g db2fadm2
- /opt/ibm/db2/V10.5/instance/db2icrt -u db2fenc2 db2inst2
Start/stop instance - tools are in ~instance_owner/sqllib/adm
su - db2inst2 db2start db2stop 4.1.2 DB2 v10.5.0.4 Fix Pack 4 (Cancun)
Downloaded from IBM DB2 with BLU Acceleration for Linux, UNIX, and Windows
This is the DB2 for xSeries x86 the x86_64 for Linux
FYI This is installed on the same VM as 4.1.1 DB2 v10.5.0.3 Fix Pack 3a hence all the previous yum updates apply.
Unpack and launch the prerequistes check (as purescale can now be done over sockets)
- mkdir /tmp/x
- cd /tmp/x
- tar xvzf /mnt/hgfs/cache/v10.5_linuxx64_server_t.tar.gz
- cd server_t
- yum update
- Disable SELinux : Edit /etc/selinux/config
- reboot
- ./db2prereqcheck >/tmp/p1
- vim /tmp/p1
Run installer - ./db2setup
- Select "Install a Product" then scroll down in the box on the right, pick the product and press the "Install New"
- I choose the 1st item DB2 Version 10.5 Fixpack 4 Workgroup,Enterprise and Advanced Editions
- Choose custom
- Choose Install DB2 Server Edition and change response file to (/root/db2server10.5.0.4.rsp).
- Click Select all which adds Oracle Data Source support
- Change install directory to /opt/ibm/db2/V10.5.0.4
- Language left as just English!
- Access DB2 Information Centre left as on the IBM Web Site
- Choose Single Partition and create an instance
- Instance owner db2inst2 group db2iadm2
- Fenced user db2fenc2 group db2fadm2
- Instance communication and startup Service name db2c_db2inst2 Port 50001 and tick Autostart instance at system startup
- Contact for health monitor notification left at default
- DB2 Text Search service - Service name db2j_db2inst2 port 55001
- Click Finish
- Post install steps
- Optionally run /opt/ibm/db2/V10.0.5.4/bin/db2val to validate installation files,instance, and database functionality
- Open first steps using db2fs
I then created a sample database
- su - db2inst2
- db2pd -utilities - instance should appear as active
- db2sampl - create sample database
- connect to the database - db2 connect to sample
- Query some data - db2 "select tabschema,count(*) from syscat.tables group by tabschema order by tabschema"
4.1.3 DB2 v10.5.0.4 HADR
Install another DB2 setup and instance (db2inst3)
Set INTRA_PARALLEL YES and bounce server
Setup will be
Instance inst2 192.168.139.250 database dave HADR port 60000 Instance inst3 192.168.139.251 database dave HADR port 60001Create database dave on inst3
On inst2: db2look -d dave -createdb On inst3: Paste create database statement into /tmp/a db2 -tvf /tmp/a On inst2: db2 get db cfg for dave > /mnt/hgfs/cache/1 On inst3: db2 get db cfg for dave > /tmp/a diff /mnt/hgfs/cache/1 /tmp/aUpdate db dave on inst3 to have the same parameters as db dave on inst2
db2 update db cfg for dave using DATABASE_MEMORY 97475 AUTOMATIC db2 update db cfg for dave using SHEAPTHRES_SHR 32000 SORTHEAP 3200 db2 update db cfg for dave using CATALOGCACHE_SZ 330 LOGBUFSZ 964 db2 update db cfg for dave using LOGARCHMETH1 LOGRETAIN db2 terminate db2 attach to inst3 mkdir /tmp/z db2 backup database dave to /tmp/z db2 activate db daveBackup primary database on instance inst2
mkdir /mnt/hgfs/cache/inst2.dave.bkup db2 backup database dave to /mnt/hgfs/cache/inst2.dave.bkupPoke holes in firewall on both hosts
On inst2 host allow connections to port 60000 iptables --line -vnL # Note input REJECTED line ifconfig -a # eth0 is network Chain INPUT (policy ACCEPT 0 packets, 0 bytes) num pkts bytes target prot opt in out source destination 1 226 64983 ACCEPT all -- * * 0.0.0.0/0 0.0.0.0/0 state RELATED,ESTABLISHED 2 5 444 ACCEPT icmp -- * * 0.0.0.0/0 0.0.0.0/0 3 4 240 ACCEPT all -- lo * 0.0.0.0/0 0.0.0.0/0 4 2 120 ACCEPT tcp -- * * 0.0.0.0/0 0.0.0.0/0 state NEW tcp dpt:22 5 763 46839 REJECT all -- * * 0.0.0.0/0 0.0.0.0/0 reject-with icmp-host-prohibited iptables -I INPUT 5 -i eth0 -p tcp --dport 60000 -m state --state NEW,ESTABLISHED -j ACCEPT /sbin/service iptables save On inst3 host allow connections to port 60001 iptables --line -vnL # Note input REJECTED line ifconfig -a # eth1 is network iptables -I INPUT 5 -i eth1 -p tcp --dport 60001 -m state --state NEW,ESTABLISHED -j ACCEPT /sbin/service iptables saveSet parameters on primary database
db2 update db cfg for dave using HADR_LOCAL_HOST 192.168.139.250 db2 update db cfg for dave using HADR_LOCAL_SVC 60000 db2 update db cfg for dave using HADR_REMOTE_HOST 192.168.139.251 db2 update db cfg for dave using HADR_REMOTE_SVC 60001 db2 update db cfg for dave using HADR_REMOTE_INST db2inst3 db2 update db cfg for dave using LOGINDEXBUILD ONRestore standby database
On standby list storage groups vim /tmp/c SELECT VARCHAR(STORAGE_GROUP_NAME, 30) AS STOGROUP, VARCHAR(DB_STORAGE_PATH, 40) AS STORAGE_PATH FROM TABLE(ADMIN_GET_STORAGE_PATHS('',-1)) AS T; db2 -tvf /tmp/c SELECT VARCHAR(STORAGE_GROUP_NAME, 30) AS STOGROUP, VARCHAR(DB_STORAGE_PATH, 40) AS STORAGE_PATH FROM TABLE(ADMIN_GET_STORAGE_PATHS('',-1)) AS T STOGROUP STORAGE_PATH ------------------------------ ---------------------------------------- IBMSTOGROUP /home/db2inst3 1 record(s) selected. On standby get db directory db2 list db directory | grep Local Local database directory = /home/db2inst3 db2 terminate db2 attach to db2inst3 db2 deactivate db dave db2 restore database dave from /mnt/hgfs/cache/inst2.dave.bkup taken at 20140907095137 on /home/db2inst3 dbpath on /home/db2inst3Setup HADR parameters on standby and start hadr on standby
db2 update db cfg for dave using HADR_LOCAL_HOST 192.168.139.251 db2 update db cfg for dave using HADR_LOCAL_SVC 60001 db2 update db cfg for dave using HADR_REMOTE_HOST 192.168.139.250 db2 update db cfg for dave using HADR_REMOTE_SVC 60000 db2 update db cfg for dave using HADR_REMOTE_INST db2inst2 db2 start hadr on database dave as standbyStart HADR on primary
db2 start hadr on database dave as primaryCheck HADR is in peer state
db2pd -db dave -hadr Database Member 0 -- Database DAVE -- Active -- Up 0 days 00:01:55 -- Date 2014-09-07-11.11.40.240899 HADR_ROLE = PRIMARY REPLAY_TYPE = PHYSICAL HADR_SYNCMODE = NEARSYNC STANDBY_ID = 1 LOG_STREAM_ID = 0 HADR_STATE = PEER HADR_FLAGS = PRIMARY_MEMBER_HOST = 192.168.139.250 PRIMARY_INSTANCE = db2inst2 PRIMARY_MEMBER = 0 STANDBY_MEMBER_HOST = 192.168.139.251 STANDBY_INSTANCE = db2inst3 STANDBY_MEMBER = 0 HADR_CONNECT_STATUS = CONNECTED HADR_CONNECT_STATUS_TIME = 09/07/2014 11:09:46.163486 (1410113386) HEARTBEAT_INTERVAL(seconds) = 30 HEARTBEAT_MISSED = 0 HEARTBEAT_EXPECTED = 3 HADR_TIMEOUT(seconds) = 120 TIME_SINCE_LAST_RECV(seconds) = 24 PEER_WAIT_LIMIT(seconds) = 0 LOG_HADR_WAIT_CUR(seconds) = 0.000 LOG_HADR_WAIT_RECENT_AVG(seconds) = 0.000000 LOG_HADR_WAIT_ACCUMULATED(seconds) = 0.000 LOG_HADR_WAIT_COUNT = 0 SOCK_SEND_BUF_REQUESTED,ACTUAL(bytes) = 0, 19800 SOCK_RECV_BUF_REQUESTED,ACTUAL(bytes) = 0, 87380 PRIMARY_LOG_FILE,PAGE,POS = S0000007.LOG, 0, 78226593 STANDBY_LOG_FILE,PAGE,POS = S0000007.LOG, 0, 78226593 HADR_LOG_GAP(bytes) = 0 STANDBY_REPLAY_LOG_FILE,PAGE,POS = S0000007.LOG, 0, 78226593 STANDBY_RECV_REPLAY_GAP(bytes) = 0 PRIMARY_LOG_TIME = 09/07/2014 10:08:31.000000 (1410109711) STANDBY_LOG_TIME = 09/07/2014 10:08:31.000000 (1410109711) STANDBY_REPLAY_LOG_TIME = 09/07/2014 10:08:31.000000 (1410109711) STANDBY_RECV_BUF_SIZE(pages) = 1928 STANDBY_RECV_BUF_PERCENT = 0 STANDBY_SPOOL_LIMIT(pages) = 25600 STANDBY_SPOOL_PERCENT = 0 STANDBY_ERROR_TIME = NULL PEER_WINDOW(seconds) = 0 READS_ON_STANDBY_ENABLED = NEnable reads on standby
On standby: db2set DB2_HADR_ROS=ON db2set DB2_STANDBY_ISO=UR db2 update db cfg for dave using HADR_SYNCMODE SYNC db2stop force db2start On primary: db2 update db cfg for dave using HADR_SYNCMODE SYNC db2 terminate db2 attach to db2inst2 db2 deactivate db dave db2 activate db daveDiag log on standby should show connection and catchup
State goes from
HDR_NO_STATE-HDR_NO_STATE-HDR_S_BOOT-HDR_S_LOC_CATCHUP- HDR_S_REM_CATCHUP_PENDING-HDR_S_REM_CATCHUP_PENDING-HDR_S_REM_CATCHUP-HDR_S_NPEERNOTE: Socket options for buffer sizes are setup and then adjusted
2014-09-07-11.08.28.714974-420 I836039E503 LEVEL: Info PID : 57309 TID : 140736796288768 PROC : db2sysc 0 INSTANCE: db2inst3 NODE : 000 DB : DAVE APPHDL : 0-165 APPID: *LOCAL.db2inst3.140907180828 AUTHID : DB2INST3 HOSTNAME: centos4.localdomain EDUID : 232 EDUNAME: db2agent (DAVE) 0 FUNCTION: DB2 UDB, High Availability Disaster Recovery, hdrEduStartup, probe:21151 MESSAGE : HADR Startup has begun. .. 2014-09-07-11.08.28.718373-420 I837647E592 LEVEL: Info PID : 57309 TID : 140736796288768 PROC : db2sysc 0 INSTANCE: db2inst3 NODE : 000 DB : DAVE APPHDL : 0-165 APPID: *LOCAL.db2inst3.140907180828 AUTHID : DB2INST3 HOSTNAME: centos4.localdomain EDUID : 232 EDUNAME: db2agent (DAVE) 0 FUNCTION: DB2 UDB, High Availability Disaster Recovery, hdrValidateLocalServiceDbCfg, probe:21215 DATA #1 :HADR_LOCAL_SVC 60001, Port number 60001, SVCENAME db2c_db2inst3, Port number 50000 2014-09-07-11.08.28.719077-420 E838240E451 LEVEL: Event PID : 57309 TID : 140736817260288 PROC : db2sysc 0 INSTANCE: db2inst3 NODE : 000 DB : DAVE HOSTNAME: centos4.localdomain EDUID : 616 EDUNAME: db2hadrs.0.0 (DAVE) 0 FUNCTION: DB2 UDB, High Availability Disaster Recovery, hdrSetHdrState, probe:10000 CHANGE : HADR state set to HDR_NO_STATE (was HDR_NO_STATE), connId=0 2014-09-07-11.08.28.721036-420 I838692E505 LEVEL: Info PID : 57309 TID : 140736817260288 PROC : db2sysc 0 INSTANCE: db2inst3 NODE : 000 DB : DAVE HOSTNAME: centos4.localdomain EDUID : 616 EDUNAME: db2hadrs.0.0 (DAVE) 0 FUNCTION: DB2 UDB, High Availability Disaster Recovery, hdrLogThisEdusEndpoints, probe:20175 DATA #1 : HADR_LOCAL_HOST 192.168.139.251, HADR_LOCAL_SVC 60001 is resolved to 192.168.139.251:60001 2014-09-07-11.08.28.721273-420 I839198E507 LEVEL: Info PID : 57309 TID : 140736817260288 PROC : db2sysc 0 INSTANCE: db2inst3 NODE : 000 DB : DAVE HOSTNAME: centos4.localdomain EDUID : 616 EDUNAME: db2hadrs.0.0 (DAVE) 0 FUNCTION: DB2 UDB, High Availability Disaster Recovery, hdrLogThisEdusEndpoints, probe:20185 DATA #1 : HADR_REMOTE_HOST 192.168.139.250, HADR_REMOTE_SVC 60000 is resolved to 192.168.139.250:60000 2014-09-07-11.08.28.721461-420 E839706E449 LEVEL: Event PID : 57309 TID : 140736817260288 PROC : db2sysc 0 INSTANCE: db2inst3 NODE : 000 DB : DAVE HOSTNAME: centos4.localdomain EDUID : 616 EDUNAME: db2hadrs.0.0 (DAVE) 0 FUNCTION: DB2 UDB, High Availability Disaster Recovery, hdrSetHdrState, probe:10000 CHANGE : HADR state set to HDR_S_BOOT (was HDR_NO_STATE), connId=0 2014-09-07-11.08.28.721702-420 I840156E441 LEVEL: Info PID : 57309 TID : 140736955672320 PROC : db2sysc 0 INSTANCE: db2inst3 NODE : 000 DB : DAVE HOSTNAME: centos4.localdomain EDUID : 593 EDUNAME: db2loggw (DAVE) 0 FUNCTION: DB2 UDB, data protection services, sqpLoggwEdu::sqlpLoggwMain, probe:4485 DATA #1 : HADR log writing services have started. 2014-09-07-11.08.28.721989-420 E840598E454 LEVEL: Event PID : 57309 TID : 140736817260288 PROC : db2sysc 0 INSTANCE: db2inst3 NODE : 000 DB : DAVE HOSTNAME: centos4.localdomain EDUID : 616 EDUNAME: db2hadrs.0.0 (DAVE) 0 FUNCTION: DB2 UDB, High Availability Disaster Recovery, hdrSetHdrState, probe:10000 CHANGE : HADR state set to HDR_S_LOC_CATCHUP (was HDR_S_BOOT), connId=0 2014-09-07-11.08.28.722176-420 I841053E478 LEVEL: Info PID : 57309 TID : 140736817260288 PROC : db2sysc 0 INSTANCE: db2inst3 NODE : 000 DB : DAVE HOSTNAME: centos4.localdomain EDUID : 616 EDUNAME: db2hadrs.0.0 (DAVE) 0 FUNCTION: DB2 UDB, High Availability Disaster Recovery, HDR_LIGHT_SCAN::hlsInitLightScan, probe:16100 DATA #1 : HADR: Initializing NON-RETRIEVING/CONTINUOUS LightScan 2014-09-07-11.08.28.722385-420 I841532E579 LEVEL: Info PID : 57309 TID : 140736817260288 PROC : db2sysc 0 INSTANCE: db2inst3 NODE : 000 DB : DAVE HOSTNAME: centos4.localdomain EDUID : 616 EDUNAME: db2hadrs.0.0 (DAVE) 0 FUNCTION: DB2 UDB, High Availability Disaster Recovery, HDR_LIGHT_SCAN::hlsPerformUltraLightScan, probe:12010 DATA #1 : HADR : Validating that all extents between head 6 and last known shipped position LSO (74052769) extent are accessible. rfwdHeadChainId is set to 0 2014-09-07-11.08.28.725372-420 I847030E489 LEVEL: Info PID : 57309 TID : 140736817260288 PROC : db2sysc 0 INSTANCE: db2inst3 NODE : 000 DB : DAVE HOSTNAME: centos4.localdomain EDUID : 616 EDUNAME: db2hadrs.0.0 (DAVE) 0 FUNCTION: DB2 UDB, High Availability Disaster Recovery, hdrEdu::hdrEduEntry, probe:20926 DATA #1 : hdrROSMinReplayLsn set to 000000000004252B, hdrROSMinReplayLso set to 70974288 2014-09-07-11.08.28.725545-420 I847520E408 LEVEL: Info PID : 57309 TID : 140736817260288 PROC : db2sysc 0 INSTANCE: db2inst3 NODE : 000 DB : DAVE HOSTNAME: centos4.localdomain EDUID : 616 EDUNAME: db2hadrs.0.0 (DAVE) 0 FUNCTION: DB2 UDB, High Availability Disaster Recovery, hdrEdu::hdrEduS, probe:21400 MESSAGE : Standby Started. 2014-09-07-11.08.28.725692-420 I847929E469 LEVEL: Info PID : 57309 TID : 140736817260288 PROC : db2sysc 0 INSTANCE: db2inst3 NODE : 000 DB : DAVE HOSTNAME: centos4.localdomain EDUID : 616 EDUNAME: db2hadrs.0.0 (DAVE) 0 FUNCTION: DB2 UDB, High Availability Disaster Recovery, hdrSetTcpWindowSize, probe:32201 DATA #1 : Info: HADR Socket send buffer size, SO_SNDBUF: 16384 bytes 2014-09-07-11.08.28.725858-420 I848399E472 LEVEL: Info PID : 57309 TID : 140736817260288 PROC : db2sysc 0 INSTANCE: db2inst3 NODE : 000 DB : DAVE HOSTNAME: centos4.localdomain EDUID : 616 EDUNAME: db2hadrs.0.0 (DAVE) 0 FUNCTION: DB2 UDB, High Availability Disaster Recovery, hdrSetTcpWindowSize, probe:32251 DATA #1 : Info: HADR Socket receive buffer size, SO_RCVBUF: 87380 bytes 2014-09-07-11.08.28.726252-420 I849347E421 LEVEL: Info PID : 57309 TID : 140736817260288 PROC : db2sysc 0 INSTANCE: db2inst3 NODE : 000 DB : DAVE HOSTNAME: centos4.localdomain EDUID : 616 EDUNAME: db2hadrs.0.0 (DAVE) 0 FUNCTION: DB2 UDB, High Availability Disaster Recovery, hdrStartReplayMaster, probe:21251 MESSAGE : Replaymaster Starting... 2014-09-07-11.08.28.726295-420 I849769E507 LEVEL: Info PID : 57309 TID : 140736796288768 PROC : db2sysc 0 INSTANCE: db2inst3 NODE : 000 DB : DAVE APPHDL : 0-165 APPID: *LOCAL.db2inst3.140907180828 AUTHID : DB2INST3 HOSTNAME: centos4.localdomain EDUID : 232 EDUNAME: db2agent (DAVE) 0 FUNCTION: DB2 UDB, High Availability Disaster Recovery, hdrEduStartup, probe:21152 MESSAGE : HADR Startup has completed. 2014-09-07-11.08.28.894039-420 E867694E469 LEVEL: Event PID : 57309 TID : 140736817260288 PROC : db2sysc 0 INSTANCE: db2inst3 NODE : 000 DB : DAVE HOSTNAME: centos4.localdomain EDUID : 616 EDUNAME: db2hadrs.0.0 (DAVE) 0 FUNCTION: DB2 UDB, High Availability Disaster Recovery, hdrSetHdrState, probe:10000 CHANGE : HADR state set to HDR_S_REM_CATCHUP_PENDING (was HDR_S_LOC_CATCHUP), connId=0 2014-09-07-11.09.45.486639-420 I868164E483 LEVEL: Warning PID : 57309 TID : 140736817260288 PROC : db2sysc 0 INSTANCE: db2inst3 NODE : 000 DB : DAVE HOSTNAME: centos4.localdomain EDUID : 616 EDUNAME: db2hadrs.0.0 (DAVE) 0 FUNCTION: DB2 UDB, High Availability Disaster Recovery, hdrHandleRemoteConn, probe:30160 MESSAGE : TCP socket connection accepted. Remote Host: 192.168.139.250 Port: 27308 2014-09-07-11.09.45.487052-420 I868648E503 LEVEL: Info PID : 57309 TID : 140736817260288 PROC : db2sysc 0 INSTANCE: db2inst3 NODE : 000 DB : DAVE HOSTNAME: centos4.localdomain EDUID : 616 EDUNAME: db2hadrs.0.0 (DAVE) 0 FUNCTION: DB2 UDB, High Availability Disaster Recovery, hdrHandleHsAck, probe:43900 DATA #1 : Handshake HDR_MSG_REDIRECT message is received from 192.168.139.250:60000 (192.168.139.250:60000) 2014-09-07-11.09.46.298095-420 I869152E501 LEVEL: Info PID : 57309 TID : 140736817260288 PROC : db2sysc 0 INSTANCE: db2inst3 NODE : 000 DB : DAVE HOSTNAME: centos4.localdomain EDUID : 616 EDUNAME: db2hadrs.0.0 (DAVE) 0 FUNCTION: DB2 UDB, High Availability Disaster Recovery, hdrHandleHsAck, probe:43900 DATA #1 : Handshake HDR_MSG_HDRACK message is received from 192.168.139.250:60000 (192.168.139.250:60000) 2014-09-07-11.09.46.298584-420 I869654E442 LEVEL: Info PID : 57309 TID : 140736817260288 PROC : db2sysc 0 INSTANCE: db2inst3 NODE : 000 DB : DAVE HOSTNAME: centos4.localdomain EDUID : 616 EDUNAME: db2hadrs.0.0 (DAVE) 0 FUNCTION: DB2 UDB, High Availability Disaster Recovery, hdrAfterVerifySystem, probe:30440 DATA #1 : Connection succeeded, connId=1 2014-09-07-11.09.46.304319-420 I870097E482 LEVEL: Info PID : 57309 TID : 140736817260288 PROC : db2sysc 0 INSTANCE: db2inst3 NODE : 000 DB : DAVE HOSTNAME: centos4.localdomain EDUID : 616 EDUNAME: db2hadrs.0.0 (DAVE) 0 FUNCTION: DB2 UDB, High Availability Disaster Recovery, hdrAfterVerifySystem, probe:30532 DATA #1 : Info: HADR Socket send buffer size adjusted to, SO_SNDBUF: 19800 bytes 2014-09-07-11.09.46.304572-420 I870580E485 LEVEL: Info PID : 57309 TID : 140736817260288 PROC : db2sysc 0 INSTANCE: db2inst3 NODE : 000 DB : DAVE HOSTNAME: centos4.localdomain EDUID : 616 EDUNAME: db2hadrs.0.0 (DAVE) 0 FUNCTION: DB2 UDB, High Availability Disaster Recovery, hdrAfterVerifySystem, probe:30534 DATA #1 : Info: HADR Socket receive buffer size adjusted to, SO_RCVBUF: 87380 bytes 2014-09-07-11.09.46.304748-420 E871066E477 LEVEL: Event PID : 57309 TID : 140736817260288 PROC : db2sysc 0 INSTANCE: db2inst3 NODE : 000 DB : DAVE HOSTNAME: centos4.localdomain EDUID : 616 EDUNAME: db2hadrs.0.0 (DAVE) 0 FUNCTION: DB2 UDB, High Availability Disaster Recovery, hdrSetHdrState, probe:10000 CHANGE : HADR state set to HDR_S_REM_CATCHUP_PENDING (was HDR_S_REM_CATCHUP_PENDING), connId=1 2014-09-07-11.09.46.304901-420 I871544E470 LEVEL: Info PID : 57309 TID : 140736817260288 PROC : db2sysc 0 INSTANCE: db2inst3 NODE : 000 DB : DAVE HOSTNAME: centos4.localdomain EDUID : 616 EDUNAME: db2hadrs.0.0 (DAVE) 0 FUNCTION: DB2 UDB, High Availability Disaster Recovery, HDR_LIGHT_SCAN::hlsInitLightScan, probe:16100 DATA #1 : HADR: Initializing RETRIEVING/PHASED LightScan 2014-09-07-11.09.46.416101-420 E875220E469 LEVEL: Event PID : 57309 TID : 140736817260288 PROC : db2sysc 0 INSTANCE: db2inst3 NODE : 000 DB : DAVE HOSTNAME: centos4.localdomain EDUID : 616 EDUNAME: db2hadrs.0.0 (DAVE) 0 FUNCTION: DB2 UDB, High Availability Disaster Recovery, hdrSetHdrState, probe:10000 CHANGE : HADR state set to HDR_S_REM_CATCHUP (was HDR_S_REM_CATCHUP_PENDING), connId=1 2014-09-07-11.09.46.550416-420 E886009E455 LEVEL: Event PID : 57309 TID : 140736817260288 PROC : db2sysc 0 INSTANCE: db2inst3 NODE : 000 DB : DAVE HOSTNAME: centos4.localdomain EDUID : 616 EDUNAME: db2hadrs.0.0 (DAVE) 0 FUNCTION: DB2 UDB, High Availability Disaster Recovery, hdrSetHdrState, probe:10000 CHANGE : HADR state set to HDR_S_NPEER (was HDR_S_REM_CATCHUP), connId=1 On the primary similar happens in the db2diag.log
State goes from
HDR_NO_STATE-HDR_P_BOOT-HDR_P_REM_CATCHUP_PENDING-HDR_P_REM_CATCHUP-HDR_P_NPEER-HDR_P_PEER
NOTE: Socket options for buffer sizes are setup and then adjusted
2014-09-07-11.09.45.100522-420 E1510088E517 LEVEL: Event PID : 2576 TID : 140571142252288 PROC : db2sysc 0 INSTANCE: db2inst2 NODE : 000 DB : DAVE APPHDL : 0-206 APPID: *LOCAL.db2inst2.140907180945 AUTHID : DB2INST2 HOSTNAME: centos2.localdomain EDUID : 191 EDUNAME: db2agent (DAVE) 0 FUNCTION: DB2 UDB, base sys utilities, sqeDBMgr::StartUsingLocalDatabase, probe:13 START : Received START HADR PRIMARY command. 2014-09-07-11.09.45.330167-420 I1512049E503 LEVEL: Info PID : 2576 TID : 140571142252288 PROC : db2sysc 0 INSTANCE: db2inst2 NODE : 000 DB : DAVE APPHDL : 0-206 APPID: *LOCAL.db2inst2.140907180945 AUTHID : DB2INST2 HOSTNAME: centos2.localdomain EDUID : 191 EDUNAME: db2agent (DAVE) 0 FUNCTION: DB2 UDB, High Availability Disaster Recovery, hdrEduStartup, probe:21151 MESSAGE : HADR Startup has begun. 2014-09-07-11.09.45.333313-420 E1512553E2628 LEVEL: Event PID : 2576 TID : 140571142252288 PROC : db2sysc 0 INSTANCE: db2inst2 NODE : 000 DB : DAVE APPHDL : 0-206 APPID: *LOCAL.db2inst2.140907180945 AUTHID : DB2INST2 HOSTNAME: centos2.localdomain EDUID : 191 EDUNAME: db2agent (DAVE) 0 FUNCTION: DB2 UDB, High Availability Disaster Recovery, hdrSetDbRoleAndDbType, probe:10020 CHANGE : HADR DATABASE ROLE/TYPE - HADR database role set to PRIMARY (was STANDARD). HADR database type set to PHYSICAL (was NONE). 2014-09-07-11.09.45.349546-420 I1517331E505 LEVEL: Info PID : 2576 TID : 140571154835200 PROC : db2sysc 0 INSTANCE: db2inst2 NODE : 000 DB : DAVE HOSTNAME: centos2.localdomain EDUID : 282 EDUNAME: db2hadrp.0.1 (DAVE) 0 FUNCTION: DB2 UDB, High Availability Disaster Recovery, hdrLogThisEdusEndpoints, probe:20175 DATA #1 :HADR_LOCAL_HOST 192.168.139.250, HADR_LOCAL_SVC 60000 is resolved to 192.168.139.250:60000 2014-09-07-11.09.45.349733-420 I1517837E507 LEVEL: Info PID : 2576 TID : 140571154835200 PROC : db2sysc 0 INSTANCE: db2inst2 NODE : 000 DB : DAVE HOSTNAME: centos2.localdomain EDUID : 282 EDUNAME: db2hadrp.0.1 (DAVE) 0 FUNCTION: DB2 UDB, High Availability Disaster Recovery, hdrLogThisEdusEndpoints, probe:20185 DATA #1 : HADR_REMOTE_HOST 192.168.139.251, HADR_REMOTE_SVC 60001 is resolved to 192.168.139.251:60001 2014-09-07-11.09.45.349899-420 E1518345E449 LEVEL: Event PID : 2576 TID : 140571154835200 PROC : db2sysc 0 INSTANCE: db2inst2 NODE : 000 DB : DAVE HOSTNAME: centos2.localdomain EDUID : 282 EDUNAME: db2hadrp.0.1 (DAVE) 0 FUNCTION: DB2 UDB, High Availability Disaster Recovery, hdrSetHdrState, probe:10000 CHANGE : HADR state set to HDR_P_BOOT (was HDR_NO_STATE), connId=0 2014-09-07-11.09.45.350052-420 I1518795E408 LEVEL: Info PID : 2576 TID : 140571154835200 PROC : db2sysc 0 INSTANCE: db2inst2 NODE : 000 DB : DAVE HOSTNAME: centos2.localdomain EDUID : 282 EDUNAME: db2hadrp.0.1 (DAVE) 0 FUNCTION: DB2 UDB, High Availability Disaster Recovery, hdrEdu::hdrEduP, probe:20301 MESSAGE : Primary Started. 2014-09-07-11.09.45.350192-420 I1519204E469 LEVEL: Info PID : 2576 TID : 140571154835200 PROC : db2sysc 0 INSTANCE: db2inst2 NODE : 000 DB : DAVE HOSTNAME: centos2.localdomain EDUID : 282 EDUNAME: db2hadrp.0.1 (DAVE) 0 FUNCTION: DB2 UDB, High Availability Disaster Recovery, hdrSetTcpWindowSize, probe:32201 DATA #1 : Info: HADR Socket send buffer size, SO_SNDBUF: 16384 bytes 2014-09-07-11.09.45.350426-420 I1519674E472 LEVEL: Info PID : 2576 TID : 140571154835200 PROC : db2sysc 0 INSTANCE: db2inst2 NODE : 000 DB : DAVE HOSTNAME: centos2.localdomain EDUID : 282 EDUNAME: db2hadrp.0.1 (DAVE) 0 FUNCTION: DB2 UDB, High Availability Disaster Recovery, hdrSetTcpWindowSize, probe:32251 DATA #1 : Info: HADR Socket receive buffer size, SO_RCVBUF: 87380 bytes 2014-09-07-11.09.45.351646-420 I1520622E471 LEVEL: Info PID : 2576 TID : 140571154835200 PROC : db2sysc 0 INSTANCE: db2inst2 NODE : 000 DB : DAVE HOSTNAME: centos2.localdomain EDUID : 282 EDUNAME: db2hadrp.0.1 (DAVE) 0 FUNCTION: DB2 UDB, High Availability Disaster Recovery, hdrSendHsMsgNoDefer, probe:30539 DATA #1 : A HDR_MSG_REDIRECT message was sent to 192.168.139.251:60001 2014-09-07-11.09.46.060413-420 I1521094E483 LEVEL: Warning PID : 2576 TID : 140571154835200 PROC : db2sysc 0 INSTANCE: db2inst2 NODE : 000 DB : DAVE HOSTNAME: centos2.localdomain EDUID : 282 EDUNAME: db2hadrp.0.1 (DAVE) 0 FUNCTION: DB2 UDB, High Availability Disaster Recovery, hdrHandleRemoteConn, probe:30160 MESSAGE : TCP socket connection accepted. Remote Host: 192.168.139.251 Port: 25830 2014-09-07-11.09.46.163107-420 I1522079E442 LEVEL: Info PID : 2576 TID : 140571154835200 PROC : db2sysc 0 INSTANCE: db2inst2 NODE : 000 DB : DAVE HOSTNAME: centos2.localdomain EDUID : 282 EDUNAME: db2hadrp.0.1 (DAVE) 0 FUNCTION: DB2 UDB, High Availability Disaster Recovery, hdrAfterVerifySystem, probe:30440 DATA #1 : Connection succeeded, connId=1 2014-09-07-11.09.46.163518-420 E1522522E462 LEVEL: Event PID : 2576 TID : 140571154835200 PROC : db2sysc 0 INSTANCE: db2inst2 NODE : 000 DB : DAVE HOSTNAME: centos2.localdomain EDUID : 282 EDUNAME: db2hadrp.0.1 (DAVE) 0 FUNCTION: DB2 UDB, High Availability Disaster Recovery, hdrSetHdrState, probe:10000 CHANGE : HADR state set to HDR_P_REM_CATCHUP_PENDING (was HDR_P_BOOT), connId=1 2014-09-07-11.09.46.171540-420 I1522985E482 LEVEL: Info PID : 2576 TID : 140571154835200 PROC : db2sysc 0 INSTANCE: db2inst2 NODE : 000 DB : DAVE HOSTNAME: centos2.localdomain EDUID : 282 EDUNAME: db2hadrp.0.1 (DAVE) 0 FUNCTION: DB2 UDB, High Availability Disaster Recovery, hdrAfterVerifySystem, probe:30532 DATA #1 : Info: HADR Socket send buffer size adjusted to, SO_SNDBUF: 19800 bytes 2014-09-07-11.09.46.171798-420 I1523468E485 LEVEL: Info PID : 2576 TID : 140571154835200 PROC : db2sysc 0 INSTANCE: db2inst2 NODE : 000 DB : DAVE HOSTNAME: centos2.localdomain EDUID : 282 EDUNAME: db2hadrp.0.1 (DAVE) 0 FUNCTION: DB2 UDB, High Availability Disaster Recovery, hdrAfterVerifySystem, probe:30534 DATA #1 : Info: HADR Socket receive buffer size adjusted to, SO_RCVBUF: 87380 bytes 2014-09-07-11.09.46.273860-420 I1523954E507 LEVEL: Info PID : 2576 TID : 140571142252288 PROC : db2sysc 0 INSTANCE: db2inst2 NODE : 000 DB : DAVE APPHDL : 0-206 APPID: *LOCAL.db2inst2.140907180945 AUTHID : DB2INST2 HOSTNAME: centos2.localdomain EDUID : 191 EDUNAME: db2agent (DAVE) 0 FUNCTION: DB2 UDB, High Availability Disaster Recovery, hdrEduStartup, probe:21152 MESSAGE : HADR Startup has completed. 2014-09-07-11.09.46.275125-420 I1524462E441 LEVEL: Info PID : 2576 TID : 140571196778240 PROC : db2sysc 0 INSTANCE: db2inst2 NODE : 000 DB : DAVE HOSTNAME: centos2.localdomain EDUID : 259 EDUNAME: db2loggw (DAVE) 0 FUNCTION: DB2 UDB, data protection services, sqpLoggwEdu::sqlpLoggwMain, probe:4485 DATA #1 : HADR log writing services have started. 2014-09-07-11.09.46.382699-420 E1525420E469 LEVEL: Event PID : 2576 TID : 140571154835200 PROC : db2sysc 0 INSTANCE: db2inst2 NODE : 000 DB : DAVE HOSTNAME: centos2.localdomain EDUID : 282 EDUNAME: db2hadrp.0.1 (DAVE) 0 FUNCTION: DB2 UDB, High Availability Disaster Recovery, hdrSetHdrState, probe:10000 CHANGE : HADR state set to HDR_P_REM_CATCHUP (was HDR_P_REM_CATCHUP_PENDING), connId=1 2014-09-07-11.09.46.383805-420 I1525890E476 LEVEL: Info PID : 2576 TID : 140571154835200 PROC : db2sysc 0 INSTANCE: db2inst2 NODE : 000 DB : DAVE HOSTNAME: centos2.localdomain EDUID : 282 EDUNAME: db2hadrp.0.1 (DAVE) 0 FUNCTION: DB2 UDB, High Availability Disaster Recovery, hdrEdu::hdrEduP, probe:20445 DATA #1 : Remote catchup starts at lso 74052769. Using page start lso 74052769. 2014-09-07-11.09.46.405115-420 I1526367E441 LEVEL: Warning PID : 2576 TID : 140571154835200 PROC : db2sysc 0 INSTANCE: db2inst2 NODE : 000 DB : DAVE HOSTNAME: centos2.localdomain EDUID : 282 EDUNAME: db2hadrp.0.1 (DAVE) 0 FUNCTION: DB2 UDB, High Availability Disaster Recovery, hdrTransitionPtoNPeer, probe:10645 MESSAGE : near peer catchup starts at LSO 74415533 2014-09-07-11.09.46.506060-420 I1526809E466 LEVEL: Info PID : 2576 TID : 140571196778240 PROC : db2sysc 0 INSTANCE: db2inst2 NODE : 000 DB : DAVE HOSTNAME: centos2.localdomain EDUID : 259 EDUNAME: db2loggw (DAVE) 0 FUNCTION: DB2 UDB, data protection services, sqpLoggwEdu::sqlpLoggwMain, probe:4399 DATA #1 : Database log writing has been suspended. Waiting to be resumed. 2014-09-07-11.09.46.506080-420 E1527276E455 LEVEL: Event PID : 2576 TID : 140571154835200 PROC : db2sysc 0 INSTANCE: db2inst2 NODE : 000 DB : DAVE HOSTNAME: centos2.localdomain EDUID : 282 EDUNAME: db2hadrp.0.1 (DAVE) 0 FUNCTION: DB2 UDB, High Availability Disaster Recovery, hdrSetHdrState, probe:10000 CHANGE : HADR state set to HDR_P_NPEER (was HDR_P_REM_CATCHUP), connId=1 2014-09-07-11.09.46.509916-420 E1527732E647 LEVEL: Info PID : 2576 TID : 140571159029504 PROC : db2sysc 0 INSTANCE: db2inst2 NODE : 000 DB : DAVE HOSTNAME: centos2.localdomain EDUID : 260 EDUNAME: db2lfr.0 (DAVE) 0 FUNCTION: DB2 UDB, recovery manager, sqlplfrFMReadLog, probe:2825 DATA #1 : SQLPLFR_SCAN_ID, PD_TYPE_SQLPLFR_SCAN_ID, 8 bytes LFR Scan Num = 2 LFR Scan Caller's EDUID = 282 MESSAGE : Reached the max number of retries waiting for the LFL in XHDR. Moving to next extent. DATA #2 : SQLPG_EXTENT_NUM, PD_TYPE_SQLPG_EXTENT_NUM, 4 bytes 2014-09-07-11.09.46.512133-420 E1528380E448 LEVEL: Event PID : 2576 TID : 140571154835200 PROC : db2sysc 0 INSTANCE: db2inst2 NODE : 000 DB : DAVE HOSTNAME: centos2.localdomain EDUID : 282 EDUNAME: db2hadrp.0.1 (DAVE) 0 FUNCTION: DB2 UDB, High Availability Disaster Recovery, hdrSetHdrState, probe:10000 CHANGE : HADR state set to HDR_P_PEER (was HDR_P_NPEER), connId=1 2014-09-07-11.09.46.513223-420 I1528829E440 LEVEL: Info PID : 2576 TID : 140571196778240 PROC : db2sysc 0 INSTANCE: db2inst2 NODE : 000 DB : DAVE HOSTNAME: centos2.localdomain EDUID : 259 EDUNAME: db2loggw (DAVE) 0 FUNCTION: DB2 UDB, data protection services, sqpLoggwEdu::sqlpLoggwMain, probe:4427 DATA #1 : Database log writing has been resumed. 4.1.4 4.1.4 DB2 v10.5.0.5 Fix Pack 5 and 7
Downloaded from IBM DB2 with BLU Acceleration for Linux, UNIX, and Windows
This is the DB2 Data Server Trial - DB2 10.5 data server trial for Linux� on AMD64 and Intel� EM64T systems (x64)
Unpack and launch the prerequistes check (as purescale can now be done over sockets)
- mkdir /tmp/x
- cd /tmp/x
- tar xvzf /mnt/hgfs/cache/v10.5_linuxx64_server_t.tar.gz
- cd server_t
- yum update
- Disable SELinux : Edit /etc/selinux/config
- reboot
- ./db2prereqcheck >/tmp/p1
- vim /tmp/p1
Run installer - ./db2setup
- Select "Install a Product" then scroll down in the box on the right, pick the product and press the "Install New"
- I choose the 1st item DB2 Version 10.5 Fixpack 5 Workgroup,Enterprise and Advanced Editions
- Choose Next
- Accept Terms in License Agreement
- Choose custom
- Choose Install DB2 Server Edition and change response file to (/root/db2server.10.5.0.5.rsp).
- Click Select all which adds everything including Oracle Data Source support
- Change install directory to /opt/ibm/db2/V10.5.0.5
- Language left as just English!
- Access DB2 Information Centre left as on the IBM Web Site
- DAS User dasusr1 group dasadm1 Home directory /home/dasusr1
- Choose create an instance
- Choose Single Partition instance
- Instance owner db2inst1 group db2iadm1 Home directory /home/db2inst1
- Fenced user db2fenc1 group db2fadm1 Home directory /home/db2fenc1
- Instance communication and startup Service name db2c_db2inst2 Port 50000 and tick Autostart instance at system startup
- Setup notifications - leave as defaults
- Contact for health monitor notification left at default db2inst1
- DB2 Text Search service - Service name db2j_db2inst2 port 55000
- Click Finish
- Optional post install steps - run db2val as per below or open DB2 first steps using db2fs
Then create a sample database and query the sample database
- su - db2inst1
- Optionally run /opt/ibm/db2/V10.5.0.5/bin/db2val to validate installation files,instance, and database functionality
- db2pd -utilities # instance should appear as active
- db2sampl # create sample database
- connect to the database - db2 connect to sample
- Query some data - db2 "select tabschema,count(*) from syscat.tables group by tabschema order by tabschema"
4.2 Oracle
4.2.1 Oracle 12.1.0.2
Derived from oracle base and Oracle 12c installation on Oracle Linux release-6 (64-bit) and Installing 11.2.0.3 on RHEL 6
First run a yum update then
Append "ol6-121.localdomain" and "ol6-121" to /etc/hosts on the "::1" line
::1 localhost localhost.localdomain localhost6 localhost6.localdomain6 ol6-121.localdomain ol6-121Add to /etc/sysctl.conf
fs.file-max = 6815744 kernel.sem = 250 32000 100 128 kernel.shmmni = 4096 kernel.shmall = 1073741824 kernel.shmmax = 4398046511104 net.core.rmem_default = 262144 net.core.rmem_max = 4194304 net.core.wmem_default = 262144 net.core.wmem_max = 1048576 fs.aio-max-nr = 1048576 net.ipv4.ip_local_port_range = 9000 65500Run /sbin/sysctl -p
Add the following lines to the /etc/security/limits.conf file.
oracle soft nofile 1024 oracle hard nofile 65536 oracle soft nproc 2047 oracle hard nproc 16384 oracle soft stack 10240 oracle hard stack 32768Add yum packages:
yum install binutils -y yum install compat-libcap1 -y yum install compat-libstdc++-33 -y yum install compat-libstdc++-33.i686 -y yum install gcc -y yum install gcc-c++ -y yum install glibc -y yum install glibc.i686 -y yum install glibc-devel -y yum install glibc-devel.i686 -y yum install ksh -y yum install libgcc -y yum install libgcc.i686 -y yum install libstdc++ -y yum install libstdc++.i686 -y yum install libstdc++-devel -y yum install libstdc++-devel.i686 -y yum install libaio -y yum install libaio.i686 -y yum install libaio-devel -y yum install libaio-devel.i686 -y yum install libXext -y yum install libXext.i686 -y yum install libXtst -y yum install libXtst.i686 -y yum install libX11 -y yum install libX11.i686 -y yum install libXau -y yum install libXau.i686 -y yum install libxcb -y yum install libxcb.i686 -y yum install libXi -y yum install libXi.i686 -y yum install make -y yum install sysstat -y yum install unixODBC -y yum install unixODBC-devel -yCreate the new groups and users.
groupadd -g 54321 oinstall groupadd -g 54322 dba groupadd -g 54323 oper #groupadd -g 54324 backupdba #groupadd -g 54325 dgdba #groupadd -g 54326 kmdba #groupadd -g 54327 asmdba #groupadd -g 54328 asmoper #groupadd -g 54329 asmadmin useradd -u 54321 -g oinstall -G dba,oper oracleSet the password for the "oracle" user.
passwd oracleEdit /etc/security/limits.d/90-nproc.conf
Change "* soft nproc 1024" line to:
* - nproc 16384Edit /etc/selinux/config
SELINUX=permissiveAlso
setenforce Permissive service iptables stop chkconfig iptables offCreate Oracle directories
mkdir -p /u01/app/oracle/product/12.1.0/db_1 chown -R oracle:oinstall /u01 chmod -R 775 /u01Add to /home/oracle/.bash_profile:
# Oracle Settings export TMP=/tmp export TMPDIR=$TMP export ORACLE_HOSTNAME=ol6-121.localdomain export ORACLE_UNQNAME=orcl export ORACLE_BASE=/u01/app/oracle export ORACLE_HOME=$ORACLE_BASE/product/12.1.0/db_1 export ORACLE_SID=orcl export PATH=/usr/sbin:$PATH export PATH=$ORACLE_HOME/bin:$PATH export LD_LIBRARY_PATH=$ORACLE_HOME/lib:/lib:/usr/lib export CLASSPATH=$ORACLE_HOME/jlib:$ORACLE_HOME/rdbms/jlibReboot
Unpack oracle sources and edit.
mkdir /tmp/x cd /tmp/x unzip /mnt/hgfs/cache/orcl12.1.0.2.0/linuxamd64_12102_database_1of2.zip unzip /mnt/hgfs/cache/orcl12.1.0.2.0/linuxamd64_12102_database_2of2.zip vim /tmp/x/database/stage/cvu/cv/admin/cvu_config change to CV_ASSUME_DISTID=OEL6Now run the installer:
xhost + su - oracle cd /tmp/x/database /usr/bin/xdpyinfo | head -5 # check $DISPLAY ./runInstallerI went for the defaults (with a good password!) and Server Class install even on my laptop!
When prompted run the root install scripts:
- /u01/app/oraInventory/orainstRoot.sh
- /u01/app/oracle/product/12.1.0/db_1/root.sh
The installer then runs Oracle Net Configuration Assistant (netca) abd Database Configuration Assistant (dbca)
Details will be:
- Global database name: orcl.localdomain
- System Identifier (SID): orcl
- Server Parameter Filename: /u01/app/oracle/product/12.1.0/db_1/dbs/spfileorcl.ora
- EM Database Express URL: https://ol6-121.localdomain:5500/em
Password Management - set passwords for SYS and SYSTEM.
Install logs are in /tmp or /u01/app/oraInventory/logs
To check install was ok
sqlplus / as sysdba select version from v$instance;4.3 SAP Adaptive Server Enterprise
4.3.1 SAP Database ASE 16.0
Download from SAP not Sybase! SAP Sybase Adaptive Server Enterprise
Install Guide is at SAP Sybase Adaptive Server Enterprise
SAP ASE 16 Manuals are at SAP Adaptive Server Enterprise 16.0
Additional developer related resources SAP Sybase Adaptive Server Enterprise
Derived from Installation guidelines ASE 15.7
Create a sybase group and user
groupadd sybase useradd -g sybase sybase passwd sybaseAdd to /etc/sysctl.conf
kernel.exec-shield=0 kernel.randomize_va_space=0Run /sbin/sysctl -p
Get 32-bit libraries for isql
yum install compat-libstdc++-33-3.2.3-69.el6.i686 -y yum update rebootExtract from source
mkdir /tmp/x cd /tmp/x tar xvzf /mnt/hgfs/cache/syb/ase160_linuxx86-64.tgzSetup folders/X permissions and switch to the sybase user
mkdir /opt/sap16 chown sybase:sybase /opt/sap16 xhost + su - sybaseAs user sybase
cd /tmp/x /usr/bin/xdpyinfo | head -5 # check $DISPLAY ./setup.binWithin the installer I chose:
Choose Install Folder - /opt/sap16 Custom Install Added Adaptive Server Enterprise - Additional ASE Language Modules Added Open Client - Embedded SQL/C,Additional Connectivity Language Modules Did not Add Open Client - Embedded SQL/Cobol,XA Interface Library for ASE Distributed Transaction Manager Added OData Server for ASE Did not add SySAM License Server! Added SAP Control Centre - SNMP Support for Adaptive Server Choose install Free Developer Edition of SAP Adaptive Server Enterprise End-user License Agreement - Choose All regions Advertisement for www.sybase.com/support/consulting/products/healthcheck whilst installing! Choose default - all components to be installed Choose default - all under same user id User Configuration Data Directory (runfiles/config/errorlog) - default /opt/sap Adaptive Server Name: ASE1 Port: 5000 Errorlog: /opt/sap/ASE-16_0/install/ASE1.log Application Type: Mixed (OLTP/DSS) Page Size: 4K Default language: us-english Default Character Set iso_1: ISO 8859-1 (Latin-1)- Western European 8=bit character set. Default Sort Order: bin_iso-1: Binary ordering, for the ISO 8859-1 or Latin-1 character set (iso_1). Optimize ASE Configuration - not check Create sample databases - checked. Also backup server port 5001, XP Server port 5002 and Job Scheduler port 4900. Configure Self Management (create schedule job which runs update stats in any database) leave as default (sa) SAP Control Centre - Configure Self Discovery Service Adaptor, use both, enable JINI Adaptor SAP Control Centre - Configure HTTP Ports http - 8282 https - 8283 SAP Control Centre - Configure RMI Port - 9999 SAP Control Centre - Configure Administration Logins - administrator sccadmin, administrator user uafadmin SAP Control Centre Repository Password - Enter a password SAP Control Centre (ssc) agent Installs ASE Server Failed installing Job Scheduler - log in /opt/sap/ASE-16_0/init/logsTo test
cd /opt/sap16 . /opt/sap16/SYBASE.sh OCS-16_0/bin/isql -SASE1 -Usa -PpasswordTo stop server
/opt/sap/OCS-16_0/bin/isql -SASE1_BS -Usa -Ppassword shutdown goTo start server
startserver -f /opt/sap16/ASE-16_0/install/RUN_ASE1 startserver -f /opt/sap16/ASE-16_0/install/RUN_ASE1_BSServer errorlog is /opt/sap16/ASE-16_0/install/ASE1.log and /opt/sap16/ASE-16_0/install/ASE1_BS.log
4.3.2 SAP Database ASE 16.0 SP01
Download from SAP not Sybase! Take a test drive with our free trials
Install Guide is at SAP Adaptive Server Enterprise 16.0 SP01
SAP ASE 16 Manuals are at SAP Adaptive Server Enterprise 16.0 or SAP Adaptive Server Enterprise
Additional developer related resources SAP Sybase Adaptive Server Enterprise
Create a sybase group and user
groupadd sybase useradd -g sybase sybase passwd sybaseAdd to /etc/sysctl.conf
kernel.exec-shield=0 kernel.randomize_va_space=0Run /sbin/sysctl -p
Get 32-bit libraries for isql
yum install compat-libstdc++-33-3.2.3-69.el6.i686 -y yum update rebootExtract from source
mkdir /tmp/x cd /tmp/x tar xvzf /mnt/hgfs/cache/syb/ase160_linuxx86-64.tgzInstall as before
4.4 Informix
4.4.1 Informix 12.10.FC4
Download Enterprise AND Advanced Enterprise versions from IBM� Informix� downloads
Derived from machine notes /tmp/x/SERVER/doc/ids_machine_notes_12.10.txt and Setting Semaphore Parameters
Add to /etc/sysctl.conf
kernel.shmmax = 4398046511104 kernel.shmmni = 4096 kernel.sem = 250 32000 100 4096 fs.aio-max-nr = 1048576Run /sbin/sysctl -p
Settings can be checked by looking under /proc/sys e.g. by more /proc/sys/fs/aio-max-nr
yum install compat-libstdc++-33-3.2.3-69.el6.i686 -y yum install ncurses-libs-5.7-3.20090208.el6.i686 -y yum update reboot mkdir /tmp/x cd /tmp/x tar xvf /mnt/hgfs/cache/ifmx/iif.12.10.FC4TL.linux-x86_64.tarNow run the 12.10 installer in GUI mode
./ids_install -i swing Change installation location from /tmp to /opt/IDS.12.10.FC4 Custom installation At the installation features step make no change (Informix Connect is not needed as this is the runtime for Client SDK which is installed). At the webserver configuration step the Apache webserver is installed at Hostname localhost.localdomain Port 8080 For OAT Administration the user is admin. Do not enable role seperation At server instance - enable "Create a server instance". Servername is ol_informix1210 Data storage location is /opt/IDS.12.10.FC4/storage Leave enabled "Initialize server instance after creation" and "use default parameters" Options for number of users are 1-100,101-500,501-1000,1001+ Port 6561 Instance number 0 DRDA protcol enabled - server alias dr_informix1210 port 18179Similar for 11.70.FC8
Change installation location to /opt/IDS.11.70.FC8 At Product Select - Add IBM Informix OpenAdmin Tool At the webserver configuration step the Apache webserver is installed at Hostname localhost.localdomain Port 8081 Servername is ol_informix1170 Port 17702 Instance number 205 DRDA protcol enabled - server alias dr_informix1170 port 20532 At Disk Space Allocation Summary - select review configuration details Yes At Review Critical Disk Space Allocation - can choose rootdbs size/location,physical log size/location,transaction log number,size and location At Review User Disk Space Allocation - can choose Data space name/pagesize/size/location, smart large object space name/size/location/if logged At Review Temporary Disk Space Allocation - can choose Temp space name/pagesize/size/locationFor 11.50.FC9
unpack and run ./ids_install -console
Change installation location to /opt/IDS.11.50.FC9 Do you want to create an IDS demonstration database server instance? - Change to Yes Use default configuration file Change servername to ol_informix1150 Change server number to 1 DRDA - Server Alias change to dr_informix1150 server errorlog (online.log) is at /opt/IDS.11.50.FC9/demo/server/online.log To access server run '. /opt/IDS.11.50.FC9/demo/server/profile_settings'We now have
- . /opt/IDS.12.10.FC4/ol_informix1210.ksh
- . /opt/IDS.11.70.FC8/ol_informix1170.ksh
- . /opt/IDS.11.50.FC9/demo/server/profile_settings
4.4.2 Informix 12.10.FC5
Download Enterprise AND Advanced Enterprise versions from IBM� Informix� downloads
Derived from machine notes /tmp/x/SERVER/doc/ids_machine_notes_12.10.txt and Setting Semaphore Parameters
Add to /etc/sysctl.conf
kernel.shmmni = 4096 kernel.sem = 250 32000 100 4096 fs.aio-max-nr = 1048576Run /sbin/sysctl -p
Settings can be checked by looking under /proc/sys e.g. by more /proc/sys/fs/aio-max-nr
yum install compat-libstdc++-33-3.2.3-69.el6.i686 -y yum install ncurses-libs-5.7-3.20090208.el6.i686 -y yum update reboot mkdir /tmp/x cd /tmp/x tar xvf tar xvf /mnt/hgfs/cache/ifmx/iif.12.10.FC5TL.linux-x86_64.tarNow run the 12.10 installer in GUI mode
./ids_install -i swing Click Next on the Gettng Started screen Accept the software license agreement and Click Next Change installation location from /tmp to /opt/IDS.12.10.FC5 Choose Custom installation At the installation features step make no change (Informix Connect is not needed as this is the runtime for Client SDK which is installed). At the Webserver Configuration step the Apache webserver is installed at Hostname localhost.localdomain Port 8080 Enable OAT Password Protection - the default For OAT Administration login setup the user name is admin. Accept the Software License Agreement again Do not enable role seperation Give user informix a password At Server Instance Creation - enable "Create a server instance". Servername is ol_informix1210 Data storage location is /opt/IDS.12.10.FC5/storage Enable "Initialize server instance after creation" and leave disabled "Modify Default Configuration parameters" Options for number of users are 1-100,101-500,501-1000,1001+ Port 28743 Instance number 0 DRDA protcol enabled - server alias dr_informix1210 port 6557 At Installation Summary screen click Install At the Server Initialization screen click Next At the Installation Complete screen click Done4.5 Postgres
4.5.1 Postgres 9.4.1 binaries
Go to PostgreSQL RPM Building Project - Repository Packages
Download CentOs 7.1 RPM
Manual is at PostgreSQL 9.4.1 Documentation
Run
- yum install util-linux-2.23.2-21.el7.x86_64 -y
- yum localinstall /tmp/x/pgdg-centos94-9.4-1.noarch.rpm -y
- yum list "postgresql94*"
- yum install postgresql94-server.x86_64 -y
- useradd postgres94rpm
- su - postgres94rpm
- mkdir -p storage/server1
- vim .bash_profile
- Add
PATH=/usr/pgsql-9.4/bin:$PATH PGDATA=/home/postgres94rpm/storage/server1 export PGDATA- exit
- su - postgres94rpm
- initdb
- (postgres -D /home/postgres94rpm/storage/server1 &)&
- createdb # create database named after your username (postgres94rpm)
- psql # connect to database named after your username (postgres94rpm)
- \db # list tablespaces
- \? # list internal commands
- \help # list sql commands
- \help drop user # help for drop user sql command
- pg_ctl stop # stop server
- pg_ctl start # start server
- pg_ctl stop # stop server
- cd $PGDATA
- ls pg_log # Server logfile
- ls pg_xlog # Server transaction logfiles
- ls *.conf # Server config files
4.5.2 Postgres 9.4.1 from source
Download source from File Browser
Get postgresql-9.4.1.tar.gz
Run
- yum whatprovides flex
- yum install flex-2.5.37-3.el7.x86_64 -y
- yum whatprovides bison
- yum install bison-2.7-4.el7.x86_64 -y
- yum list readline-devel
- yum install readline-devel.x86_64 -y
- yum list zlib-devel
- yum install zlib-devel.x86_64 -y
- useradd postgres94
- su - postgres94
- mkdir /tmp/x;cd /tmp/x
- tar xvzf /mnt/hgfs/cache/postgres/postgresql-9.4.1.tar.gz
- cd postgresql-9.4.1
- ./configure
- gmake
- gmake check # All 145 tests passed.
- As root cd /tmp/x/postgresql-9.4.1; gmake install
- Login again as postgres94
- mkdir -p storage/server2
- vim .bash_profile
- Add
PATH=/usr/local/pgsql/bin:$PATH PGDATA=/home/postgres94/storage/server2 export PGDATA- Logout and su back in again
- initdb
- (postgres -D /home/postgres94/storage/server2 &)&
- createdb # create database named after your username (postgres94rpm)
- psql # connect to database named after your username (postgres94rpm)
- \db # list tablespaces
- \? # list internal commands
- \help # list sql commands
- \help drop user # help for drop user sql command
- pg_ctl stop # stop server
- pg_ctl start # start server
- pg_ctl stop # stop server
- cd $PGDATA
- ls pg_log # Server logfile
- ls pg_xlog # Server transaction logfiles
- ls *.conf # Server config files
5 Centos 7 64-bit
5.1 Informix
5.1.1 Informix 12.10.FC4
Download from IBM� Informix� downloads
Add to /etc/sysctl.conf
kernel.shmmax = 4398046511104 kernel.shmmni = 4096 kernel.sem = 250 32000 100 4096 fs.aio-max-nr = 1048576Run /sbin/sysctl -p
Settings can be checked by looking under /proc/sys e.g. by more /proc/sys/fs/aio-max-nr
yum install compat-libstdc++-33-3.2.3-71.el7.x86_64 yum update reboot mkdir /tmp/z cd /tmp/z tar xvf /mnt/hgfs/cache/ifmx/iif.12.10.FC4TL.linux-x86_64.tarNow run the 12.10 installer in GUI mode
- ./ids_install -i swing
- Change installation location from /tmp to /opt/IDS.12.10.FC4
- Custom installation
- At the installation features step make no change (Informix Connect is not needed as this is the runtime for Client SDK which is installed).
- At the webserver configuration step the Apache webserver is installed at Hostname localhost.localdomain Port 8080
- For OAT Administration the user is admin.
- Do not enable role seperation
- At server instance - enable "Create a server instance".
- Servername is ol_informix1210
- Data storage location is /opt/IDS.12.10.FC4/storage
- Leave enabled "Initialize server instance after creation" and "use default parameters"
- Options for number of users are 1-100,101-500,501-1000,1001+
- Port 6561 Instance number 0
- DRDA protcol enabled - server alias dr_informix1210 port 18179
- On the "Terminal Window" screen Click Next
- On the "Using the new instance" screen Click Next
- On the "Installation Complete" screen Click Done
5.1.2 Informix 12.10.FC6
Download from IBM� Informix� downloads
Download Informix Enterprise Time-Limited Edition for Linux x86_64
Add to /etc/sysctl.conf
kernel.shmmax = 4398046511104 kernel.shmmni = 4096 kernel.sem = 250 32000 100 4096 fs.aio-max-nr = 1048576Run /sbin/sysctl -p
Settings can be checked by looking under /proc/sys e.g. by more /proc/sys/fs/aio-max-nr
yum whatprovides "*/libstdc++.so.5" yum install compat-libstdc++-33-3.2.3-72.el7.x86_64 -y yum update reboot mkdir /tmp/x cd /tmp/x tar xvf /mnt/hgfs/cache/sw/informix/iif.12.10.FC6TL.linux-x86_64.tarNow run the 12.10 installer in GUI mode
- ./ids_install -i swing
- On the "Getting Started" screen click Next.
- On the "Software License Agreement" screen click to accept and click Next.
- On the "Installation Location" Screen change installation location from /tmp to /opt/IDS.12.10.FC6
- On the "Installation or Distribution" screen click Custom installation
- On the "Product Selection" screen make no changes (Informix Connect is not needed as this is the runtime for Client SDK which is installed) and click Next.
- On the "Web Server Configuration" screen make no changes (the Apache webserver is installed at Hostname localhost.localdomain Port 8080) and click Next.
- On the "Security Features" screen make no changes (leave OAT password protection enabled) and click Next.
- On the "OAT Administrator login setup" screen make no changes (leave User name as admin), enter the password and click Next.
- On the "Software License Agreement" screen click to accept and click Next.
- On the "Role Seperation" screen make no changes (do not enable role seperation) and click Next.
- On the "Provide password to create the following user" screen enter the password for informix and click Next.
- On the "Server Instance Creation" screen enable "Create a server instance".
- Instance name is ol_informix1210
- Data storage location is /opt/IDS.12.10.FC6/storage
- Enable "Initialize server instance after creation"
- Do NOT enable "Modify Default Configuration Parameters", click Next.
- On the "Configuration - Number of Users" make no changes (leave as 1-100 users) and click Next.
- On the "Connectivity" screen make no changes
- Service Name ol_informix1210,Port 31077,Instance server number 0
- DRDA protcol enabled - server alias dr_informix1210 port 16287, click Next
- On the "Installation Summary" screen click Install.
- On the "Server Initialization" screen Click Next
- On the "Terminal Window" screen Click Next
- On the "Using the new instance" screen Click Next
- On the "Installation Complete" screen Click Done
Check the new Informix instance ol_informix1210
su - informix . /opt/IDS.12.10.FC6/ol_informix1210.ksh onstat - Your evaluation license will expire on 2016-10-07 00:00:00 IBM Informix Dynamic Server Version 12.10.FC6TL -- On-Line -- Up 00:09:19 -- 185992 Kbytes5.1.3 Informix 12.10.FC8
Download from IBM� Informix� downloads
Download Informix Enterprise Time-Limited Edition for Linux x86_64
Add to /etc/sysctl.conf
kernel.shmmax = 4398046511104 kernel.shmmni = 4096 kernel.sem = 250 32000 100 4096 fs.aio-max-nr = 1048576Run /sbin/sysctl -p
Settings can be checked by looking under /proc/sys e.g. by more /proc/sys/fs/aio-max-nr
yum whatprovides "*/libstdc++.so.5" yum install compat-libstdc++-33-3.2.3-72.el7.x86_64 -y yum update reboot mkdir /tmp/x cd /tmp/x tar xvf /mnt/hgfs/cache/sw/informix/iif.12.10.FC8TL.linux-x86_64.tarNow run the 12.10 installer in GUI mode
- ./ids_install -i swing
- On the "Getting Started" screen click Next.
- On the "Software License Agreement" screen click to accept and click Next.
- On the "Installation Location" Screen change installation location from /opt/Informix_Software_Bundle to /opt/IDS.12.10.FC8
- On the "Installation or Distribution" screen click Custom installation
- On the "Product Selection" screen add IBM Informix OpenAdmin Tool (Informix Connect is not needed as this is the runtime for Client SDK which is installed) and click Next.
- On the "Web Server Configuration" screen make no changes (the Apache webserver is installed at Hostname localhost.localdomain Port 8080) and click Next.
- On the "Security Features" screen make no changes (leave OAT password protection enabled) and click Next.
- On the "OAT Administrator login setup" screen make no changes (leave User name as admin), enter the password and click Next.
- On the "Software License Agreement" screen click to accept and click Next.
- On the "Role Seperation" screen make no changes (do not enable role seperation) and click Next.
- On the "Provide password to create the following user" screen enter the password for informix and click Next.
- On the "Server Instance Creation" screen enable "Create a server instance"
- Instance name is ol_informix1210
- Data storage location is /opt/IDS.12.10.FC8/storage
- Enable "Initialize server instance after creation"
- Do NOT enable "Modify Default Configuration Parameters", click Next.
- On the "Configuration - Number of Users" make no changes (leave as 1-100 users) and click Next.
- On the "Connectivity" screen make no changes
- Service Name ol_informix1210,Port 23176,Instance server number 0
- DRDA protcol enabled - server alias dr_informix1210 port 24179, click Next
- On the "Installation Summary" screen click Install.
- On the "Server Initialization" screen Click Next
- On the "Terminal Window" screen Click Next
- On the "Using the new instance" screen Click Next
- On the "Installation Complete" screen Click Done
Check the new Informix instance ol_informix1210
- su - informix
- . /opt/IDS.12.10.FC8/ol_informix1210.ksh
onstat - Your evaluation license will expire on 2017-05-14 00:00:00 IBM Informix Dynamic Server Version 12.10.FC8TL -- On-Line -- Up 00:01:37 -- 185992 Kbytes5.1.4 Informix 12.10.FC9
Download from IBM� Informix� downloads
Download Informix Enterprise Time-Limited Edition for Linux x86_64
Add to /etc/sysctl.conf
kernel.shmmax = 4398046511104 kernel.shmmni = 4096 kernel.sem = 250 32000 100 4096 fs.aio-max-nr = 1048576Run /sbin/sysctl -p
Settings can be checked by looking under /proc/sys e.g. by more /proc/sys/fs/aio-max-nr
yum whatprovides "*/libstdc++.so.5" yum install compat-libstdc++-33-3.2.3-72.el7.x86_64 -y yum update reboot mkdir /tmp/x cd /tmp/x tar xvf /mnt/hgfs/cache/sw/informix/IDS12.10/iif.12.10.FC9TL.linux-x86_64.tarAs per STARTAPACHE GIVES ERROR: LIBPCRE.SO.0: CANNOT OPEN
ln -s /usr/lib64/libpcre.so.1 /usr/lib64/libpcre.so.0 ln -s /usr/lib64/libexpat.so.1 /usr/lib64/libexpat.so.0Now run the 12.10 installer in GUI mode
- ./ids_install -i swing
- On the "Getting Started" screen click Next.
- On the "Software License Agreement" screen click to accept and click Next.
- On the "Installation Location" Screen change installation location from /opt/Informix_Software_Bundle to /opt/IDS.12.10.FC9TL
- On the "Installation or Distribution" screen click Custom installation
- On the "Product Selection" screen add IBM Informix OpenAdmin Tool (IBM Informix Connect is not needed as this is the runtime for Client SDK which is installed) and click Next.
- On the "Web Server Configuration" screen make no changes (the Apache webserver is installed at Hostname localhost.localdomain Port 8080) and click Next.
- On the "Security Features" screen make no changes (leave OAT password protection enabled) and click Next.
- On the "OAT Administrator login setup" screen make no changes (leave User name as admin), enter the password and click Next.
- On the "Software License Agreement" screen click to accept and click Next.
- On the "Role Seperation" screen make no changes (do not enable role seperation) and click Next.
- On the "Provide password to create the following user" screen enter the password for informix and click Next.
- On the "Server Instance Creation" screen enable "Create a server instance" and "Initialize server instance after creation"
- Instance name is ol_informix1210
- Data storage location is /opt/IDS.12.10.FC9TL/storage
- Enable "Initialize server instance after creation"
- Do NOT enable "Modify Default Configuration Parameters", click Next.
- On the "Configuration - Number of Users" make no changes (leave as 1-100 users) and click Next.
- On the "Connectivity" screen make no changes
- Service Name ol_informix1210,Port 31584,Instance server number 0
- DRDA protcol enabled - server alias dr_informix1210 port 7886, click Next
- On the "Installation Summary" screen click Install.
- On the "Server Initialization" screen Click Next
- On the "Terminal Window" screen Click Next
- On the "Using the new instance" screen Click Next
- On the "Installation Complete" screen Click Done
Check the new Informix instance ol_informix1210
- su - informix
- . /opt/IDS.12.10.FC9TL/ol_informix1210.ksh
onstat - Your evaluation license will expire on 2018-02-08 00:00:00 IBM Informix Dynamic Server Version 12.10.FC9TL -- On-Line -- Up 00:02:03 -- 185992 Kbytes5.1.5 Informix 12.10.FC12
Download from Informix
Click Download Trial,select "Ultimate Edition or Developer Edition"
On the "Informix Developer and Time-Limited Editions" Page select "Informix Ultimate Edition, Time-Limited for Linux x86-64"/"Version 1210FC12tl"
Add to /etc/sysctl.conf
kernel.shmmax = 4398046511104 kernel.shmmni = 4096 kernel.sem = 250 32000 100 4096 fs.aio-max-nr = 1048576Run /sbin/sysctl -p
Settings can be checked by looking under /proc/sys e.g. by more /proc/sys/fs/aio-max-nr
yum whatprovides "*/libstdc++.so.5" yum install compat-libstdc++-33-3.2.3-72.el7.x86_64 -y yum update reboot mkdir /tmp/x cd /tmp/x tar xvf /mnt/hgfs/cache/sw/informix/IDS12.10/iif.12.10.FC9TL.linux-x86_64.tarAs per STARTAPACHE GIVES ERROR: LIBPCRE.SO.0: CANNOT OPEN
ln -s /usr/lib64/libpcre.so.1 /usr/lib64/libpcre.so.0 ln -s /usr/lib64/libexpat.so.1 /usr/lib64/libexpat.so.0Now run the 12.10 installer in GUI mode
- ./ids_install -i swing
- On the "Getting Started" screen click Next.
- On the "Software License Agreement" screen click to accept and click Next.
- On the "Installation Location" Screen change installation location from /opt/Informix_Software_Bundle to /opt/IDS.12.10.FC9TL
- On the "Installation or Distribution" screen click Custom installation
- On the "Product Selection" screen add IBM Informix OpenAdmin Tool (IBM Informix Connect is not needed as this is the runtime for Client SDK which is installed) and click Next.
- On the "Web Server Configuration" screen make no changes (the Apache webserver is installed at Hostname localhost.localdomain Port 8080) and click Next.
- On the "Security Features" screen make no changes (leave OAT password protection enabled) and click Next.
- On the "OAT Administrator login setup" screen make no changes (leave User name as admin), enter the password and click Next.
- On the "Software License Agreement" screen click to accept and click Next.
- On the "Role Seperation" screen make no changes (do not enable role seperation) and click Next.
- On the "Provide password to create the following user" screen enter the password for informix and click Next.
- On the "Server Instance Creation" screen enable "Create a server instance" and "Initialize server instance after creation"
- Instance name is ol_informix1210
- Data storage location is /opt/IDS.12.10.FC9TL/storage
- Enable "Initialize server instance after creation"
- Do NOT enable "Modify Default Configuration Parameters", click Next.
- On the "Configuration - Number of Users" make no changes (leave as 1-100 users) and click Next.
- On the "Connectivity" screen make no changes
- Service Name ol_informix1210,Port 31584,Instance server number 0
- DRDA protcol enabled - server alias dr_informix1210 port 7886, click Next
- On the "Installation Summary" screen click Install.
- On the "Server Initialization" screen Click Next
- On the "Terminal Window" screen Click Next
- On the "Using the new instance" screen Click Next
- On the "Installation Complete" screen Click Done
Check the new Informix instance ol_informix1210
- su - informix
- . /opt/IDS.12.10.FC9TL/ol_informix1210.ksh
onstat - Your evaluation license will expire on 2018-02-08 00:00:00 IBM Informix Dynamic Server Version 12.10.FC9TL -- On-Line -- Up 00:02:03 -- 185992 Kbytes65.1.6 Informix 12.10.FC16
Download from Informix Developer and Time Limited Editions
Get Informix 12.10.FC16 Advanced Enterprise Time Limited Edition
Install packages
yum whatprovides ksh yum -y install ksh-20120801-144.el7_9.x86_64 yum updateAdd to /usr/lib/sysctl.d/99-informix
kernel.sem = 250 32000 100 4096Run /sbin/sysctl -p /usr/lib/sysctl.d/99-informix
Settings can be checked by looking under /proc/sys e.g. by more /proc/sys/fs/aio-max-nr
reboot mkdir /tmp/x cd /tmp/x tar xvf /mnt/hgfs/d-cache/sw/informix/IDS12.10/FC16/IIF.12.10.FC16DE.linux-x86_64.tar # Verify binaries openssl x509 -in informix.pem.cer -noout -text Certificate: Data: Version: 3 (0x2) Serial Number: 01:8a:05:4e:8f:cd:a5:94:2a:d2:9c:e3:1e:49:b6:ae Signature Algorithm: sha256WithRSAEncryption Issuer: C=US, O=DigiCert, Inc., CN=DigiCert Trusted G4 Code Signing RSA4096 SHA384 2021 CA1 Validity Not Before: Feb 6 00:00:00 2023 GMT Not After : Aug 8 23:59:59 2024 GMT Subject: C=US, ST=New York, L=Armonk, O=International Business Machines Corporation, OU=IBM CCSS, CN=International Business Machines Corporation Subject Public Key Info: Public Key Algorithm: rsaEncryption Public-Key: (4096 bit) Modulus: 00:e6:9d:a2:27:f0:3e:87:0b:14:79:7a:ec:43:55: f3:ca:a9:67:2e:6a:b2:84:29:7a:18:2a:f2:6f:35: bc:56:29:f3:e6:c6:8a:d5:ec:54:41:a2:4c:14:35: 86:ba:d5:9f:b1:dd:00:ad:73:a0:d9:cc:82:da:8d: 7b:23:16:a0:15:eb:c6:35:12:8e:67:98:71:8c:35: cb:a4:ce:25:eb:c9:1c:b7:78:1e:b9:d4:7e:21:fa: 21:4e:bd:4c:45:fb:47:97:c7:10:5b:8e:1f:3a:f4: 8c:9b:28:61:83:03:c7:05:d2:14:9b:d0:94:4b:05: 50:85:dd:f7:68:04:60:5b:d6:5c:f7:41:bf:33:ed: a0:5d:36:40:7c:f0:37:60:1b:33:45:fb:2a:48:b4: 13:24:2a:d9:8b:6d:6e:76:39:aa:48:15:bd:b5:87: 48:f3:f8:a4:c7:cb:c6:87:24:bc:2a:5d:3f:af:af: e0:4c:b1:26:4f:d7:d2:cb:05:15:22:1c:97:4e:3f: e9:10:68:0d:f5:f1:8a:e6:20:c6:a8:d5:27:12:77: 0f:08:ea:16:0d:13:9c:63:32:ba:ec:09:f7:34:a3: e9:e6:e0:00:f7:06:b8:10:ea:0e:5b:ff:41:34:f4: dd:1f:36:7d:e5:0e:3b:57:99:60:4f:75:6f:ad:60: e8:d8:31:aa:2d:b1:4d:c6:4e:b6:21:b3:d8:23:de: d7:1c:e9:af:57:34:e7:32:4b:47:c7:21:9d:78:62: 63:c2:f0:fe:00:2e:af:66:14:11:23:e1:ce:ee:f7: 10:af:a6:5d:68:e0:ea:1c:3e:37:ec:12:97:b8:bd: e3:05:fa:48:03:76:21:54:2e:37:48:ca:ca:e4:1e: 0b:25:90:33:6a:c3:9c:13:48:1d:78:5a:61:15:ae: c4:ac:91:23:94:ae:bc:3f:ec:e3:4a:a7:5a:bd:2e: ee:bc:0c:5f:d7:e1:fd:86:f9:07:ff:03:dd:f3:70: aa:04:de:02:24:72:56:b1:b4:f8:fa:bc:51:3d:be: a2:a3:32:53:4e:0a:62:a3:41:5c:a0:df:77:33:c2: 63:2e:2a:3f:fd:38:37:0a:27:19:04:8e:bf:f4:d7: a0:ea:33:a3:f6:5e:b2:8f:b8:a9:de:85:2a:79:02: 43:ce:d0:c6:61:3f:08:fb:e2:86:c9:9e:3b:b2:8a: 39:d8:07:6b:1b:2a:32:c7:4f:55:fb:8d:c0:08:c6: 0d:83:1d:cd:dd:59:0a:d2:45:bc:a6:f3:50:58:b1: 2b:a6:b1:3c:01:99:eb:73:33:a2:bc:2e:b6:11:69: 6c:e7:3c:ba:ee:6b:ed:58:f2:2c:11:aa:c9:cf:5f: 69:dd:8d Exponent: 65537 (0x10001) X509v3 extensions: X509v3 Authority Key Identifier: keyid:68:37:E0:EB:B6:3B:F8:5F:11:86:FB:FE:61:7B:08:88:65:F4:4E:42 X509v3 Subject Key Identifier: 7D:F0:06:3D:A7:2E:69:8A:69:37:10:D4:8A:04:67:00:FA:A7:8D:B4 X509v3 Key Usage: critical Digital Signature X509v3 Extended Key Usage: Code Signing X509v3 CRL Distribution Points: Full Name: URI:http://crl3.digicert.com/DigiCertTrustedG4CodeSigningRSA4096SHA3842021CA1.crl Full Name: URI:http://crl4.digicert.com/DigiCertTrustedG4CodeSigningRSA4096SHA3842021CA1.crl X509v3 Certificate Policies: Policy: 2.23.140.1.4.1 CPS: http://www.digicert.com/CPS Authority Information Access: OCSP - URI:http://ocsp.digicert.com CA Issuers - URI:http://cacerts.digicert.com/DigiCertTrustedG4CodeSigningRSA4096SHA3842021CA1.crt X509v3 Basic Constraints: critical CA:FALSE Signature Algorithm: sha256WithRSAEncryption 0b:31:61:2f:f4:a7:bc:66:a0:b6:1c:11:40:38:71:ab:48:0f: c7:d1:71:92:49:77:98:02:f1:12:11:bc:e1:23:4a:70:ef:eb: 69:40:ec:ea:e0:4f:2a:78:90:13:47:ef:e1:97:ab:9d:69:c5: 6a:93:66:7f:29:ba:d3:26:da:99:41:36:65:8d:d4:85:3d:24: e2:c4:d9:a9:49:93:09:38:0f:8a:22:87:df:11:9a:88:e1:d7: 9d:b7:64:a0:ee:ac:5f:e3:e5:c9:bf:f9:df:53:2c:86:c3:8b: e3:0a:06:29:75:78:9f:61:92:21:b4:c5:13:45:bb:ef:e7:9d: 05:2c:b5:cc:ae:e7:fc:ff:9d:41:6e:c4:16:1e:7a:5d:77:07: 32:75:3a:16:2a:f1:50:4a:35:bf:4c:6c:c7:26:cc:41:f1:39: 70:98:85:0b:26:c8:57:e3:e7:c5:4a:01:1f:d8:e8:04:1c:20: 2a:fc:da:ae:e7:b0:86:2f:61:61:c2:d8:a5:a7:f3:ee:e3:60: 6f:7d:a9:85:da:b6:60:7b:cf:a2:a0:72:8c:14:b9:55:4d:30: 51:22:2e:f5:d4:ae:8c:a2:7e:25:71:39:17:9c:cd:e5:ca:19: 4f:88:87:9b:bd:e6:14:83:5c:c5:36:6f:e9:b2:59:47:d7:e9: 92:2b:89:fc:74:c1:7a:6c:97:a6:97:63:81:92:04:1c:7f:38: af:57:89:d2:76:83:0a:2f:8e:cb:d3:51:0f:60:55:81:96:26: 76:0b:17:56:9a:ab:d8:03:1a:4e:6d:18:82:6f:88:4a:92:2b: bb:c1:50:c1:f8:74:42:bc:c1:6b:d6:3c:1b:ef:a7:32:ec:83: d0:fa:1b:1a:e1:e1:9c:cd:88:1a:8c:d1:b0:00:ab:e0:41:10: dd:4b:16:2c:44:25:41:29:a4:96:96:a6:ec:7e:c9:ae:9e:3a: 6d:2c:d8:a1:00:1d:7a:da:0f:e6:7f:6e:89:84:5c:1c:a8:14: 6c:8f:20:c6:96:cc:ca:c5:51:f1:05:b5:a6:11:ea:15:b5:71: 2c:1d:b2:6b:fa:33:cc:09:55:b0:58:da:a7:7e:e9:c7:67:b5: 72:56:cb:da:8a:49:1f:bb:30:3e:cd:c7:1d:4e:7e:21:e2:f6: e0:d2:80:76:cb:49:85:10:3f:71:69:ca:ef:01:8d:2f:02:b5: 1a:31:49:80:e0:ab:1c:9c:1b:71:da:c6:ef:3a:a4:7e:4b:f3: aa:78:b1:7c:4d:a0:8e:86:63:cf:64:71:b0:25:54:85:85:86: 2c:10:ec:40:68:30:e2:73:ac:19:9c:ba:ca:87:66:89:fa:68: e5:65:9e:63:41:34:cc:99 openssl x509 -in informix.pem.cer -noout -text Certificate: Data: Version: 3 (0x2) Serial Number: 01:8a:05:4e:8f:cd:a5:94:2a:d2:9c:e3:1e:49:b6:ae Signature Algorithm: sha256WithRSAEncryption Issuer: C=US, O=DigiCert, Inc., CN=DigiCert Trusted G4 Code Signing RSA4096 SHA384 2021 CA1 Validity Not Before: Feb 6 00:00:00 2023 GMT Not After : Aug 8 23:59:59 2024 GMT Subject: C=US, ST=New York, L=Armonk, O=International Business Machines Corporation, OU=IBM CCSS, CN=International Business Machines Corporation Subject Public Key Info: Public Key Algorithm: rsaEncryption Public-Key: (4096 bit) Modulus: 00:e6:9d:a2:27:f0:3e:87:0b:14:79:7a:ec:43:55: f3:ca:a9:67:2e:6a:b2:84:29:7a:18:2a:f2:6f:35: bc:56:29:f3:e6:c6:8a:d5:ec:54:41:a2:4c:14:35: 86:ba:d5:9f:b1:dd:00:ad:73:a0:d9:cc:82:da:8d: 7b:23:16:a0:15:eb:c6:35:12:8e:67:98:71:8c:35: cb:a4:ce:25:eb:c9:1c:b7:78:1e:b9:d4:7e:21:fa: 21:4e:bd:4c:45:fb:47:97:c7:10:5b:8e:1f:3a:f4: 8c:9b:28:61:83:03:c7:05:d2:14:9b:d0:94:4b:05: 50:85:dd:f7:68:04:60:5b:d6:5c:f7:41:bf:33:ed: a0:5d:36:40:7c:f0:37:60:1b:33:45:fb:2a:48:b4: 13:24:2a:d9:8b:6d:6e:76:39:aa:48:15:bd:b5:87: 48:f3:f8:a4:c7:cb:c6:87:24:bc:2a:5d:3f:af:af: e0:4c:b1:26:4f:d7:d2:cb:05:15:22:1c:97:4e:3f: e9:10:68:0d:f5:f1:8a:e6:20:c6:a8:d5:27:12:77: 0f:08:ea:16:0d:13:9c:63:32:ba:ec:09:f7:34:a3: e9:e6:e0:00:f7:06:b8:10:ea:0e:5b:ff:41:34:f4: dd:1f:36:7d:e5:0e:3b:57:99:60:4f:75:6f:ad:60: e8:d8:31:aa:2d:b1:4d:c6:4e:b6:21:b3:d8:23:de: d7:1c:e9:af:57:34:e7:32:4b:47:c7:21:9d:78:62: 63:c2:f0:fe:00:2e:af:66:14:11:23:e1:ce:ee:f7: 10:af:a6:5d:68:e0:ea:1c:3e:37:ec:12:97:b8:bd: e3:05:fa:48:03:76:21:54:2e:37:48:ca:ca:e4:1e: 0b:25:90:33:6a:c3:9c:13:48:1d:78:5a:61:15:ae: c4:ac:91:23:94:ae:bc:3f:ec:e3:4a:a7:5a:bd:2e: ee:bc:0c:5f:d7:e1:fd:86:f9:07:ff:03:dd:f3:70: aa:04:de:02:24:72:56:b1:b4:f8:fa:bc:51:3d:be: a2:a3:32:53:4e:0a:62:a3:41:5c:a0:df:77:33:c2: 63:2e:2a:3f:fd:38:37:0a:27:19:04:8e:bf:f4:d7: a0:ea:33:a3:f6:5e:b2:8f:b8:a9:de:85:2a:79:02: 43:ce:d0:c6:61:3f:08:fb:e2:86:c9:9e:3b:b2:8a: 39:d8:07:6b:1b:2a:32:c7:4f:55:fb:8d:c0:08:c6: 0d:83:1d:cd:dd:59:0a:d2:45:bc:a6:f3:50:58:b1: 2b:a6:b1:3c:01:99:eb:73:33:a2:bc:2e:b6:11:69: 6c:e7:3c:ba:ee:6b:ed:58:f2:2c:11:aa:c9:cf:5f: 69:dd:8d Exponent: 65537 (0x10001) X509v3 extensions: X509v3 Authority Key Identifier: keyid:68:37:E0:EB:B6:3B:F8:5F:11:86:FB:FE:61:7B:08:88:65:F4:4E:42 X509v3 Subject Key Identifier: 7D:F0:06:3D:A7:2E:69:8A:69:37:10:D4:8A:04:67:00:FA:A7:8D:B4 X509v3 Key Usage: critical Digital Signature X509v3 Extended Key Usage: Code Signing X509v3 CRL Distribution Points: Full Name: URI:http://crl3.digicert.com/DigiCertTrustedG4CodeSigningRSA4096SHA3842021CA1.crl Full Name: URI:http://crl4.digicert.com/DigiCertTrustedG4CodeSigningRSA4096SHA3842021CA1.crl X509v3 Certificate Policies: Policy: 2.23.140.1.4.1 CPS: http://www.digicert.com/CPS Authority Information Access: OCSP - URI:http://ocsp.digicert.com CA Issuers - URI:http://cacerts.digicert.com/DigiCertTrustedG4CodeSigningRSA4096SHA3842021CA1.crt X509v3 Basic Constraints: critical CA:FALSE Signature Algorithm: sha256WithRSAEncryption 0b:31:61:2f:f4:a7:bc:66:a0:b6:1c:11:40:38:71:ab:48:0f: c7:d1:71:92:49:77:98:02:f1:12:11:bc:e1:23:4a:70:ef:eb: 69:40:ec:ea:e0:4f:2a:78:90:13:47:ef:e1:97:ab:9d:69:c5: 6a:93:66:7f:29:ba:d3:26:da:99:41:36:65:8d:d4:85:3d:24: e2:c4:d9:a9:49:93:09:38:0f:8a:22:87:df:11:9a:88:e1:d7: 9d:b7:64:a0:ee:ac:5f:e3:e5:c9:bf:f9:df:53:2c:86:c3:8b: e3:0a:06:29:75:78:9f:61:92:21:b4:c5:13:45:bb:ef:e7:9d: 05:2c:b5:cc:ae:e7:fc:ff:9d:41:6e:c4:16:1e:7a:5d:77:07: 32:75:3a:16:2a:f1:50:4a:35:bf:4c:6c:c7:26:cc:41:f1:39: 70:98:85:0b:26:c8:57:e3:e7:c5:4a:01:1f:d8:e8:04:1c:20: 2a:fc:da:ae:e7:b0:86:2f:61:61:c2:d8:a5:a7:f3:ee:e3:60: 6f:7d:a9:85:da:b6:60:7b:cf:a2:a0:72:8c:14:b9:55:4d:30: 51:22:2e:f5:d4:ae:8c:a2:7e:25:71:39:17:9c:cd:e5:ca:19: 4f:88:87:9b:bd:e6:14:83:5c:c5:36:6f:e9:b2:59:47:d7:e9: 92:2b:89:fc:74:c1:7a:6c:97:a6:97:63:81:92:04:1c:7f:38: af:57:89:d2:76:83:0a:2f:8e:cb:d3:51:0f:60:55:81:96:26: 76:0b:17:56:9a:ab:d8:03:1a:4e:6d:18:82:6f:88:4a:92:2b: bb:c1:50:c1:f8:74:42:bc:c1:6b:d6:3c:1b:ef:a7:32:ec:83: d0:fa:1b:1a:e1:e1:9c:cd:88:1a:8c:d1:b0:00:ab:e0:41:10: dd:4b:16:2c:44:25:41:29:a4:96:96:a6:ec:7e:c9:ae:9e:3a: 6d:2c:d8:a1:00:1d:7a:da:0f:e6:7f:6e:89:84:5c:1c:a8:14: 6c:8f:20:c6:96:cc:ca:c5:51:f1:05:b5:a6:11:ea:15:b5:71: 2c:1d:b2:6b:fa:33:cc:09:55:b0:58:da:a7:7e:e9:c7:67:b5: 72:56:cb:da:8a:49:1f:bb:30:3e:cd:c7:1d:4e:7e:21:e2:f6: e0:d2:80:76:cb:49:85:10:3f:71:69:ca:ef:01:8d:2f:02:b5: 1a:31:49:80:e0:ab:1c:9c:1b:71:da:c6:ef:3a:a4:7e:4b:f3: aa:78:b1:7c:4d:a0:8e:86:63:cf:64:71:b0:25:54:85:85:86: 2c:10:ec:40:68:30:e2:73:ac:19:9c:ba:ca:87:66:89:fa:68: e5:65:9e:63:41:34:cc:99 openssl ocsp -no_nonce -issuer informix.pem.chain -cert informix.pem.cer -VAfile informix.pem.chain -text -url http://ocsp.digicert.com -respout ocsptest OCSP Request Data: Version: 1 (0x0) Requestor List: Certificate ID: Hash Algorithm: sha1 Issuer Name Hash: 915DEAC5D1E15E49646B8A94E04E470958C9BB89 Issuer Key Hash: 6837E0EBB63BF85F1186FBFE617B088865F44E42 Serial Number: 018A054E8FCDA5942AD29CE31E49B6AE OCSP Response Data: OCSP Response Status: successful (0x0) Response Type: Basic OCSP Response Version: 1 (0x0) Responder Id: 6837E0EBB63BF85F1186FBFE617B088865F44E42 Produced At: Dec 29 07:48:55 2023 GMT Responses: Certificate ID: Hash Algorithm: sha1 Issuer Name Hash: 915DEAC5D1E15E49646B8A94E04E470958C9BB89 Issuer Key Hash: 6837E0EBB63BF85F1186FBFE617B088865F44E42 Serial Number: 018A054E8FCDA5942AD29CE31E49B6AE Cert Status: good This Update: Dec 29 07:33:02 2023 GMT Next Update: Jan 5 06:33:02 2024 GMT Signature Algorithm: sha384WithRSAEncryption 34:a7:78:87:91:40:3e:00:1d:3f:f7:0d:da:fd:5a:d3:74:15: a2:f8:13:ce:8b:3d:1e:8e:41:0e:01:ea:4e:f3:3e:8b:f2:c2: 7f:31:b8:fc:c2:2e:fd:4d:09:90:4b:07:d3:4b:ca:a9:b8:80: 5e:c0:bb:9b:45:e7:15:39:d6:e0:02:af:a3:a1:ef:10:e7:74: bf:5b:0b:14:9f:29:08:66:95:af:ce:49:34:62:0c:66:cd:f4: d7:a1:92:17:6b:5f:0c:69:6a:03:a2:69:da:db:fa:a3:de:a3: c7:08:8c:75:35:ab:1a:45:81:d6:5d:d4:5f:9a:fc:a5:4e:20: bd:ac:20:ab:44:8d:3f:8d:c0:5e:01:7b:bb:c2:50:61:0b:a4: 15:ec:eb:34:66:30:a4:6a:18:f0:33:58:d5:21:e4:66:15:13: 48:bc:dd:f7:9e:6f:e1:3a:00:fb:e5:5a:2a:e8:51:fa:44:fb: 00:cc:3e:b2:17:bb:2a:62:15:0d:c1:5e:e7:dc:08:0c:1a:9e: 97:48:62:cc:16:4f:3e:44:6e:43:03:12:58:8c:d8:4e:5f:44: 8c:c0:4d:cb:79:9e:3b:ba:fa:65:6a:6f:28:bb:91:58:c8:8f: 7c:da:91:f7:4e:f5:32:4f:44:91:e9:d2:53:3e:06:66:54:6c: 6b:9a:8d:0a:d1:ca:9b:ea:20:29:4a:0a:da:73:d8:1b:05:df: f6:7c:03:b6:04:ed:e5:a2:eb:41:af:b6:e4:be:40:67:a8:f4: 4a:55:00:3a:ef:46:8e:5d:3c:4a:98:72:33:f1:65:c1:e6:81: 25:e4:4e:57:f8:56:c9:71:84:25:62:ba:50:e1:aa:b0:3f:8a: 3a:81:04:79:44:fe:2f:15:89:bb:06:93:54:c8:72:25:1b:4b: 34:f6:bc:c2:22:10:34:51:50:c2:ce:17:53:a2:57:3f:16:ff: ee:ce:ee:b1:94:7e:d5:a8:cb:dd:59:a2:b2:d4:6c:b3:9a:cd: fe:cf:97:10:2f:9a:02:56:1e:92:d8:b9:47:31:4a:80:5e:35: 2c:a4:95:c9:e7:5b:83:d8:83:30:cd:c8:8c:2d:d1:c7:24:ec: 28:4c:17:74:da:58:27:89:be:97:c7:ce:22:25:ff:c2:cc:08: f4:9f:02:54:85:51:b1:e7:00:29:06:12:13:29:e1:a6:b5:23: 6e:fe:6a:f4:35:4b:c8:fe:ca:2c:50:83:25:9b:35:cf:1e:08: e9:f4:b4:03:44:f2:fe:cc:f0:65:fd:79:1f:2c:c4:f3:10:2a: 52:47:37:72:2f:05:db:4d:2f:e8:94:0c:c3:f1:98:75:3c:12: 3a:28:de:a9:0e:13:23:c3 Response verify OK informix.pem.cer: good This Update: Dec 29 07:33:02 2023 GMT Next Update: Jan 5 06:33:02 2024 GMT openssl dgst -sha256 -verify informix.pem.pub.key -signature IIF.12.10.FC16DE_672.linux86_64_2.6.18-128.el5.tar.cosign.sig IIF.12.10.FC16DE_672.linux86_64_2.6.18-128.el5.tar Verified OK mkdir x cd x tar xvf ../IIF.12.10.FC16DE_672.linux86_64_2.6.18-128.el5.tarNow run the 12.10 installer in GUI mode
- ./ids_install -i swing
- On the "Getting Started" screen click Next.
- On the "Software License Agreement" screen click to accept and click Next.
- On the "Installation Location" Screen change installation location from /opt/Informix_Software_Bundle to /opt/IDS.12.10.FC16DE and click Next
- On the "Installation or Distribution" screen click Custom installation and click Next
- On the "Product Selection" screen and click Next.
- On the "Role Seperation" screen make no changes (do not enable role seperation) and click Next.
- On the "Provide password to create the following user" screen enter the password for informix and click Next.
- On the "Server Instance Creation" screen enable "Create a server instance" and "Initialize server instance after creation"
- Instance name is ol_informix1210
- Data storage location is /opt/IDS.12.10.FC16DE/storage
- Enable "Initialize server instance after creation"
- Do NOT enable "Modify Default Configuration Parameters", click Next.
- On the "Configuration - Number of Users" make no changes (leave as 1-100 users) and click Next.
- On the "Connectivity" screen make no changes
- Service Name ol_informix1210,Port 25112,Instance server number 0
- DRDA protcol enabled - server alias dr_informix1210 port 17259, click Next
- On the "Installation Summary" screen click Install.
- On the "Server Initialization" screen Click Next
- On the "Installation Complete" screen Click Done
Check the new Informix instance ol_informix1210
- su - informix
- . /opt/IDS.12.10.FC16DE/ol_informix1210.ksh
onstat - IBM Informix Dynamic Server Version 12.10.FC16DE -- On-Line -- Up 00:02:48 -- 185996 Kbytes5.2 SAP Adaptive Server Enterprise
5.2.1 SAP ASE Suite ASE 16.0 SP02 PL02
Download from SAP not Sybase! SAP Adaptive Server Enterprise Developer Center
Go to Get a Free "Developer" Edition
Documentation is at SAP Sybase Adaptive Server Enterprise
Additional developer related resources SAP Sybase Adaptive Server Enterprise
This includes ASE 16 SP02 PL02
Turn off the firewall
systemctl mask firewalld service firewalld stop systemctl disable firewalld systemctl status firewalld -lCreate a sybase group and user
groupadd sybase useradd -g sybase sybase passwd sybaseAdd to /etc/sysctl.conf
kernel.randomize_va_space=0 net.ipv6.conf.all.disable_ipv6 = 1Run /sbin/sysctl -p
Get 32-bit libraries for isql
yum whatprovides "*/libstdc++.so.5" yum install compat-libstdc++-33-3.2.3-72.el7.x86_64 -y yum whatprovides /lib/ld-linux.so.2 yum install glibc-2.17-106.el7_2.6.i686 -y yum update rebootExtract from source
mkdir /tmp/x cd /tmp/x tar xvzf /mnt/hgfs/cache/sw/sap/ASE16SP02PL01/ASE_Suite.linuxamd64.tgzSetup folders/X permissions and switch to the sybase user
mkdir /opt/sap16sp02pl02 chown sybase:sybase /opt/sap16sp02pl02 visudo Copy the root line and change name to sybase (for now!) sybase ALL=(ALL) ALL xhost +si:localuser:sybase su - sybaseAs user sybase
export DISPLAY=:0 /usr/bin/xdpyinfo | head -5 # check $DISPLAY cd /tmp/x/ASE_SuiteSAP have release many products as part of the ASE Suite, yes including repserver at last!
ls archives ase_add_lm_mm conn_perl_mm lang rs_add_lm sybpsu ase_cagent_mm conn_php_mm lang_mm rs_asa sylapi asecmap_mm conn_python_mm locales saphostagent.sar SySAMLicenseInfo.xml asemanifest.mf dbcapi_mm odata_mm sapjre71 sysam_server_mm ase_mm dbisql_mm odbc_mm sapjre71_mm sysam_util cfw_mm dblib_mm open_client sapjre81_mm sysam_util_mm conn_add_lm esqlc_mm open_client_mm SCC-3_2 version.txt conn_add_lm_mm esqlcobol_mm qptune_mm shared_lib_mm xa_mm conn_lm ie_java_mm rep_server SYBASE_ASE_DE.lic conn_lm_mm jconnect16_mm rma SYBASE_ASE_XE.licNow we run the install
./setup.binWithin the installer
- On the Introduction screen, click Next
- On the Choose Install Folder screen, change to /opt/sap16sp02pl01
- On the Choose Install Set screen, select Full
- On the SAP Host Agent screen choose Yes and enter the Sybase password
- On the Software License Type Selection choose Evaluate SAP Adaptive Server Enterprise
- On the End-User License Agreement choose geographic location (has to be All regions)
- On the Pre-Installation Summary click Install
- On the Configure New Servers screen leave all selected
- On the Configure Servers with a Different User Account screen Choose the default of No
- On the User Configuration Data Directory Choose the Default of /opt/sap16sp02pl01
- On the Configure New SAP ASE
- Change SAP ASE Name to ASE1
- Enter the System Administrators Password
- Leave Enable SAP Ase for SAP ASe Cockpit monitoring enabled
- Leave the Technical user as tech_user
- Enter the Technical user password
- Leave the Host Name as localhost
- Leave the Port Number as 5000
- Leave the Error Log as /opt/sap16sp02pl01/ASE-16_0/install/ASE1.log
- Leave the Application Type as Mixed (OLTP/DSS)
- Leave the Page Size as 4K
- Leave the Default language: us-english
- Leave the Default Character Set iso_1: ISO 8859-1 (Latin-1)- Western European 8-bit character set.
- Leave the Default Sort Order: bin_iso-1: Binary ordering, for the ISO 8859-1 or Latin-1 character set (iso_1).
- Leave Optimize ASE Configuration unchecked
- Check the box Create sample databases
- Click Next
- Click OK on the Warning about the default page size for previous versions being 2K
- On the next screen leave the default locations and sizes for master/system procedure/system/tempdb devices and size
- Leave Enable PCI unchecked and click Next
- On the Configure New Backup Server screen Accept the defaults
- Backup Server Name ASE1_BS - Port Number 5001 - Error Log /opt/sap16sp02pl01/ASE-16_0/install/ASE1_BS.log - Allow Hosts blank- Click Next
- On the Configure New XP Server screen accept the defaults
- XP Server Name ASE1_XP (Cannot be changed) - Port Number 5002 - Error Log /opt/sap16sp02pl01/ASE-16_0/install/ASE1_XP.logClick Next On the Configure New Job Scheduler screen accept the defaults - Job Scheduler Agent Name ASE1_JSAGENT - Port Number 4900 - Management Device /opt/sap16sp02pl01/ASE-16_0/data/sybmgmtdb.dat - Management Device Size 76 MB - Management Database Size 76 MBClick Next On the Configure Self Management screen accept the defaults - Self Management User Name sa - Password entry grey-ed outClick Next On the ASE HADR Setup Site screen - Enter Cluster ID SC1 - must be 3 characters in length, and start with an alphabetic character! - Leave Setup Site as primary (not companion) - Leave Replication Mode as sync (not async)Click Next On the ASE HADR on Primary Site screen - Enter Site Name SITE1 - Leave Database Dump Directory as default - Leave RMA RMI port 7000 - Leave RMA TDS port 7001 - Leave Replication Server starting port 5005 - Leave SRS device buffer location/size as default /opt/sap16sp02pl01/ASE-16_0/data and 256MB - Leave SRS simple persistent queue directory as default /opt/sap16sp02pl01/ASE-16_0/data and 2000 MBClick Next On the Users for ASE HADR screen - Leave ASE HADR maintenance user as DR_maint - Enter ASE HADR maintenance user password - Leave RMA Adminstrator user as DR_admin - Enter RMA Adminstrator user passwordClick Next On the Replicate Databases in ASE HADR screen - Leave noneClick Next On the ASE HADR Secondary Site screen - Leave is the companion site set up as NoClick NextOn the Cockpit Ports screen - Leave HTTP Port as 4282 - Leave HTTPS port as 4283 - Leave TDS Port as 4998 - Leave RMI port as 4992Click Next On the Cockpit Ports screen - Leave Cockpit Administrator user as sscadmin - Leave Cockpit Agent adminsitrator user as uafadmin - Enter all the passwords!Click Next On the New Server Configuration screen click Next The install ends and mentions to run the installer on the other site to complete the installation.
The responses are saved in /opt/sap16sp02pl02/log/companion_responses.txt
5.2.2 SAP ASE Suite ASE 16.0 SP03
Download from SAP not Sybase! Featured Content
Go to Get a Free "Developer" Edition
Documentation is at SAP Adaptive Server Enterprise
This includes ASE 16 SP03
Turn off the firewall
systemctl mask firewalld service firewalld stop systemctl disable firewalld systemctl status firewalld -lCreate a sybase group and user
groupadd sybase useradd -g sybase sybase passwd sybaseAdd to /etc/sysctl.conf
kernel.randomize_va_space=0 net.ipv6.conf.all.disable_ipv6 = 1Run /sbin/sysctl -p
Get 32-bit libraries for isql
yum whatprovides "*/libstdc++.so.5" yum install compat-libstdc++-33-3.2.3-72.el7.x86_64 -y yum whatprovides "*/ld-lsb-x86-64.so.3" yum install redhat-lsb-core-4.1-27.el7.centos.1.x86_64 -y yum update rebootExtract from source
mkdir /tmp/x cd /tmp/x tar xvzf /mnt/hgfs/cache/sw/sap/ASE16SP03/ASE_Suite.linuxamd64.tgzSetup folders/X permissions and switch to the sybase user
mkdir /opt/sap16sp03 chown sybase:sybase /opt/sap16sp03 visudo /^root Copy the root line and change name to sybase (for now!) sybase ALL=(ALL) ALL xhost +si:localuser:sybase su - sybaseAs user sybase
export DISPLAY=:0 /usr/bin/xdpyinfo | head -5 # check $DISPLAY cd /tmp/xNow we run the install
./setup.binWithin the installer
- On the Introduction screen, click Next
- On the Choose Install Folder screen, change to /opt/sap16sp03, click Next
- On the Choose Install Set screen, select Full, click Next
- On the SAP Host Agent screen choose Yes and enter the Sybase password, click Next
- On the Software License Type Selection choose Evaluate SAP Adaptive Server Enterprise, click Next
- On the End-User License Agreement choose geographic location (has to be All regions), accept the license agreement and click Next
- On the Pre-Installation Summary click Install
- On the Configure New Servers screen select all apart from "Configure Historical Monitoring Data Repository", click Next
- On the Configure Servers with a Different User Account screen Choose the default of No, click Next
- On the User Configuration Data Directory Choose the Default of /opt/sap16sp03, click Next
- On the Configure New SAP ASE:
- Change SAP ASE Name to ASE1
- Enter the System Administrators Password
- Leave Enable SAP Ase for SAP ASE Cockpit monitoring enabled
- Leave the Technical user as tech_user
- Enter the Technical user password
- Leave the Host Name as localhost
- Leave the Port Number as 5000
- Leave the Error Log as /opt/sap16sp03/ASE-16_0/install/ASE1.log
- Leave the Application Type as Mixed (OLTP/DSS)
- Leave the Page Size as 4K
- Leave the Default language: us-english
- Leave the Default Character Set iso_1: ISO 8859-1 (Latin-1)- Western European 8-bit character set.
- Leave the Default Sort Order: bin_iso-1: Binary ordering, for the ISO 8859-1 or Latin-1 character set (iso_1).
- Leave Optimize ASE Configuration unchecked
- Check the box Create sample databases
- Click Next
- Click OK on the Warning about the default page size for previous versions being 2K
- On the next screen leave the default locations and sizes for master/system procedure/system/tempdb devices and size
- Leave Enable PCI unchecked and click Next
- On the Configure New Backup Server screen Accept the defaults
- Backup Server Name ASE1_BS - Port Number 5001 - Error Log /opt/sap16sp03/ASE-16_0/install/ASE1_BS.log - Allow Hosts blank- Click Next
- On the Configure New XP Server screen accept the defaults
- XP Server Name ASE1_XP (Cannot be changed) - Port Number 5002 - Error Log /opt/sap16sp03/ASE-16_0/install/ASE1_XP.logClick Next On the Configure New Job Scheduler screen accept the defaults - Job Scheduler Agent Name ASE1_JSAGENT - Port Number 4900 - Management Device /opt/sap16sp03/ASE-16_0/data/sybmgmtdb.dat - Management Device Size 76 MB - Management Database Size 76 MBClick Next On the Configure Self Management screen accept the defaults - Self Management User Name sa - Password entry grey-ed outClick Next On the ASE HADR Setup Site screen - Enter Cluster ID SC1 - must be 3 characters in length, and start with an alphabetic character! - Leave Setup Site as primary (not companion) - Leave Replication Mode as sync (not async)Click Next On the ASE HADR on Primary Site screen - Enter Site Name SITE1 - Leave Database Dump Directory as default - Leave RMA RMI port 7000 - Leave RMA TDS port 4909 - Leave Replication Server starting port 5005 - Leave SRS device buffer location/size as default /opt/sap16sp03/data and 256MB - Leave SRS simple persistent queue directory as default /opt/sap16sp03/data and 2000 MBClick Next On the Users for ASE HADR screen - Leave ASE HADR maintenance user as DR_maint - Enter ASE HADR maintenance user password - Leave RMA Adminstrator user as DR_admin - Enter RMA Adminstrator user passwordClick Next On the Replicate Databases in ASE HADR screen - Leave noneClick Next On the ASE HADR Secondary Site screen - Leave is the companion site set up as NoClick NextOn the Cockpit Ports screen - Leave hostname as localhost - Leave HTTP Port as 4282 - Leave HTTPS port as 4283 - Leave TDS Port as 4998 - Leave RMI port as 4992Click Next On the Cockpit Ports screen - Leave Cockpit Administrator user as sscadmin - Leave Cockpit Agent adminsitrator user as uafadmin - Enter all the passwords!Click Next On the New Server Configuration Summary screen click Next The install ends and mentions to run the installer on the other site to complete the installation.
The responses are saved in /opt/sap16sp03/log/companion_responses.txt
To install on the companion site the installer would need to be run with -f and the name of the response file
We then extend the license from 90 days to 1 year
Obtain the license from SAP License Keys for Preview, Evaluation and Developer Versions
Select radio button to the left of "AS1 - SAP ASE Enterprise Edition evaluation" then scroll down to enter "Personal Data & System Info"
To get the hostname and hostid as sybase run
cd /opt/sap16sp03/SYSAM-2_0/bin ./lmutil lmhostid lmutil - Copyright (c) 1989-2016 Flexera Software LLC. All Rights Reserved. The FlexNet host ID of this machine is "000c29434622" ./lmutil lmhostid -hostname lmutil - Copyright (c) 1989-2016 Flexera Software LLC. All Rights Reserved. The FlexNet host ID of this machine is "HOSTNAME=localhost.localdomain"5.3 DB2
5.3.1 DB2 11.1
Downloaded from IBM DB2 with BLU Acceleration for Linux, UNIX, and Windows
This is the DB2 Data Server Trial (including pureScale, BLU Acceleration) Version 11.1
Unpack and launch the prerequistes check
- mkdir /tmp/x
- cd /tmp/x
- tar xvzf /mnt/hgfs/cache/sw/db2/11.1.0.0/v11.1_linuxx64_server_t.tar.gz
- cd server_t
- yum update
- Disable SELinux : Edit /etc/selinux/config
- reboot
- cd /tmp/x/server_t
- ./db2prereqcheck >/tmp/p1
- vim /tmp/p1
Run installer - ./db2setup
- Select New Install
- Select the default "DB2 Version 11.1.0.0 Workgroup,Enterprise and Advanced Editions"
- On the Configuration screen click Custom and checkbox to agree to IBM terms,leave "Create an instance" selected and click Next
- On the Select Features click "Select all" and click Next
- On the Select Languages screen leave the default of English and click Next
- On the Documentation screen leave default of "On the IBM Web site" and click Next
- On the DAS User screen leave default of dasusr1, enter a Password and click Next
- On the Database Partitioning screen leave default of single partition and click Next
- On the Instance Owner screen leave default of db2inst1, enter a Password and click Next
- On the Fenced User screen leave default of db2fenc1, enter a Password and click Next
- On the Instance Communnication screen leave default of service name db2c_db2inst1/port 50000 and autostart the instance at system startup and click Next
- On the Notifications screen leave defaults of notification smtp server localhost.localdomain, Administration contact list location local and click Next
- On the Health Monitoring screen leave defaults of New contact db2inst1, email address db2inst1@localhost.localdomain and click Next
- On the Text Search Service screen leave defaults of configure db2inst1,service name db2j_db2inst1/port 55000 and click Next
- On the response file and Summary screen leave the default to save settings in a response file
- Change the response filename to /root/db2server.11.1.rsp
- Install location is /opt/ibm/db2/V11.1
- On the Setup complete screen click Post-install steps
- On back to the main install screen and click Finish
- Optional post install steps - run db2val as per below or open DB2 first steps using db2fs
Then create a sample database and query the sample database
- su - db2inst1
- Optionally run /opt/ibm/db2/V11.1/bin/db2val to validate installation files,instance, and database functionality
- db2pd -utilities # instance should appear as active
- db2sampl # create sample database
- connect to the database - db2 connect to sample
- Query some data - db2 "select tabschema,count(*) from syscat.tables group by tabschema order by tabschema"
5.3.2 DB2 11.1 Mod1 Fix pack1
NOTE: This is an upgrade from DB2 11.1 above - different for a change!
Downloaded from Download DB2 Fix Packs by version for DB2 for Linux, UNIX and Windows
This leads to DB2 Version 11.1 Mod1 Fix pack1 for Linux, UNIX, and Windows
NOTE: On this page expand the + on the left hand side ABOVE the entry you want to download
I downloaded the "DB2 Universal Fix Pack",for Linux x64 this is v11.1.1fp1_linuxx64_universal_fixpack.tar.gz
Notes for the universal fix pack are at Universal versus product-specific fix packs
Notes for installing fixpacks are at Applying fix packs in DB2 database environments
Step are:
- Logon as root
- cd /tmp/x
- tar xvzf /mnt/hgfs/cache/sw/db2/11.1.1.0/v11.1.1fp1_linuxx64_universal_fixpack.tar.gz
- ps -ef | grep -i db2 # NOTE: If any instance are up run additional steps (db2stop/db2admin stop for DAS) to stop them
- cd universal
- ./db2prereqcheck > /tmp/p1
- vim /tmp/p1
This setup is not Purescale so next
- ./installFixPack -b /opt/ibm/db2/V11.1
- Answer no to a different installation directory
Upgrade the runs to completion
./installFixPack -b /opt/ibm/db2/V11.1 Do you want to choose a different installation directory for the fix pack? [yes/no] ------------------------------------------------------------------------------------ no DBI1017I installFixPack is updating the database products installed in location /opt/ibm/db2/V11.1. DB2 installation is being initialized. Total number of tasks to be performed: 55 Total estimated time for all tasks to be performed: 2298 second(s) Task #1 start Description: Stopping DB2 Fault Monitor Estimated time 10 second(s) Task #1 end Task #2 start Description: Preparing the system Estimated time 120 second(s) Task #2 end Task #3 start Description: Base Client Support for installation with root privileges Estimated time 3 second(s) Task #3 end Task #4 start Description: Product Messages - English Estimated time 14 second(s) Task #4 end Task #5 start Description: Base client support Estimated time 352 second(s) Task #5 end Task #6 start Description: Java Runtime Support Estimated time 188 second(s) Task #6 end Task #7 start Description: Java Help (HTML) - English Estimated time 7 second(s) Task #7 end Task #8 start Description: Base server support for installation with root privileges Estimated time 8 second(s) Task #8 end Task #9 start Description: Global Secure ToolKit Estimated time 64 second(s) Task #9 end Task #10 start Description: Java support Estimated time 13 second(s) Task #10 end Task #11 start Description: SQL procedures Estimated time 3 second(s) Task #11 end Task #12 start Description: ICU Utilities Estimated time 34 second(s) Task #12 end Task #13 start Description: Java Common files Estimated time 18 second(s) Task #13 end Task #14 start Description: Base server support Estimated time 577 second(s) Task #14 end Task #15 start Description: Control Center Help (HTML) - English Estimated time 13 second(s) Task #15 end Task #16 start Description: Relational wrappers common Estimated time 3 second(s) Task #16 end Task #17 start Description: DB2 data source support Estimated time 6 second(s) Task #17 end Task #18 start Description: ODBC data source support Estimated time 226 second(s) Task #18 end Task #19 start Description: Teradata data source support Estimated time 4 second(s) Task #19 end Task #20 start Description: Spatial Extender server support Estimated time 18 second(s) Task #20 end Task #21 start Description: Scientific Data Sources Estimated time 5 second(s) Task #21 end Task #22 start Description: JDBC data source support Estimated time 68 second(s) Task #22 end Task #23 start Description: IBM Software Development Kit (SDK) for Java(TM) Estimated time 53 second(s) Task #23 end Task #24 start Description: DB2 LDAP support Estimated time 4 second(s) Task #24 end Task #25 start Description: DB2 Instance Setup wizard Estimated time 25 second(s) Task #25 end Task #26 start Description: Structured file data sources Estimated time 5 second(s) Task #26 end Task #27 start Description: Integrated Flash Copy Support Estimated time 3 second(s) Task #27 end Task #28 start Description: Oracle data source support Estimated time 4 second(s) Task #28 end Task #29 start Description: Connect support Estimated time 3 second(s) Task #29 end Task #30 start Description: Application data sources Estimated time 4 second(s) Task #30 end Task #31 start Description: Spatial Extender client Estimated time 3 second(s) Task #31 end Task #32 start Description: SQL Server data source support Estimated time 4 second(s) Task #32 end Task #33 start Description: Communication support - TCP/IP Estimated time 3 second(s) Task #33 end Task #34 start Description: Base application development tools Estimated time 35 second(s) Task #34 end Task #35 start Description: DB2 Update Service Estimated time 4 second(s) Task #35 end Task #36 start Description: Parallel Extension Estimated time 3 second(s) Task #36 end Task #37 start Description: EnterpriseDB code Estimated time 4 second(s) Task #37 end Task #38 start Description: Replication tools Estimated time 58 second(s) Task #38 end Task #39 start Description: Sample database source Estimated time 4 second(s) Task #39 end Task #40 start Description: itlm Estimated time 3 second(s) Task #40 end Task #41 start Description: DB2 Text Search Estimated time 123 second(s) Task #41 end Task #42 start Description: Command Line Processor Plus Estimated time 6 second(s) Task #42 end Task #43 start Description: Sybase data source support Estimated time 3 second(s) Task #43 end Task #44 start Description: Informix data source support Estimated time 4 second(s) Task #44 end Task #45 start Description: Federated Data Access Support Estimated time 3 second(s) Task #45 end Task #46 start Description: First Steps Estimated time 3 second(s) Task #46 end Task #47 start Description: Product Signature for DB2 Server Edition Estimated time 6 second(s) Task #47 end Task #48 start Description: Guardium Installation Manager Client Estimated time 20 second(s) Task #48 end Task #49 start Description: Setting DB2 library path Estimated time 180 second(s) Task #49 end Task #50 start Description: Executing control tasks Estimated time 20 second(s) Task #50 end Task #51 start Description: Updating global registry Estimated time 20 second(s) Task #51 end Task #52 start Description: Starting DB2 Fault Monitor Estimated time 10 second(s) Task #52 end Task #53 start Description: Updating the db2ls and db2greg link Estimated time 1 second(s) Task #53 end Task #54 start Description: Updating the DB2 Administration Server Estimated time 40 second(s) Task #54 end Task #55 start Description: Updating existing DB2 instances Estimated time 60 second(s) Task #55 end The execution completed successfully. For more information see the DB2 installation log at "/tmp/installFixPack.log.6729". more /tmp/installFixPack.log.6729 DB2 Fix Pack Update log file started at: Sun Feb 12 16:11:09 2017 GMT ============================================================ Operating system information: Linux 3.10.0-514.6.1.el7.x86_64.#1 SMP Wed Jan 18 13:06:3 6 UTC 2017 x86_64 Previously Installed Components: Base client support Java support SQL procedures Base server support DB2 data source support ODBC data source support Teradata data source support Spatial Extender server support Scientific Data Sources JDBC data source support IBM Software Development Kit (SDK) for Java(TM) DB2 LDAP support DB2 Instance Setup wizard Structured file data sources Integrated Flash Copy Support Oracle data source support Connect support Application data sources Spatial Extender client SQL Server data source support Communication support - TCP/IP Base application development tools DB2 Update Service Replication tools Sample database source DB2 Text Search Sybase data source support Informix data source support Federated Data Access Support First Steps Guardium Installation Manager Client Selected Components: Base client support Java support SQL procedures Base server support DB2 data source support ODBC data source support Teradata data source support Spatial Extender server support Scientific Data Sources JDBC data source support IBM Software Development Kit (SDK) for Java(TM) DB2 LDAP support DB2 Instance Setup wizard Structured file data sources Integrated Flash Copy Support Oracle data source support Connect support Application data sources Spatial Extender client SQL Server data source support Communication support - TCP/IP Base application development tools DB2 Update Service Replication tools Sample database source DB2 Text Search Sybase data source support Informix data source support Federated Data Access Support First Steps Guardium Installation Manager Client Languages: English (already installed ) Target directory: /opt/ibm/db2/V11.1 Space required: 1667 MB Stopping DB2 Fault Monitor :.......Success Preparing the system :.......Success Backing up installed components. Updating selected components. Installing: BASE_CLIENT_R Installing: DB2_PRODUCT_MESSAGES_EN Installing: BASE_CLIENT Installing: JAVA_RUNTIME_SUPPORT Installing: DB2_JAVA_HELP_EN Installing: BASE_DB2_ENGINE_R Installing: GSK Installing: JAVA_SUPPORT Installing: SQL_PROCEDURES Installing: ICU_SUP Installing: JAVA_COMMON_FILES Installing: BASE_DB2_ENGINE Installing: DB2_CONTROL_CENTER_HELP_EN Installing: RELATIONAL_WRAPPERS_COMMON Installing: DB2_DATA_SOURCE_SUPPORT Installing: ODBC_DATA_SOURCE_SUPPORT Installing: TERADATA_DATA_SOURCE_SUPPORT Installing: SPATIAL_EXTENDER_SERVER_SUPPORT Installing: IINR_SCIENTIFIC_WRAPPER Installing: JDBC_DATA_SOURCE_SUPPORT Installing: JDK Installing: LDAP_EXPLOITATION Installing: INSTANCE_SETUP_SUPPORT Installing: IINR_STRUCTURED_FILES_WRAPPER Installing: ACS Installing: ORACLE_DATA_SOURCE_SUPPORT Installing: CONNECT_SUPPORT Installing: IINR_APPLICATIONS_WRAPPER Installing: SPATIAL_EXTENDER_CLIENT_SUPPORT Installing: SQL_SERVER_DATA_SOURCE_SUPPORT Installing: COMMUNICATION_SUPPORT_TCPIP Installing: APPLICATION_DEVELOPMENT_TOOLS Installing: DB2_UPDATE_SERVICE Installing: DATABASE_PARTITIONING_SUPPORT Installing: EDB Installing: REPL_CLIENT Installing: DB2_SAMPLE_DATABASE Installing: ITLM Installing: TEXT_SEARCH Installing: CLPPLUS Installing: SYBASE_DATA_SOURCE_SUPPORT Installing: INFORMIX_DATA_SOURCE_SUPPORT Installing: FED_DATA_SOURCE_SUPPORT Installing: FIRST_STEPS Installing: ESE_PRODUCT_SIGNATURE Installing: GUARDIUM_INST_MNGR_CLIENT Updating DB2 file sets :.......Success Executing control tasks :.......Success Updating global registry :.......Success Starting DB2 Fault Monitor :.......Success Updating the db2ls and db2greg link :.......Success Updating the DB2 Administration Server :.......Success The instance "db2inst1" has been updated successfully. The following instances were successfully updated: db2inst1 Updating existing DB2 instances :.......Success Post Fix Pack Update Recommendations ------------------------------------- Required steps: Perform the post-installation tasks specified in the fix pack Readme. Optional steps: To validate your installation files, instance, and database functionality, run the Vali dation Tool, /opt/ibm/db2/V11.1/bin/db2val. For more information, see "db2val" in the D B2 Information Center. DB2 Fix Pack Update log file finished at: Sun Feb 12 16:16:22 2017 GMT ============================================================Next we perform the post installation steps for instance db2inst1
- . /home/db2inst1/sqllib/db2profile
- # We skip djxlink as we are not using InfoSphere Federation Server
- /opt/ibm/db2/V11.1/instance/db2ilist # just db2inst1
- /opt/ibm/db2/V11.1/instance/db2iupdt db2inst1
Output from db2iupdt is
/opt/ibm/db2/V11.1/instance/db2iupdt db2inst1 DBI1446I The db2iupdt command is running. DB2 installation is being initialized. Total number of tasks to be performed: 4 Total estimated time for all tasks to be performed: 309 second(s) Task #1 start Description: Setting default global profile registry variables Estimated time 1 second(s) Task #1 end Task #2 start Description: Initializing instance list Estimated time 5 second(s) Task #2 end Task #3 start Description: Configuring DB2 instances Estimated time 300 second(s) Task #3 end Task #4 start Description: Updating global profile registry Estimated time 3 second(s) Task #4 end The execution completed successfully. For more information see the DB2 installation log at "/tmp/db2iupdt.log.67614". DBI1070I Program db2iupdt completed successfully. more /tmp/db2iupdt.log.67614 DB2 Setup log file started at: Sun Feb 12 18:38:00 2017 GMT ============================================================ Operating system information: Linux 3.10.0-514.6.1.el7.x86_64.#1 SMP Wed Jan 18 13:06:3 6 UTC 2017 x86_64 Existing instances to configure: Instance name: db2inst1 Instance user information: User name: db2inst1 Setting default global profile registry variables :.......Success Initializing instance list :.......Success The instance "db2inst1" has been updated successfully. Configuring DB2 instances :.......Success Updating global profile registry :.......Success Post-installation instructions ------------------------------- Required steps: Start using the DB2 product using a valid user ID such as the DB2 instance owner's ID " db2inst1". Optional steps: To validate your installation files, instance, and database functionality, run the Vali dation Tool, /opt/ibm/db2/V11.1/bin/db2val. For more information, see "db2val" in the D B2 Information Center. Open First Steps by running "db2fs" using a valid user ID such as the DB2 instance owne r's ID. You will need to have DISPLAY set and a supported web browser in the path of th is user ID. Verify that you have access to the DB2 Information Center based on the choices you made during this installation. If you performed a typical or a compact installation, verify that you can access the IBM Web site using the internet. If you performed a custom ins tallation, verify that you can access the DB2 Information Center location specified dur ing the installation. Ensure that you have the correct license entitlements for DB2 products and features ins talled on this machine. Each DB2 product or feature comes with a license certificate fi le (also referred to as a license key) that is distributed on an Activation CD, which a lso includes instructions for applying the license file. If you purchased a base DB2 pr oduct, as well as, separately priced features, you might need to install more than one license certificate. The Activation CD for your product or feature can be downloaded fr om Passport Advantage if it is not part of the physical media pack you received from IB M. For more information about licensing, search the Information Center (https://www-01. ibm.com/support/knowledgecenter/SSEPGG_11.1.0/com.ibm.db2.luw.kc.doc/welcome.html) usin g terms such as "license compliance", "licensing" or "db2licm". To use your DB2 database product, you must have a valid license. For information about obtaining and applying DB2 license files, see http://www-01.ibm.com/support/knowledgece nter/SSEPGG_11.1.0/com.ibm.db2.luw.qb.server.doc/doc/c0061199.html. DB2 Setup log file finished at: Sun Feb 12 18:39:53 2017 GMT ============================================================Next we update the DAS server
- /opt/ibm/db2/V11.1/instance/dasupdt
/opt/ibm/db2/V11.1/instance/dasupdt DBI1070I Program dasupdt completed successfully.Next we update the system catalog for our instance
- su - db2inst1
- db2updv111 -d SAMPLE
db2updv111 -d SAMPLE _________________________________________________________________________ _____ DB2 Service Tools _____ I B M db2updv111 This tool is a service utility designed to update a DB2 Version 11.1 database to the current fix pack level. _________________________________________________________________________ DB2 Universal Database Version 11.1, 5622-044 (c) Copyright IBM Corp. 2015 Licensed Material - Program Property of IBM IBM DATABASE 2 Database update to current fix pack tool db2updv111 completed successfully for database 'SAMPLE'.Restart everything
- db2start for instances (as db2inst1)
- db2admin start for db2servers (as dasusr1)
5.3.3 DB2 Early Access Program
At DB2 for Linux, UNIX and Windows
5.4 Oracle
5.4.1 Oracle 12.1.0.2
Derived from oracle base and Oracle 12c installation on Oracle Linux release-6 (64-bit) and Installing 11.2.0.3 on RHEL 6
First run a yum update then
Append "ol7-121.localdomain" and "ol7-121" to /etc/hosts on the "::1" line
::1 localhost localhost.localdomain localhost6 localhost6.localdomain6 ol7-121.localdomain ol7-121Add to /etc/sysctl.conf
fs.file-max = 6815744 kernel.sem = 250 32000 100 128 kernel.shmmni = 4096 kernel.shmall = 1073741824 kernel.shmmax = 4398046511104 net.core.rmem_default = 262144 net.core.rmem_max = 4194304 net.core.wmem_default = 262144 net.core.wmem_max = 1048576 fs.aio-max-nr = 1048576 net.ipv4.ip_local_port_range = 9000 65500Run /sbin/sysctl -p
Add the following lines to the /etc/security/limits.conf file.
oracle soft nofile 1024 oracle hard nofile 65536 oracle soft nproc 2047 oracle hard nproc 16384 oracle soft stack 10240 oracle hard stack 32768Add yum packages:
yum install binutils -y yum install compat-libcap1 -y yum install compat-libstdc++-33 -y yum install compat-libstdc++-33.i686 -y yum install gcc -y yum install gcc-c++ -y yum install glibc -y yum install glibc.i686 -y yum install glibc-devel -y yum install glibc-devel.i686 -y yum install ksh -y yum install libgcc -y yum install libgcc.i686 -y yum install libstdc++ -y yum install libstdc++.i686 -y yum install libstdc++-devel -y yum install libstdc++-devel.i686 -y yum install libaio -y yum install libaio.i686 -y yum install libaio-devel -y yum install libaio-devel.i686 -y yum install libXext -y yum install libXext.i686 -y yum install libXtst -y yum install libXtst.i686 -y yum install libX11 -y yum install libX11.i686 -y yum install libXau -y yum install libXau.i686 -y yum install libxcb -y yum install libxcb.i686 -y yum install libXi -y yum install libXi.i686 -y yum install make -y yum install sysstat -y yum install unixODBC -y yum install unixODBC-devel -yCreate the new groups and users.
groupadd -g 54321 oinstall groupadd -g 54322 dba groupadd -g 54323 oper #groupadd -g 54324 backupdba #groupadd -g 54325 dgdba #groupadd -g 54326 kmdba #groupadd -g 54327 asmdba #groupadd -g 54328 asmoper #groupadd -g 54329 asmadmin useradd -u 54321 -g oinstall -G dba,oper oracleSet the password for the "oracle" user.
passwd oracleEdit /etc/security/limits.d/20-nproc.conf
Change "* soft nproc 4096" line to:
* - nproc 16384Edit /etc/selinux/config
SELINUX=permissiveAlso
setenforce PermissiveTurn off the firewall
systemctl mask firewalld service firewalld stop systemctl disable firewalld systemctl status firewalld -lCreate Oracle directories
mkdir -p /u01/app/oracle/product/12.1.0/db_1 chown -R oracle:oinstall /u01 chmod -R 775 /u01Add to /home/oracle/.bash_profile
# Oracle Settings export TMP=/tmp export TMPDIR=$TMP export ORACLE_HOSTNAME=ol6-121.localdomain export ORACLE_UNQNAME=orcl export ORACLE_BASE=/u01/app/oracle export ORACLE_HOME=$ORACLE_BASE/product/12.1.0/db_1 export ORACLE_SID=orcl export PATH=/usr/sbin:$PATH export PATH=$ORACLE_HOME/bin:$PATH export LD_LIBRARY_PATH=$ORACLE_HOME/lib:/lib:/usr/lib export CLASSPATH=$ORACLE_HOME/jlib:$ORACLE_HOME/rdbms/jlibAdd a new 20GB hard disk and add a 4GB swap device
- In VMWare Workstation add a new hard disk with defaults which will be a SCSI disk 20GB in size
- Rescan the scsi bus
- grep mpt /sys/class/scsi_host/host?/proc_name /sys/class/scsi_host/host2/proc_name:mptspi Take the host number and force a rescan of that scsi bus - echo "- - -" > /sys/class/scsi_host/host2/scan - fdisk /dev/sdb - add a new partition (n) default partition 1, set size as +4G, note the UUID= - change the type (t) to type 82 linux swap - write (w) the partition back - mkswap /dev/sdb1 - vim /etc/fstab - duplicate the swap line but change the start to UUID= and the uuid of the partition e.g. UUID=81259d7e-7a36-4631-a178-ec84c0c01892 swap swap defaults 0 0 - swapon -av - swapon -s , use fdisk,mkswap,/etc/fstab to add 4GBReboot
Unpack oracle sources and edit.
mkdir /tmp/x cd /tmp/x unzip /mnt/hgfs/cache/sw/oracle/orcl12.1.0.2.0/linuxamd64_12102_database_1of2.zip unzip /mnt/hgfs/cache/sw/oracle/orcl12.1.0.2.0/linuxamd64_12102_database_2of2.zip vim /tmp/x/database/stage/cvu/cv/admin/cvu_config change to CV_ASSUME_DISTID=OEL7Now run the installer:
xhost + xhost +si:localuser:oracle su - oracle export DISPLAY=:0 /usr/bin/xdpyinfo | head -5 # check $DISPLAY cd /tmp/x/database ./runInstaller
- On the "Configure Security Updates" screen uncheck "I wish to receive security updates via My Oracle Support" and click Next
- On the you have not provided an email address warning click Yes
- On the "Select Installation Option" screen leave as "Create and configure a database" and click Next
- On the "System class" screen click "Server class" and click Next
- On the "Grid Installation Options" screen leave as "Single instance database installation" and click Next
- On the "Select Install Type" screen leave as "Typical install" and click Next
- On the "Typically installation" screen leave the defaults
- Oracle base /u01/app/oracle - Software location /u01/app/oracle/product/12.1.0/db_1 - Storage type File system - Database file location /u01/app/oracle/ordata - Database Edition Enterprise Edition (6.4GB) - OSDBA group dba - Global database name orcl.localdomain - Create as Container database checked - Pluggable database name pdborclEnter the administrative password and Click Next On the "Create Inventory" screen leave as /u01/app/orainventory,oraInventory group name oinstall and click Next On the "Summary" screen click "Save Response File" Folder will be /home/oracle, change name to db1.rsp, Click Save On the "Summary" screen click Install When prompted run the root install scripts - /u01/app/oraInventory/orainstRoot.sh - /u01/app/oracle/product/12.1.0/db_1/root.shThe installer then runs Oracle Net Configuration Assistant (netca) abd Database Configuration Assistant (dbca) Details will be:
- Global database name: orcl.localdomain - System Identifier (SID): orcl - Server Parameter Filename: /u01/app/oracle/product/12.1.0/db_1/dbs/spfileorcl.ora - EM Database Express URL: https://ol6-121.localdomain:5500/emOn the "Finish" screen click Close Install logs are in /tmp or /u01/app/oraInventory/logs
To check install was ok
sqlplus / as sysdba select version from v$instance;5.4.2 Oracle 12.1.0.2
Downloaded from Oracle Database Software Downloads
Derived from oracle base and Oracle 12c installation on Oracle Linux release-6 (64-bit) and Installing 11.2.0.3 on RHEL 6
First run a yum update then
Append "ol7-121.localdomain" and "ol7-121" to /etc/hosts on the "::1" line
::1 localhost localhost.localdomain localhost6 localhost6.localdomain6 ol7-121.localdomain ol7-121Add to /etc/sysctl.conf
fs.file-max = 6815744 kernel.sem = 250 32000 100 128 kernel.shmmni = 4096 kernel.shmall = 1073741824 kernel.shmmax = 4398046511104 net.core.rmem_default = 262144 net.core.rmem_max = 4194304 net.core.wmem_default = 262144 net.core.wmem_max = 1048576 fs.aio-max-nr = 1048576 net.ipv4.ip_local_port_range = 9000 65500Run /sbin/sysctl -p
Add the following lines to the /etc/security/limits.conf file.
oracle soft nofile 1024 oracle hard nofile 65536 oracle soft nproc 2047 oracle hard nproc 16384 oracle soft stack 10240 oracle hard stack 32768Add yum packages:
yum install binutils -y yum install compat-libcap1 -y yum install compat-libstdc++-33 -y yum install compat-libstdc++-33.i686 -y yum install gcc -y yum install gcc-c++ -y yum install glibc -y yum install glibc.i686 -y yum install glibc-devel -y yum install glibc-devel.i686 -y yum install ksh -y yum install libgcc -y yum install libgcc.i686 -y yum install libstdc++ -y yum install libstdc++.i686 -y yum install libstdc++-devel -y yum install libstdc++-devel.i686 -y yum install libaio -y yum install libaio.i686 -y yum install libaio-devel -y yum install libaio-devel.i686 -y yum install libXext -y yum install libXext.i686 -y yum install libXtst -y yum install libXtst.i686 -y yum install libX11 -y yum install libX11.i686 -y yum install libXau -y yum install libXau.i686 -y yum install libxcb -y yum install libxcb.i686 -y yum install libXi -y yum install libXi.i686 -y yum install make -y yum install sysstat -y yum install unixODBC -y yum install unixODBC-devel -yCreate the new groups and users.
groupadd -g 54321 oinstall groupadd -g 54322 dba groupadd -g 54323 oper #groupadd -g 54324 backupdba #groupadd -g 54325 dgdba #groupadd -g 54326 kmdba #groupadd -g 54327 asmdba #groupadd -g 54328 asmoper #groupadd -g 54329 asmadmin useradd -u 54321 -g oinstall -G dba,oper oracleSet the password for the "oracle" user.
passwd oracleEdit /etc/security/limits.d/20-nproc.conf
Change "* soft nproc 4096" line to:
* - nproc 16384Edit /etc/selinux/config
SELINUX=permissiveAlso
setenforce PermissiveTurn off the firewall
systemctl mask firewalld service firewalld stop systemctl disable firewalld systemctl status firewalld -lCreate Oracle directories
mkdir -p /u01/app/oracle/product/12.1.0/db_1 chown -R oracle:oinstall /u01 chmod -R 775 /u01Add to /home/oracle/.bash_profile
# Oracle Settings export TMP=/tmp export TMPDIR=$TMP export ORACLE_HOSTNAME=ol6-121.localdomain export ORACLE_UNQNAME=orcl export ORACLE_BASE=/u01/app/oracle export ORACLE_HOME=$ORACLE_BASE/product/12.1.0/db_1 export ORACLE_SID=orcl export PATH=/usr/sbin:$PATH export PATH=$ORACLE_HOME/bin:$PATH export LD_LIBRARY_PATH=$ORACLE_HOME/lib:/lib:/usr/lib export CLASSPATH=$ORACLE_HOME/jlib:$ORACLE_HOME/rdbms/jlibAdd a new 20GB hard disk and add a 4GB swap device
- In VMWare Workstation add a new hard disk with defaults which will be a SCSI disk 20GB in size
- Rescan the scsi bus
- grep mpt /sys/class/scsi_host/host?/proc_name /sys/class/scsi_host/host2/proc_name:mptspi Take the host number and force a rescan of that scsi bus - echo "- - -" > /sys/class/scsi_host/host2/scan - fdisk /dev/sdb - add a new partition (n) default partition 1, set size as +4G, note the UUID= - change the type (t) to type 82 linux swap - write (w) the partition back - mkswap /dev/sdb1 - vim /etc/fstab - duplicate the swap line but change the start to UUID= and the uuid of the partition e.g. UUID=81259d7e-7a36-4631-a178-ec84c0c01892 swap swap defaults 0 0 - swapon -av - swapon -s , use fdisk,mkswap,/etc/fstab to add 4GBReboot
Unpack oracle sources and edit.
mkdir /tmp/x cd /tmp/x unzip /mnt/hgfs/cache/sw/oracle/orcl12.1.0.2.0/linuxamd64_12102_database_1of2.zip unzip /mnt/hgfs/cache/sw/oracle/orcl12.1.0.2.0/linuxamd64_12102_database_2of2.zip vim /tmp/x/database/stage/cvu/cv/admin/cvu_config change to CV_ASSUME_DISTID=OEL7Now run the installer:
xhost + xhost +si:localuser:oracle su - oracle export DISPLAY=:0 /usr/bin/xdpyinfo | head -5 # check $DISPLAY cd /tmp/x/database ./runInstaller
- On the "Configure Security Updates" screen uncheck "I wish to receive security updates via My Oracle Support" and click Next
- On the you have not provided an email address warning click Yes
- On the "Select Installation Option" screen leave as "Create and configure a database" and click Next
- On the "Select System class" screen click "Server class" and click Next
- On the "Select Database Installation Option" screen leave as "Single instance database installation" and click Next
- On the "Select Install Type" screen leave as "Typical install" and click Next
- On the "Typically Install Configuration" screen leave the defaults
- Oracle base /u01/app/oracle - Software location /u01/app/oracle/product/12.1.0/db_1 - Storage type File system - Database file location /u01/app/oracle/ordata - Database Edition Enterprise Edition (7.5GB) - OSDBA group dba - Global database name orcl - Create as Container database checked - Pluggable database name orclpdbEnter the password and Click Next On the "Create Inventory" screen leave as /u01/app/orainventory,oraInventory group name oinstall and click Next On the "Summary" screen click "Save Response File" Folder will be /home/oracle, change name to db1.rsp, Click Save On the "Summary" screen click Install When prompted run the root install scripts in a terminal window - /u01/app/oraInventory/orainstRoot.sh - /u01/app/oracle/product/12.1.0/db_1/root.shThe second script will finish running the generic part of the root script and then run the product-specific root actions
When prompted to setup the Oracle Trace File Analyzer (TFA) reply yes
Once complete go back to the installer and on the "Execute Configuration Scripts" window click OK
The installer then runs Oracle Net Configuration Assistant (netca) abd Database Configuration Assistant (dbca) Details will be:
- Global database name: orcl.localdomain - System Identifier (SID): orcl - Server Parameter Filename: /u01/app/oracle/product/12.1.0/db_1/dbs/spfileorcl.ora - Oracle Enterprise Manager Database Express URL: https://ol6-121.localdomain:5500/emOn the "Finish" screen click Close Install logs are in /tmp,/u01/app/oraInventory/logs (Installer) or /u01/app/oracle/product/12.1.0/db_1/install (Trace File Analyzer)
To check install was ok
sqlplus / as sysdba select version from v$instance; select * from v$version; select * from product_component_version; SET SERVEROUTPUT ON; EXEC dbms_output.put_line( dbms_db_version.version ); EXEC dbms_output.put_line( dbms_db_version.release );5.5 Postgres
5.5.1 Postgres 9.5.2 binaries
Go to PostgreSQL RPM Building Project - Repository Packages
Download 9.5 CentOS 7.1 RPM
Manual is at PostgreSQL 9.4.1 Documentation
Run
- yum install util-linux -y
- yum localinstall /mnt/hgfs/cache/sw/postgres/pgdg-centos95-9.5-2.noarch.rpm -y
- yum list "postgresql95*"
- yum install postgresql95-server.x86_64 -y
- useradd postgres95rpm
- su - postgres95rpm
- mkdir -p storage/server1
- vim .bash_profile
- Add
PATH=/usr/pgsql-9.5/bin:$PATH PGDATA=/home/postgres95rpm/storage/server1 export PGDATA- exit
- su - postgres95rpm
- initdb
- vim /home/postgres95rpm/storage/server1/postgresql.conf
- Change unix_socket_directories to start with /home/postgres95rpm/storage
- pg_ctl -D /home/postgres95rpm/storage/server1 -l logfile start
- pg_ctl -D /home/postgres95rpm/storage/server1 status
- export PGHOST=/home/postgres95rpm/storage
- createdb # create database named after your username (postgres95rpm)
- psql # connect to database named after your username (postgres95rpm)
- \db # list tablespaces
- \? # list internal commands
- \help # list sql commands
- \help drop user # help for drop user sql command
- \q # quit
- pg_ctl stop # stop server
5.5.2 Postgres 9.6 beta2 from source
Download source from File Browser
Get postgresql-9.6beta2.tar.gz
Run
- yum install readline-devel -y
- yum install zlib-devel -y
- yum install tcl -y
- yum install docbook-dtds docbook-style-dsssl docbook-style-xsl libxslt openjade -y
- useradd postgres96b2
- su - postgres96b2
- mkdir /tmp/x;cd /tmp/x
- tar xvzf /mnt/hgfs/cache/sw/postgres/postgresql-9.6beta2.tar.gz
- cd postgresql-9.6beta2
- ./configure
- gmake
- gmake check # All 166 tests passed.
- As root cd /tmp/x/postgresql-9.6beta2; gmake install
- Login again as postgres96b2
- mkdir -p storage/server2
- vim .bash_profile
- Add
PATH=/usr/local/pgsql/bin:$PATH PGDATA=/home/postgres96b2/storage/server2 export PGDATA- Logout and su back in again
- initdb
- pg_ctl -D /home/postgres96b2/storage/server2 -l logfile start
- createdb # create database named after your username (postgres96b2)
- psql # connect to database named after your username (postgres96b2)
- \db # list tablespaces
- \q # quit
- pg_ctl stop # stop server
5.5.3 Postgres 9.6.1 from source
Download source from File Browser
- yum install readline-devel -y
- yum install zlib-devel -y
- yum install tcl -y
- yum install docbook-dtds docbook-style-dsssl docbook-style-xsl libxslt openjade -y
- useradd postgres961
- su - postgres961
- mkdir /tmp/x;cd /tmp/x
- tar xvzf /mnt/hgfs/cache/sw/postgres/postgresql-9.6.1.tar.gz
- cd postgresql-9.6
- ./configure
- gmake
- gmake check # All 166 tests passed.
- As root cd /tmp/x/postgresql-9.6; gmake install
- Login again as postgres961
- mkdir -p storage/server2
- vim .bash_profile
- Add
PATH=/usr/local/pgsql/bin:$PATH PGDATA=/home/postgres961/storage/server2 export PGDATA- Logout and su back in again
- initdb
- pg_ctl -D /home/postgres961/storage/server2 -l logfile start
- createdb # create database named after your username (postgres961)
- psql # connect to database named after your username (postgres961)
- \db # list tablespaces
- \q # quit
- pg_ctl stop # stop server
5.5.4 Postgres 9.6.2 from source
Download source from File Browser
- yum install readline-devel -y
- yum install zlib-devel -y
- yum install tcl -y
- yum install docbook-dtds docbook-style-dsssl docbook-style-xsl libxslt openjade -y
- useradd postgres962
- su - postgres962
- mkdir /tmp/x;cd /tmp/x
- tar xvzf /mnt/hgfs/cache/sw/postgres/postgresql-9.6.2.tar.gz
- cd postgresql-9.6.2
- ./configure
- gmake
- gmake check # All 167 tests passed.
- As root cd /tmp/x/postgresql-9.6.2
- gmake install
- Login again as postgres962
- mkdir -p storage/server1
- vim .bash_profile
- Add
PATH=/usr/local/pgsql/bin:$PATH PGDATA=/home/postgres962/storage/server1 export PGDATA- Logout and su back in again
- initdb
- pg_ctl -D /home/postgres962/storage/server1 -l logfile start
- createdb # create database named after your username (postgres962)
- psql # connect to database named after your username (postgres962)
- \db # list tablespaces
- \q # quit
- pg_ctl stop # stop server
5.5.5 Postgres 10.0 from source
Download source from File Browser
- yum install readline-devel -y
- yum install zlib-devel -y
- yum install tcl -y
- yum install docbook-dtds docbook-style-dsssl docbook-style-xsl libxslt openjade -y
- useradd postgres100
- su - postgres100
- mkdir /tmp/x;cd /tmp/x
- tar xvjf /mnt/hgfs/cache/sw/postgres/postgresql-10.0.tar.bz2
- cd postgresql-10.0
- ./configure
- gmake
- gmake check # All 178 tests passed.
- As root cd /tmp/x/postgresql-10.0
- gmake install
- su - postgres100
- mkdir -p storage/server1
- vim .bash_profile
- Add
PATH=/usr/local/pgsql/bin:$PATH PGDATA=/home/postgres100/storage/server1 export PGDATA- Logout and su back in again
- initdb
- pg_ctl -D /home/postgres100/storage/server1 -l logfile start
- createdb # create database named after your username (postgres962)
- psql # connect to database named after your username (postgres962)
- \db # list tablespaces
- \q # quit
- pg_ctl stop # stop server
5.6 SQL Server
5.6.1 SQL Server 2017 CTP1
From SQL Server v.Next Public Preview
Notes from Install SQL Server on Red Hat Enterprise Linux
- Logon as yourself, NOT root!
- sudo su
- curl https://packages.microsoft.com/config/rhel/7/mssql-server.repo > /etc/yum.repos.d/mssql-server.repo
- curl https://packages.microsoft.com/config/rhel/7/prod.repo > /etc/yum.repos.d/msprod.repo
- exit
- sudo yum install -y mssql-server
- sudo /opt/mssql/bin/sqlservr-setup
- systemctl status mssql-server
- sudo firewall-cmd --zone=public --add-port=1433/tcp --permanent
- sudo firewall-cmd --reload
- sudo yum install -y mssql-server mssql-tools
- sqlcmd -S localhost -U SA -P yourpassword
- select @@version
- go
5.6.2 SQL Server 2017 CTP1.1
From SQL Server v.Next Public Preview
Notes from Install SQL Server on Red Hat Enterprise Linux
- Logon as yourself, NOT root!
- sudo su
- curl https://packages.microsoft.com/config/rhel/7/mssql-server.repo > /etc/yum.repos.d/mssql-server.repo
- curl https://packages.microsoft.com/config/rhel/7/prod.repo > /etc/yum.repos.d/msprod.repo
- exit
- sudo yum install -y mssql-server
- sudo /opt/mssql/bin/sqlservr-setup
- systemctl status mssql-server
- sudo firewall-cmd --zone=public --add-port=1433/tcp --permanent
- sudo firewall-cmd --reload
- sudo yum install -y mssql-server mssql-tools
- sqlcmd -S localhost -U SA -P yourpassword
- select @@version
- go
5.6.3 SQL Server 2017 CTP1.2
From SQL Server v.Next Public Preview
Notes from Install SQL Server on Red Hat Enterprise Linux
- Logon as yourself, NOT root!
- sudo su
- curl https://packages.microsoft.com/config/rhel/7/mssql-server.repo > /etc/yum.repos.d/mssql-server.repo
- curl https://packages.microsoft.com/config/rhel/7/prod.repo > /etc/yum.repos.d/msprod.repo
- exit
- sudo yum install -y mssql-server
- sudo /opt/mssql/bin/sqlservr-setup # Enter password and answer y to both startup questions
- systemctl status mssql-server
- sudo firewall-cmd --zone=public --add-port=1433/tcp --permanent
- sudo firewall-cmd --reload
- sudo yum update
- sudo yum remove unixODBC-utf16 unixODBC-utf16-devel
- sudo yum install mssql-tools unixODBC-devel
- sudo yum check-update
- sudo yum update mssql-tools
- echo 'export PATH="$PATH:/opt/mssql-tools/bin"' >> ~/.bash_profile
- echo 'export PATH="$PATH:/opt/mssql-tools/bin"' >> ~/.bashrc
- source ~/.bashrc
- sqlcmd -S localhost -U SA -P yourpassword
- select @@version
- go
NOTE: As we set the sql server to start on host startup we get
sudo /opt/mssql/bin/sqlservr-setup [sudo] password for justdave: Microsoft(R) SQL Server(R) Setup You can abort setup at anytime by pressing Ctrl-C. Start this program with the --help option for information about running it in unattended mode. Please enter a password for the system administrator (SA) account: Please confirm the password for the system administrator (SA) account: Setting system administrator (SA) account password... Do you wish to start the SQL Server service now? [y/n]: y Do you wish to enable SQL Server to start on boot? [y/n]: y Created symlink from /etc/systemd/system/multi-user.target.wants/mssql-server.service to /usr/lib/systemd/system/mssql-server.service. Created symlink from /etc/systemd/system/multi-user.target.wants/mssql-server-telemetry.service to /usr/lib/systemd/system/mssql-server-telemetry.service. Setup completed successfully.To use a debugger
See also mapping gdb commands to lldb http://lldb.llvm.org/lldb-gdb.html yum whatprovides lldb yum install lldb-3.4.2-7.el7.x86_64 lldb -p 3890 thread list thread select 100 bt # backtrace q # quit5.6.4 SQL Server 2017 CTP1.3
From SQL Server v.Next Public Preview
Notes from Install SQL Server on Red Hat Enterprise Linux
- Logon as yourself, NOT root!
- sudo su
- curl https://packages.microsoft.com/config/rhel/7/mssql-server.repo > /etc/yum.repos.d/mssql-server.repo
- curl https://packages.microsoft.com/config/rhel/7/prod.repo > /etc/yum.repos.d/msprod.repo
- exit
- sudo yum install -y mssql-server
- sudo /opt/mssql/bin/sqlservr-setup # Enter password and answer y to both startup questions
- systemctl status mssql-server
- sudo firewall-cmd --zone=public --add-port=1433/tcp --permanent
- sudo firewall-cmd --reload
- sudo yum update
- sudo yum remove unixODBC-utf16 unixODBC-utf16-devel
- sudo yum install mssql-tools unixODBC-devel
- sudo yum check-update
- sudo yum update mssql-tools
- echo 'export PATH="$PATH:/opt/mssql-tools/bin"' >> ~/.bash_profile
- echo 'export PATH="$PATH:/opt/mssql-tools/bin"' >> ~/.bashrc
- source ~/.bashrc
- sqlcmd -S localhost -U SA -P yourpassword
- select @@version
- go
NOTE: As we set the sql server to start on host startup we get
sudo /opt/mssql/bin/sqlservr-setup [sudo] password for justdave: Microsoft(R) SQL Server(R) Setup You can abort setup at anytime by pressing Ctrl-C. Start this program with the --help option for information about running it in unattended mode. Please enter a password for the system administrator (SA) account: Please confirm the password for the system administrator (SA) account: Setting system administrator (SA) account password... Do you wish to start the SQL Server service now? [y/n]: y Do you wish to enable SQL Server to start on boot? [y/n]: y Created symlink from /etc/systemd/system/multi-user.target.wants/mssql-server.service to /usr/lib/systemd/system/mssql-server.service. Created symlink from /etc/systemd/system/multi-user.target.wants/mssql-server-telemetry.service to /usr/lib/systemd/system/mssql-server-telemetry.service. Setup completed successfully.5.6.5 SQL Server 2017 CTP1.4 with SQL Server Agent
From SQL Server next version CTP 1.4 now available
Notes from Install SQL Server on Red Hat Enterprise Linux
SQL Server Agents notes from Install SQL Server Agent on Linux
- Logon as yourself, NOT root!
- sudo su
- curl https://packages.microsoft.com/config/rhel/7/mssql-server.repo > /etc/yum.repos.d/mssql-server.repo
- curl https://packages.microsoft.com/config/rhel/7/prod.repo > /etc/yum.repos.d/msprod.repo
- exit
- sudo yum install -y mssql-server
- sudo /opt/mssql/bin/mssql-conf setup # Enter password and answer y to both startup questions
- systemctl status mssql-server
- sudo firewall-cmd --zone=public --add-port=1433/tcp --permanent
- sudo firewall-cmd --reload
- sudo yum update
- sudo yum remove unixODBC-utf16 unixODBC-utf16-devel
- sudo yum install mssql-tools unixODBC-devel
- sudo yum check-update
- sudo yum update mssql-tools
- echo 'export PATH="$PATH:/opt/mssql-tools/bin"' >> ~/.bash_profile
- echo 'export PATH="$PATH:/opt/mssql-tools/bin"' >> ~/.bashrc
- source ~/.bashrc
- sqlcmd -S localhost -U SA -P yourpassword
- select @@version
- go
- sudo yum install mssql-server-agent
- sudo systemctl restart mssql-server
- systemctl status mssql-server
- sudo yum install -y mssql-server-fts
6 Raspberry Pi 2
6.1 Informix
6.1.1 Informix 12.10.FC4 on Raspberry Pi 2
First download NOOBS from Raspberry Pi Downloads and install NOOBS are per the setup guide Getting Started with NOOBS This starts with the SD Card Formatter
To convert from exFat to FAT32 use diskpart (run as administrator)
diskpart list disk select disk 2 list partition 1 shrink (->1MB) extend size=32766 (->1MB less than 32GB) list partition (will appear as 31GB) format fs=fat32 quickCopy the NOOBS files onto the SD drive
Eject the SD device
Insert SD, HDMI,USB Keyboard/Mouse,Network and lastly Power into Raspberry PI 2
With thanks to Mount an SMB network drive on Raspberry Pi
and A SQL database for sensor and JSON data on Raspian
Download Putty to be able to remotely login to the RaspBerry Pi 2 SSH using Windows
This goes to PuTTY Download Page
vi /home/pi/.smbcredentials Add username=x password=y and save chmod 600 /home/pi/.smbcredentials sudo mkdir /media/cache sudo vi /etc/fstab Add an entry similar to //192.168.0.7/cache /media/cache cifs credentials=/home/pi/.smbcredentials,uid=1000,gid=1000,iocharset=utf8 0 0 sudo mount -aI copied the install files locally
sudo mkdir -p /opt/cache/ifmx cd /opt/cache/ifmx cp /media/cache/ifmx/ids* .Set kernel parameters
sudo vi /etc/sysctl.conf Add kernel.shmmax = 536870912 kernel.shmmni = 4096 kernel.shmall = 131072 kernel.sem = 250 32000 100 4096 fs.aio-max-nr = 1048576sudo /sbin/sysctl -p
Install packages
pi@raspberrypi /tmp/x/SERVER/doc $ sudo apt-get install libaio1 Reading package lists... Done Building dependency tree Reading state information... Done The following NEW packages will be installed: libaio1 0 upgraded, 1 newly installed, 0 to remove and 0 not upgraded. Need to get 8,944 B of archives. After this operation, 53.2 kB of additional disk space will be used. Get:1 http://mirrordirector.raspbian.org/raspbian/ wheezy/main libaio1 armhf 0.3.109-3 [8,944 B] Fetched 8,944 B in 0s (35.5 kB/s) Selecting previously unselected package libaio1:armhf. (Reading database ... 76938 files and directories currently installed.) Unpacking libaio1:armhf (from .../libaio1_0.3.109-3_armhf.deb) ... Setting up libaio1:armhf (0.3.109-3) ... pi@raspberrypi ~ $ dpkg -s libgcc1 | grep Status Status: install ok installed pi@raspberrypi ~ $ dpkg -s libstdc++6 | grep Status Status: install ok installed pi@raspberrypi ~ $ dpkg -s libncurses5 | grep Status Status: install ok installedSetup user informix and start X as root
root@raspberrypi:/tmp/x# sudo addgroup informix Adding group `informix' (GID 1004) ... Done. root@raspberrypi:/tmp/x# sudo adduser --ingroup informix informix Adding user `informix' ... Adding new user `informix' (1001) with group `informix' ... Creating home directory `/home/informix' ... Copying files from `/etc/skel' ... Enter new UNIX password: Retype new UNIX password: passwd: password updated successfully Changing the user information for informix Enter the new value, or press ENTER for the default Full Name []: informix Room Number []: Work Phone []: Home Phone []: Other []: Is the information correct? [Y/n] Y root@raspberrypi:/tmp/x# sudo visudo Add informix ALL=(ALL) NOPASSWD: ALL Ctrl-X to exit, Y to save buffer and accept default filenameUpdate software check java version
sudo su sudo apt-get update sudo apt-get openjdk-7-jdk dpkg-query -L openjdk-7-jdk | grep "bin.java" /usr/lib/jvm/java-7-openjdk-armhf/bin/java -version startx Open Terminal PATH=/usr/lib/jvm/java-7-openjdk-armhf/bin:$PATH java -versionStart the installation in GUI
mkdir /tmp/x cd /tmp/x tar xvf /opt/cache/ifmx/ids.12.10.UC4DE.Linux-ARM7.tar ./ids_install -i swing Click Next on the Getting Started screen Accept the software license agreement and Click Next Change installation location from /tmp to /opt/IDS.12.10.FC4DE On the "Installation or Distribution" screen Choose Custom installation On the "Product Selection" screen click Next Accept the Software License Agreement again On the "Role Separation" screen click Next On the "Server Instance" screen enable "Create a server instance" On the "Configuration - Number of users" screen click Next On the "Connectivity" Screen Click Next (port 9088,DRDA port 9089) On the "Terminal Window" screen Click Next On the "Using the new instance" screen Click Next On the "Installation Complete" screen Click DoneSwitch to user informix and check the server is up
su - informix cd /opt/IDS.12.10.FC4DE . ./ol_informix1210.ksh onstat -V IBM Informix Dynamic Server Version 12.10.UC4DE Software Serial Number AAA#B0000006.1.2 Informix 12.10.FC4 on Raspberry Pi 2
First install both servers ol_informix1210 and ol_informix1210_2
On both instances
# On first server cd $INFORMIXDIR/etc mv $INFORMIXSQLHOSTS sqlhosts.orig cp sqlhosts.orig $INFORMIXSQLHOSTS vi $INFORMIXSQLHOSTS # Add onsoctcp and drsoctcp entries from 2nd server # On second server cd $INFORMIXDIR/etc mv $INFORMIXSQLHOSTS sqlhosts.orig scp sqlhosts from 1st server to $INFORMIXSQLHOSTSOn both servers setup ~informix/.rhosts
ls -l ~/.rhosts -rw------- 1 informix informix 28 May 11 22:42 /home/informix/.rhosts more ~/.rhosts 192.168.0.120 192.168.0.121Setup HADR
On the primary run ontape -s -L 0 -t STDIO > /tmp/1 Stop the secondary onmode -ky Update /etc/services on both hosts to include entries for the other server sudo vi /etc/services Mark the primary as a primary onmode -d primary ol_informix1210_2 Copy the primary backup to the secondary machine with scp Move the secondary chunks to the same path as the primary cd $INFORMIXDIR/storage for i in ol_* do echo "mv $i `echo $i | sed 's/_2_/_/'`" done > /tmp/a Restore the secondary ontape -p -t STDIO < /tmp/1 Mark the seconday as a secondary onmode -d secondary ol_informix1210Check with onstat -m
Primary 23:06:19 DR: Primary to Primary 23:06:19 DR: new type = primary, secondary server name = ol_informix1210_2 23:06:20 DR: Primary server connected 23:06:20 DR: Secondary server needs failure recovery 23:06:39 Logical Log 6 Complete, timestamp: 0x34c47. 23:06:39 Process exited with return code 127: /bin/sh /bin/sh -c /opt/IDS.12.10.FC4DE/etc/alarmprogram.sh 2 23 "Logical Log 6 Complete, timestamp: 0x34c47." "Logical Log 6 Complete, timestamp: 0x34c47." "" 23001 23:06:40 DR: Sending log 6, size 3270 pages, 36.54 percent used 23:06:41 DR: Sending log 7 (current), size 3270 pages, 0.12 percent used Secondary 23:06:20 DR: Secondary server connected 23:06:20 DR: Secondary server needs failure recovery 23:06:21 DR: Failure recovery from disk in progress ... 23:06:21 Logical Recovery Started. 23:06:21 12 recovery worker threads will be started. 23:06:21 Start Logical Recovery - Start Log 6, End Log ? 23:06:21 Starting Log Position - 6 0x491018 23:06:21 Clearing the physical and logical logs has started 23:06:38 Cleared 125 MB of the physical and logical logs in 17 seconds 23:06:41 Started processing open transactions on secondary during startup 23:06:55 Finished processing open transactions on secondary during startup. 23:06:56 Logical Log 6 Complete, timestamp: 0x34c9c.7 Redhat 7 64-bit
7.1 Informix
7.1.1 Informix 11.50.FC9
Download from IBM Informix - IBM Analytics
Go to "Try it"
Download Informix Enterprise Time-Limited Edition for Linux x86_64
Add to /etc/sysctl.conf
kernel.shmmax = 4398046511104 kernel.shmmni = 4096 kernel.shmall = 4194304 kernel.sem = 250 32000 32 4096 fs.aio-max-nr = 1048576Run /sbin/sysctl -p
Settings can be checked by looking under /proc/sys e.g. by more /proc/sys/fs/aio-max-nr
yum repolist all | grep optional yum-config-manager --enable rhel-7-server-optional-rpms yum whatprovides "*/libstdc++.so.5" yum install compat-libstdc++-33-3.2.3-72.el7.x86_64 -y yum install glibc.i686 -y yum update reboot mkdir /tmp/x cd /tmp/x tar xvf /mnt/hgfs/cache/sw/informix/IDS11.50/iif.11.50.FC9TL.linux-x86_64.tar groupadd informix useradd informix -g informix passwd informix # enter passwordNow on the Desktop go to Applications -> Firefox Web Browser
Go to Java SE 7 Archive Downloads
Click on "Java SE Development Kit 7u80"
Under "Java SE Development Kit 7u80" click on the "Accept License Agreement" toggle
Then click on the download link "jdk-7u80-linux-x64.rpm"
Click "Save File"
In a terminal install Java 7
- rpm -qlp /root/Downloads/jdk-7u80-linux-x64.rpm # Will put files into /usr/java/jdk1.7.0_80
- yum install /root/Downloads/jdk-7u80-linux-x64.rpm -y
Now run the 11.50 installer in GUI mode
- ./ids_install -gui -javahome /usr/java/jdk1.7.0_80/jre
- On the first 2 screens click Next.
- On the "Software License Agreement" screen click to accept and click Next.
- On the Directory Name Screen change installation location from /opt/IBM/informix to /opt/IDS.11.50.FC9TL
- On the List of Products screen leave the default (Informix Connect is not needed as this is the runtime for Client SDK which is installed), change the install types to Custom and click Next and
- On the "IBM Informix Client-SDK Version 3.50" screen make no changes (all items selected) and click Next.
- On the "IBM Informix Dynamic Server Version 11.50" screen make no changes (all items selected) and click Next.
- On the "installation directory is not secure" screen choose "Let the installation program secure the path (Recommended)" and click Next.
- On the "Do you want to enable role seperation for auditing procedures" screen accept the default of No and click Next.
- On the "Do you want to create an IDS demonstration database server instance?" screen choose Yes and click Next.
- On the "Demonstration Database Instance Configuration" screen accept the default of Use the default configuration file and click Next
- On the "Specify your server configuration parameters" screen accept the defaults and click Next
- Defaults are Server Name demo_on, Server Number 0
- On the "Please read the summary information below" screen click Next
- On the "Please read the information below" screen click Next
- On the "Select a terminal emulator" screen accept the default of None and click Next
- On the "Please read the summary information below" screen click Next
- Click Finish
Check the new Informix instance demo_on
- su - informix
- cd /opt/IDS.11.50.FC9TL/demo/server
- . ./profile_settings
- onstat -
Your evaluation license will expire on 2017-06-17 00:00:00 IBM Informix Dynamic Server Version 11.50.FC9TL -- On-Line -- Up 00:11:58 -- 47932 Kbytes7.1.2 Informix 11.70.FC8
Download from IBM Informix - IBM Analytics
Go to "Try it"
Download Informix Enterprise Time-Limited Edition for Linux x86_64
Add to /etc/sysctl.conf
kernel.shmmax = 4398046511104 kernel.shmmni = 4096 kernel.shmall = 4194304 kernel.sem = 250 32000 32 4096 fs.aio-max-nr = 1048576Run /sbin/sysctl -p
Settings can be checked by looking under /proc/sys e.g. by more /proc/sys/fs/aio-max-nr
yum repolist all | grep optional yum-config-manager --enable rhel-7-server-optional-rpms yum whatprovides "*/libstdc++.so.5" yum install compat-libstdc++-33-3.2.3-72.el7.x86_64 -y yum install glibc.i686 -y yum update reboot mkdir /tmp/x cd /tmp/x tar xvf /mnt/hgfs/cache/sw/informix/IDS11.70/iif.11.70.FC8TL.linux-x86_64.tar groupadd informix useradd informix -g informix passwd informix # enter passwordNow run the 11.70 installer in GUI mode
- ./ids_install -i swing
- On the "Getting Started" screen click Next
- On the "Software License Agreement" screen click to accept and click Next.
- On the "Installation Goals" screen leave the default of "Install products and features" and click Next
- On the "Installation Location" screen change the installation location from /opt/IBM/informix to /opt/IDS.11.70.FC8TL and click Next
- On the "Installation Type" screen change to Custom and click Next
- On the "Product Selection" screen enable the IBM Informix OpenAdmin Tool and click Next
- On the "Web Server Configuration" screen leave the defaults and click Next
- On the "Security Features" screen leave the defaults and click Next
- On the "OAT Administrator login setup" screen enter a password and click Next
- On the "Software License Agreement" screen click to accept and click Next.
- On the "Role Seperation" screen accept the default of No and click Next.
- On the "Server Instance" screen enable Create a server instance",leave the defaults and click Next
- On the "Connectivity" screen leave the defaults and click Next
- On the "Disk Space Allocation Summary" accept the default of No and click Next.
- On the "Installation Summary" screen click Install
- On the "Server Initialization" screen click Next
- On the "Terminal Window" accept the default of No and click Next.
- On the "Using the new instance" screen click Next
- On the "Installation Complete" screen click Done
Check the new Informix instance demo_on
- su - informix
- cd /opt/IDS.11.70.FC8TL
- . ./ol_informix1170.ksh
- onstat -
our evaluation license will expire on 2018-02-24 00:00:00 IBM Informix Dynamic Server Version 11.70.FC8TL -- On-Line -- Up 00:04:15 -- 173952 Kbytes7.2 SQL Server
7.2.1 SQL Server 2017 CTP2.1 with SQL Server Agent,mssql-scripter and DBFS tool
SQL Server 2017 CTP2.1 with SQL Server Agent
- Logon as yourself, NOT root!
- sudo su
- curl https://packages.microsoft.com/config/rhel/7/mssql-server.repo > /etc/yum.repos.d/mssql-server.repo
- curl https://packages.microsoft.com/config/rhel/7/prod.repo > /etc/yum.repos.d/msprod.repo
- export ACCEPT_EULA=Y
- yum install -y mssql-server
- /opt/mssql/bin/mssql-conf setup # Enter password and answer y to both startup questions
- systemctl status mssql-server
- firewall-cmd --zone=public --add-port=1433/tcp --permanent
- firewall-cmd --reload
- yum update -y
- yum remove unixODBC-utf16 unixODBC-utf16-devel -y
- yum install -y mssql-tools unixODBC-devel
- yum check-update
- yum update mssql-tools
- exit
- echo 'export PATH="$PATH:/opt/mssql-tools/bin"' >> ~/.bash_profile
- echo 'export PATH="$PATH:/opt/mssql-tools/bin"' >> ~/.bashrc
- source ~/.bashrc
- sqlcmd -S localhost -U sa
- select @@version
- go
- su -
- yum install mssql-server-agent
- systemctl restart mssql-server
- systemctl status mssql-server
- yum install -y mssql-server-fts
mssql-scripter
mssql scripter is a Python based tool to generate create and insert statements from database objects
First we install pip
- curl "https://bootstrap.pypa.io/get-pip.py" -o "get-pip.py"
- cksum get-pip.py -- should be 322870790 1595408 get-pip.py
- sum get-pip.py -- should be 46713 1559
- stat --format="%s %n" get-pip.py -- should be 1595408 get-pip.py
- python get-pip.py
- pip --version # This needs to be version 9.0 or above
Next we install and test mssql-scripter
- pip install mssql-scripter
- mssql-scripter -h
- exit
We try this against the locally installed sql server
sqlcmd -S localhost -U sa create database justdave use justdave create table jobs (job_no int) with (DATA_COMPRESSION = PAGE) go exit mssql-scripter --server localhost --database justdave --user sa --include-objects jobs
Install DBFS tool
DBFS tool is an open source tool which exposes DMVs as virtual files in a virtual folder on Linux
su - wget https://github.com/Microsoft/dbfs/releases/download/0.1.5/dbfs-0.1.5-0.x86_64.rpm wget https://dl.fedoraproject.org/pub/epel/epel-release-latest-7.noarch.rpm rpm -ivh epel-release-latest-7.noarch.rpm yum update -y yum install dbfs-0.1.5-0.x86_64.rpm -y exit dbfs -hWe then try this against the local installed sql server
mkdir demo cd demo mkdir dmv vim dmvtool.config [server] hostname=00.000.000.000 username=sa password=MyPassword version=16 dbfs -c ./dmvtool.config -m ./dmv
7.2.2 SQL Server Operations Studio preview 0.23.6
Download SQL Server Operations Studio from Download and install Microsoft SQL Operations Studio (preview)
Create a user and group sqlops,extract and run the program
groupadd sqlops useradd sqlops -g sqlops yum install libXScrnSaver -y xhost +si:localuser:sqlops # permission sqlops user to use the X Window System su - sqlops export DISPLAY=:0 # Use the local X display server /usr/bin/xdpyinfo | head -5 # check no /usr/bin/xdpyinfo: unable to open display ":0". errors. tar xvf /mnt/hgfs/cache/sw/mssql/SQLOPS/sqlops-linux-0.23.6.tar.gz echo 'export PATH="$PATH:~/sqlops-linux-x64"' >> ~/.bashrc source ~/.bashrc sqlops
7.2.3 SQL Server mssql-cli Public Preview
The public preview for mssql-cli is available from Try mssql-cli, a new interactive command line tool for SQL Server
groupadd sqlcli useradd sqlcli -g sqlcli wget https://dl.fedoraproject.org/pub/epel/epel-release-latest-7.noarch.rpm # Only 15k! yum install ./epel-release-latest-7.noarch.rpm -y yum install icu libunwind python-pip -y pip install mssql-cli su - sqlcliThe pip install command downloads the required files!
mssql-cli is installed in /usr/bin!
Telemtry can be disabled by setting environment variable MSSQL_CLI_TELEMETRY_OPTOUT to 'True' or '1'.
Digging further we see that python is used "python -m mssqlcli.main" and "mssqltoolsservice"
Help can be found with --help
Once connected IntelliSense is available
Although it does not fill in @@ variables!
Even though SOME @@ variables ARE syntax highlighted!
Press Enter runs the query, go or ';' is not needed!
Once the query is complete, press 'q' to get back to the query prompt
Press Ctrl-D to leave the program and we get a reply "Goodbye!"!
7.2.4 SQL Server Operations Studio preview 2017-Dec-18
Download SQL Server Operations Studio from Microsoft/sqlopsstudio
This is a 2017-Dec-18 pre-release
groupadd sqlops useradd sqlops -g sqlops yum install libXScrnSaver -y xhost +si:localuser:sqlops # permission sqlops user to use the X Window System su - sqlops export DISPLAY=:0 # Use the local X display server /usr/bin/xdpyinfo | head -5 # check no /usr/bin/xdpyinfo: unable to open display ":0". errors. tar xvzf /mnt/hgfs/cache/sw/mssql/SQLOPS/2017-Dec-18-sqlops-linux.tar.gz echo 'export PATH="$PATH:~/sqlops-linux-x64"' >> ~/.bashrc source ~/.bashrc sqlopsAn Adaptive Join done as a hash match!
Top Operations includes Actual Rows.Actual Executions and potentially rebinds/rewinds
7.2.5 SQL Server 2017 CU3
Logon as yourself, NOT root!
- sudo su
- curl -o /etc/yum.repos.d/mssql-server.repo https://packages.microsoft.com/config/rhel/7/mssql-server-2017.repo
- curl -o /etc/yum.repos.d/msprod.repo https://packages.microsoft.com/config/rhel/7/prod.repo
- export ACCEPT_EULA=Y
- yum install -y mssql-server
- /opt/mssql/bin/mssql-conf setup # Enter password and answer y to both startup questions
- systemctl status mssql-server
- firewall-cmd --zone=public --add-port=1433/tcp --permanent
- firewall-cmd --reload
- yum update -y
- yum remove unixODBC-utf16 unixODBC-utf16-devel -y
- yum install -y mssql-tools unixODBC-devel
- yum check-update
- yum update mssql-tools
- exit
- echo 'export PATH="$PATH:/opt/mssql-tools/bin"' >> ~/.bash_profile
- echo 'export PATH="$PATH:/opt/mssql-tools/bin"' >> ~/.bashrc
- source ~/.bashrc
- sqlcmd -S localhost -U sa
- select @@version
- go
- su -
- yum install mssql-server-agent
- systemctl restart mssql-server
- systemctl status mssql-server
- yum install -y mssql-server-fts
7.3 DB2
7.3.1 DB2 11.1.2.2
Downloaded from IBM DB2 with BLU Acceleration for Linux, UNIX, and Windows
This is the DB2 Data Server Trial (including pureScale, BLU Acceleration) Version 11.1
Unpack and launch the prerequistes check
- mkdir /tmp/x
- cd /tmp/x
- tar xvzf /mnt/hgfs/cache/sw/db2/11.1.2.2/v11.1_linuxx64_server_t.tar.gz
- cd server_t
- yum update
- Disable SELinux : Edit /etc/selinux/config
- reboot
- cd /tmp/x/server_t
- ./db2prereqcheck >/tmp/p1
- vim /tmp/p1
Run installer - ./db2setup
- Select New Install
- Select the default "DB2 Version 11.1.2.2 Server Editions"
- On the Configuration screen click Custom and checkbox to agree to IBM terms,leave "Create an instance" selected and change the Directory to /opt/ibm/db2/V11.1.2.2 click Next
- On the Select Features click "Select all" and click Next
- On the Select Languages screen leave the default of English and click Next
- On the Documentation screen leave default of "On the IBM Web site" and click Next
- On the Database Partitioning screen leave default of "Single partition instance" and click Next
- On the Instance Owner screen leave default of db2inst1, group db2iadm1, enter a Password and click Next
- On the Fenced User screen leave default of db2fenc1, group db2fadm1, enter a Password and click Next
- On the Instance Communnication screen leave default of service name db2c_db2inst1/port 50000 and autostart the instance at system startup and click Next
- On the Relational Wrappers screen leave default of "Do not setup the db2inst1 instance to use the relational wrapper components" and click Next
- On the Text Search Service screen leave defaults of configure db2inst1,service name db2j_db2inst1/port 55000 and click Next
- On the Response File and Summary screen leave the default to save settings in a response file
- Change the response filename to /root/db2server.11.1.2.2.rsp
- Install location is /opt/ibm/db2/V11.1.2.2
- Click Finish
- On the Setup complete screen click Post-install steps
- On back to the main install screen and click Finish
- Optional post install steps - run db2val as per below or open DB2 first steps using db2fs
Then create a sample database and query the sample database
- su - db2inst1
- Optionally run /opt/ibm/db2/V11.1.2.2/bin/db2val to validate installation files,instance, and database functionality
- db2pd -utilities # instance should appear as active
- db2sampl # create sample database
- connect to the database - db2 connect to sample
- Query some data - db2 "select tabschema,count(*) from syscat.tables group by tabschema order by tabschema"
8 Ubuntu 16.04
8.1 SQL Server
8.1.1 SQL Server 2017 CTP2.1 with SQL Server Agent,mssql-scripter and DBFS tool
SQL Server 2017 CTP2.1 with SQL Server Agent
Download Ubuntu Server 16.04 from Download Ubuntu Server
Add GUI,vim,curl,net-tools and VMWare Tools - 2.12 Ubuntu 16.04/17.10 add GUI,vim,curl,net-tools and VMWare Tools
Install SQL Server and Tools
sudo su curl https://packages.microsoft.com/keys/microsoft.asc | sudo apt-key add - curl https://packages.microsoft.com/config/ubuntu/16.04/mssql-server.list | sudo tee /etc/apt/sources.list.d/mssql-server.list curl https://packages.microsoft.com/config/ubuntu/16.04/prod.list | sudo tee /etc/apt/sources.list.d/msprod.list apt-get update export ACCEPT_EULA=Y apt-get install -y mssql-server -- Enter the sa password /opt/mssql/bin/mssql-conf setup exit systemctl status mssql-server sudo ufw allow 1433 sudo apt-get update sudo apt-get install mssql-tools unixodbc-dev echo 'export PATH="$PATH:/opt/mssql-tools/bin"' >> ~/.bash_profile echo 'export PATH="$PATH:/opt/mssql-tools/bin"' >> ~/.bashrc source ~/.bashrcInstall mssql-scripter
mssql scripter is a Python based tool to generate create and insert statements from database objects
Login as yourself sudo apt-get install python-pip sudo pip install --upgrade pip -- This needs to be version 9.0 or above pip --version sudo pip install mssql-scripter mssql-scripter --helpWe try this against the locally installed sql server
sqlcmd -S localhost -U sa create database justdave use justdave create table jobs (job_no int) with (DATA_COMPRESSION = PAGE) go exit mssql-scripter --server localhost --database justdave --user sa --include-objects jobs
Install DBFS tool
DBFS tool is an open source tool which exposes DMVs as virtual files in a virtual folder on Linux
sudo wget https://github.com/Microsoft/dbfs/releases/download/0.1.5/dbfs_0.1.5_amd64.deb -- ignore dependency issues, fixed by next command sudo dpkg -i dbfs_0.1.5_amd64.deb sudo apt-get install -f dbfs -h mkdir demo cd demo mkdir dmv vim dmvtool.config [server] hostname=00.000.000.000A username=MyUserName password=MyPassword version=16 dbfs -c ./dmvtool.config -m ./dmv
8.1.2 SQL Server 2017 CTP2.1 SSIS installation
Install Ubuntu Server 16.04 with Desktop and VMWare Tools as per SQL Server installation above
sudo su curl https://packages.microsoft.com/keys/microsoft.asc | sudo apt-key add - curl https://packages.microsoft.com/config/ubuntu/16.04/mssql-server.list | sudo tee /etc/apt/sources.list.d/mssql-server.list -- Go to -- System Settings Icon on the left -- Software & Updates -- Other Software -- Unselect the cdrom entries. -- Click Close then Reload apt-get update apt-get install -y mssql-server-is /opt/ssis/bin/ssis-conf gpasswd -a justdave ssis -- current user for using ssis exit echo 'export PATH="/opt/ssis/bin:$PATH"' >> ~/.bash_profile echo 'export PATH="/opt/ssis/bin:$PATH"' >> ~/.bashrc source ~/.bashrc -- In Visual Studio 2015 -- File->New->Project->Installed->Templates->Business Intelligence->Intergration Services->Integration Services Project Business Intelligence -- Call the project SSOL1 -- From the SSIS Toolbox on the left add a "Execute Process" Task -- From the properties box in the bottom right Change the name and description to "RunSimpleTask" -- On the project menu select "Convert to Package Deployment Model" -- On the project menu select "SSOL1" Properties -> Deployment-> Change CreateDeploymentUtility to True -- In Solution Explorer under "SSIS Packages" change Package.dtsx to RST.dtsx -- On the menu Choose Build->Build Solution Go to C:\Users\David\Documents\Visual Studio 2015\Projects\SSOL1\SSOL1\bin\Deployment Copy RST.dtsx to Linux -- Then on the Linux machine create a file \tmp\1.sh containing date > /tmp/2 -- Change the Executable on the task to C:\tmp\1.sh -- On LinuxWe need to fix some file permissions to get dtexec to run our package. -- strace -f -o /tmp/1 -s 2014 dtexec /? -- dtexec: Unable to open /var/opt/ssis/.system/instance_id: Permission denied (13) -- dtexec: Unable to open /var/opt/ssis/.system/instance_id: Permission denied (13) -- was -rw-r--r-- 1 root root 37 May 29 03:46 instance_id chmod 666 /var/opt/ssis/.system/instance_id -- dtexec /F RST.dtsx -- dtexec: Debugger.cpp:578: static void Debugger::Print(const void *, unsigned int): Assertion `"A serious error condition has been encountered." == nullptr' failed. -- open("/var/opt/ssis/.system/profiles/Temp/7762c06a7df67e8482b6e0b5d28dfd1", O_RDWR|O_CREAT|O_EXCL, 0660) = -1 EACCES (Permission denied) chmod 777 /var/opt/ssis/.system/profiles/Temp -- strace -f -o /tmp/1 -s 1024 dtexec /F RST.dtsx -- open("/var/opt/ssis/.system/system/lsa.hiv", O_RDONLY) = -1 EACCES (Permission denied) -- -rw-r----- 1 root root 12288 May 29 03:46 /var/opt/ssis/.system/system/lsa.hiv chmod 644 /var/opt/ssis/.system/system/lsa.hiv -- open("/var/opt/ssis/.system/system/security.hiv", O_RDONLY) = -1 EACCES (Permission denied) -- -rw-r----- 1 root root 40960 May 29 03:46 /var/opt/ssis/.system/system/security.hiv chmod 644 /var/opt/ssis/.system/system/security.hiv -- rename("/var/opt/ssis/.system/system/security.hiv", "/var/opt/ssis/.system/system/security.hiv.lkg") = -1 EACCES (Permission denied) -- drwxr-xr-x 4 root root 4096 May 29 03:46 /var/opt/ssis/.system/system chmod 777 /var/opt/ssis/.system/systemThis fails with "The specified executable is not a valid application for this OS platform."
We then create a C program as /tmp/a
vim /tmp/a.c cat /tmp/a.c #include#include #include #include int main (int argc, char *argv[]) { int fd; char *args[] = { "/bin/date",0 }; fd=open("/tmp/b",O_WRONLY | O_CREAT | O_TRUNC); close(1); dup2(fd,1); execve(args[0], &args[0],NULL); } gcc -o /tmp/a /tmp/a.c This fails again with the same error
We then try a package containing a file system task to create a directory
In Visual Studio 2015 on the Project menu we select Add Package and rename the package to FST.dtsx On the Control Flow we add a File System Task and rename this to MakeDir. In properties we set the operation to "Create Directory" In the connection managers pane we add a New File Connection, rename this to "z" and change the "Connection String" to /tmp/z We then build the solution and try running the Package via dtexec and get an error that the filename contain invalid characters
We amend the "Connection string" to C:\tmp\z and this works and creates the folder /tmp/z!
8.1.3 SQL Server Operations Studio preview 0.23.6
Download SQL Server Operations Studio from Download and install Microsoft SQL Operations Studio (preview)
Create a user and group sqlops,extract and run the program
sudo su groupadd sqlops useradd -m -g sqlops sqlops xhost +si:localuser:sqlops # permission sqlops user to use the X Window System su - sqlops export DISPLAY=:0 # Use the local X display server /usr/bin/xdpyinfo | head -5 # check no /usr/bin/xdpyinfo: unable to open display ":0". errors. tar xvf /mnt/hgfs/cache/sw/mssql/SQLOPS/sqlops-linux-0.23.6.tar.gz echo 'export PATH="$PATH:~/sqlops-linux-x64"' >> ~/.bashrc source ~/.bashrc sqlops
8.1.4 SQL Server Operations Studio preview 2017-Dec-18
Download SQL Server Operations Studio from Microsoft/sqlopsstudio
This is a 2017-Dec-18 pre-release
Create a user and group sqlops,extract and run the program
sudo su groupadd sqlops useradd -m -g sqlops sqlops xhost +si:localuser:sqlops # permission sqlops user to use the X Window System su - sqlops export DISPLAY=:0 # Use the local X display server /usr/bin/xdpyinfo | head -5 # check no /usr/bin/xdpyinfo: unable to open display ":0". errors. tar xvzf /mnt/hgfs/cache/sw/mssql/SQLOPS/2017-Dec-18-sqlops-linux.tar.gz echo 'export PATH="$PATH:~/sqlops-linux-x64"' >> ~/.bashrc source ~/.bashrc sqlopsPut cursor over the top where is says "SQL Operations Studio" to get the menus!
Get the actual plan
9 Ubuntu 17.10
9.1 SQL Server
9.1.1 SQL Server mssql-cli Public Preview
Download Ubuntu Server 17.10 from Download Ubuntu Server
Add GUI,vim and curl - 2.12 Ubuntu 16.04/17.10 add GUI,vim,curl,net-tools and VMWare Tools
The public preview for mssql-cli is available from Try mssql-cli, a new interactive command line tool for SQL Server
sudo su groupadd sqlcli useradd sqlcli -g sqlcli -m apt-get update & apt-get install -y libunwind8 python-pip libicu57 pip install --upgrade pip pip install mssql-cli su - sqlcliWe can run mssql-cli with IntelliSense
@@ variables do not get IntelliSense the same as on Redhat
However SOME @@ variables do get syntax highlighting as on Redhat
10 Rocky 8.8
10.1 Informix
10.1.1 Informix 14.10.FC10W1
Download from Informix Developer and Time Limited Editions
Get "Informix Developer Edition 14.10.FC10W1 Linux x86 64 FC10W1"
Install packages
yum whatprovides ncurses-compat-libs yum -y install ncurses-compat-libs-6.1-10.20180224.el8.x86_64 yum whatprovides ksh yum -y install ksh-20120801-259.el8.x86_64 yum whatprovides libstdc++ yum -y install libstdc++-8.5.0-20.el8.x86_64 yum update reboot mkdir /tmp/x cd /tmp/x tar xvf /mnt/hgfs/d-cache/sw/informix/IDS14.10/FC10W1/ibm.ids.14.10.FC10W1.LNX.tar mkdir x cd x tar xvf ../ibm.ids.14.10.FC10W1.LNX.tarAs per STARTAPACHE GIVES ERROR: LIBPCRE.SO.0: CANNOT OPEN
ln -s /usr/lib64/libpcre.so.1 /usr/lib64/libpcre.so.0 ln -s /usr/lib64/libexpat.so.1 /usr/lib64/libexpat.so.0Now run the 14.10 installer in GUI mode
- ./ids_install -i gui
- On the "Getting Started" screen click Next.
- On the "Software License Agreement" screen click to accept and click Next.
- On the "Installation Location" Screen change installation location from /opt/Informix_Software_Bundle to /opt/IDS.14.10.FC10W1DE
- On the "Installation or Distribution" screen click Custom installation
- On the "Product Selection" screen click Next.
- On the "Role Seperation" screen make no changes (do not enable role seperation) and click Next.
- On the "Provide password to create the following user" screen enter the password for informix and click Next.
- On the "Server Instance Creation" screen enable "Create a server instance" and "Initialize server instance after creation"
- Instance name is ol_informix1410
- Data storage location is /opt/IDS.14.10.FC10W1DE/storage
- Enable "Initialize server instance after creation"
- Do NOT enable "Modify Default Configuration Parameters", click Next.
- On the "Configuration - Number of Users" make no changes (leave as 1-100 users) and click Next.
- On the "Connectivity" screen make no changes
- Service Name ol_informix1410,Port 11309,Instance server number 0
- DRDA protcol enabled - server alias dr_informix1410 port 9136, click Next
- On the "Installation Summary" screen click Install.
- On the "Server Initialization" screen Click Next
- On the "Using the new instance" screen Click Next
- On the "Installation Complete" screen Click Done
Check the new Informix instance ol_informix1410
- su - informix
- . /opt/IDS.14.10.FC10W1DE/ol_informix1410.ksh
onstat - IBM Informix Dynamic Server Version 14.10.FC10W1DE -- On-Line -- Up 00:02:57 -- 185996 Kbytes 2023-12-28 01:32:15